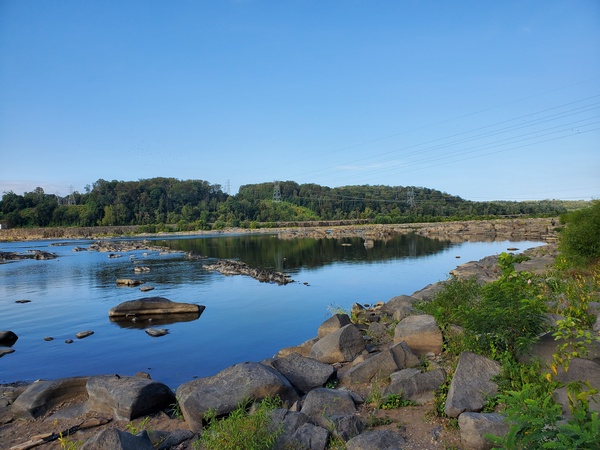
I headed back to Valley Forge National Historical Park (US-0761, KFF-0761) to try out an antenna configuration I didn’t get to during my last visit. I was eager to see how well my Elecraft KH1’s internal ATU would match it.
The antenna in question is just a 35-foot wire with a 17-foot counterpoise. There’s nothing novel about this configuration, as it’s a popular choice for the Elecraft KH1. Since I bought the KH1 last summer, I had never tried directly feeding a random wire. Since I already had the 35-foot wire I used in North Carolina last year, I gave it a go this morning.
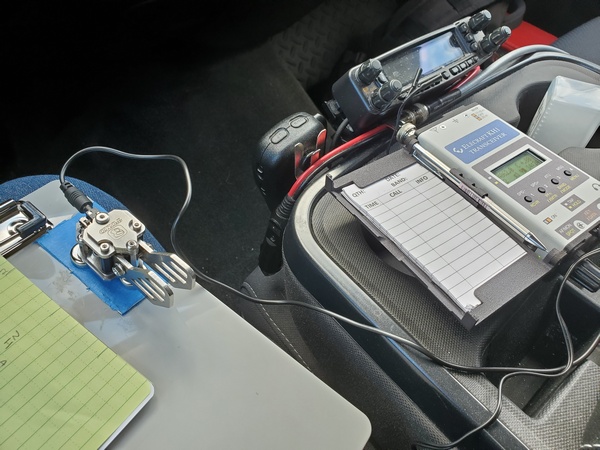
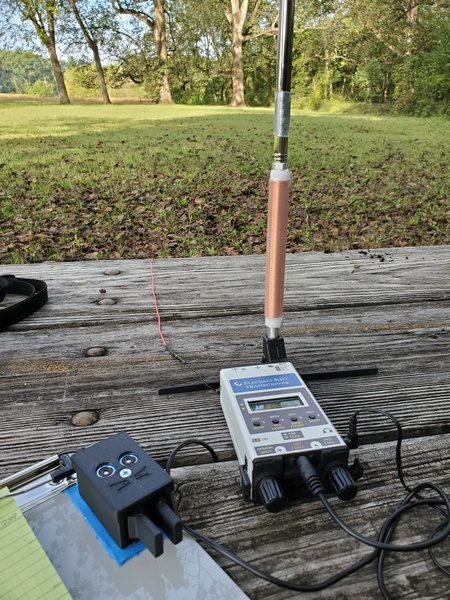
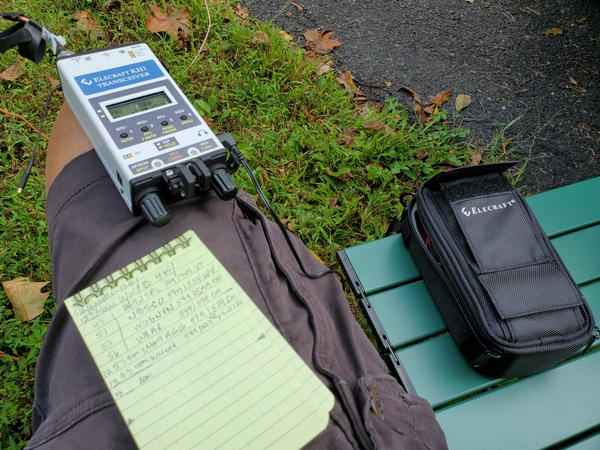
To support the 35-foot wire, I used a 31-foot Jackite pole on my homebrew drive-on mount. I sloped the wire down to my camp chair. I laid out the counterpoise wire in the grass and used a binding post to a BNC adapter to connect both wires to the KH1. To hold the KH1, I used a kneeboard from Tufteln strapped to my leg. I used my CWMouse paddles for sending.
My Elecraft KH1 on a kneeboard
Before starting my activation, I tried the KH1 on each of its five bands. The KH1 found a 1:1 match on both 40M and 30M. The 20M band gave the highest SWR at 1.6:1; however, the KH1 was putting out a full five watts on that band. On both 17M and 15M, the SWR was a respectable 1.3:1.
My 31-foot Jackit pole on a homebrew drive-on mount
Satisfied that the KH1 was happy with this antenna configuration, I got underway on 40M. The wire seemed to get ust fine, but it’s hard to judge an antenna’s performance on the air. There are just too many variables in play. Anyway, I made contacts all up and down the East Coast and out to the mid-west. I ended up making contacts on 40M, 30M, and 20M. It was a bit too early in the morning for 17M and 15M.
After an hour and 10 minutes, I wrapped up with 25 contacts in my log with nine park-to-park contacts. Not too bad for early on a Monday morning, I suppose.
Overall, I was very happy with the 35-foot wire with the KH1. I think it might be a permanent addition to my backpack. It certainly doesn’t take up much room. I’ll probably be using it for the upcoming Flight of the Bumblebees contest.
This is one of those antenna projects that started with: “I wonder if…” Designed with my Elecraft KH1 in mind, it covers the 20M, 17M, and 15M with the use of an tuner—similar to how the KH1’s whip antenna operates. It wasn’t something I had a burning need for, but it turned out to be pretty effective.
Concept
For many of my recent activations, I’ve been using my Elecraft KH1 with my base-loaded 12-foot whip. While I built the loading coil for 40M through 17M, I found that the KH1’s internal tuner easily matched the 12-foot whip on 17M and 15M, with the coil bypassed. A 12-foot radiator is resonant somewhere around 19.5 MHz, so it falls in between the 17M and 15M bands. Even though the 12-foot whip is a compromise, I was regularly making DX contacts on those two bands running five watts or less.
That got me thinking about building a more portable antenna for 20M through 15M using a 12-foot radiator. What I came up with was a simple 12-foot wire antenna that uses a loading coil for 20M and just the 12-foot wire for 17M and 15M.
When I thought about it, what I was building was conceptually similar to the Elecraft AX1 antenna and the KH1’s whip antenna. These antennas are close to resonance on 20M and resonant somewhere in between 17M and 15M. My antenna would operate the same way, except it would be almost 8 feet longer. I’ve always had good luck with the AX1 and the KH1’s whip antenna, so I figured my proposed antenna should work even better.
Along with the electrical properties, I wanted to make the antenna small and lightweight, using a #26 AWG radiator along with two 13-foot counterpoise wires. Also, I wanted to use—as much as possible—parts I already had in my junk box.
Parts List
I selected most of the parts based on availability in my junk box. They might not be the optimal choices, but here’s what I used:
T106-2 iron powder toroid
#22 AWG enameled wire (approx. 35 inches)
SPST slide switch. I actually adapted a DPDT slide switch, since I already had a bag of them.
#26 AWG wire (12 ft for radiator)
#26 AWG wire (2x13ft for counterpoise wires)
2mm banana plugs & jacks (2 sets for connecting the counterpoise wires)
(2) ring terminals
BNC female jack
(2) 4-40 x ¾-inch bolts plus some washers and nuts for the antenna and counterpoise connections. I used a couple of knurled nuts I had on hand.
Plastic box. I had one that measures about 2.5 x 1.75 x 1 inches.
Construction:
When I first thought about building this thing, I originally envisioned a more field-friendly form factor with built-in winders for the antenna and counterpoise wires. Since I constrained myself to using parts I already had (and I don’t own a 3-D printer), I used a plastic box I bought years ago but never used.
The construction was pretty simple; it’s just a toroid, a switch, and some connectors in a box. They say a picture is worth a thousand words, so have a look at the accompanying pictures to see how I built it.
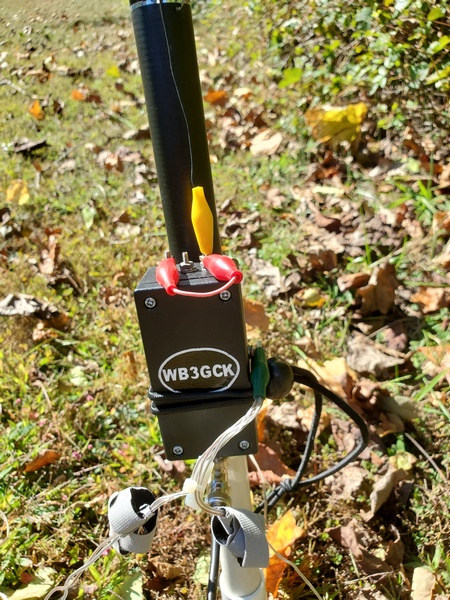
Inside the matchbox
I used some online calculators to determine the loading inductance needed for 20M. Assuming I would need to tweak the number of turns, I started with one turn more than I had estimated. It’s easier to remove turns than to add turns—don’t ask me how I know this.
I used some foam mounting tape to hold the toroid in place. For good measure, I also wedged in a piece of Styrofoam between the toroid and the lid. That adds some assurance that the toroid won’t come loose in the field. The trickiest part was cutting a square opening for the slide switch. That took some careful work with a nibbler tool and a file to get it done without destroying the box.
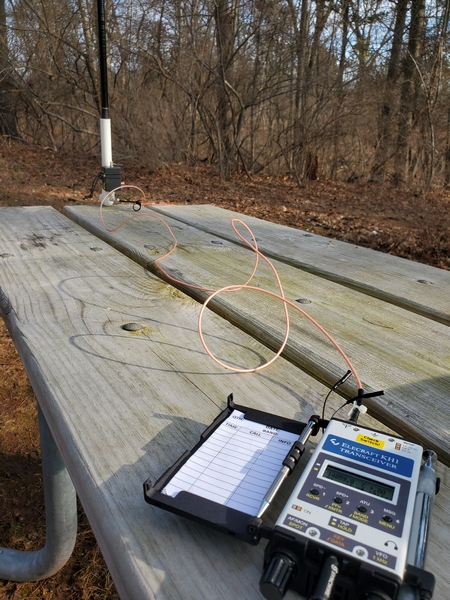
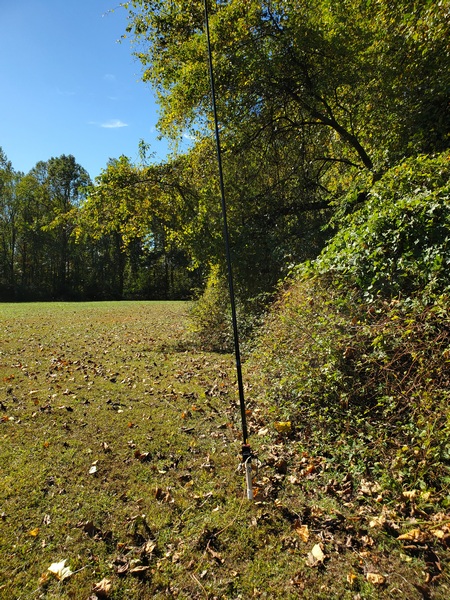
You could use a tree branch to support this antenna, but I like to keep my field setups self-contained. I found a cheap telescopic pole on eBay that measures about 12’ 3” fully extended, so I went with that.
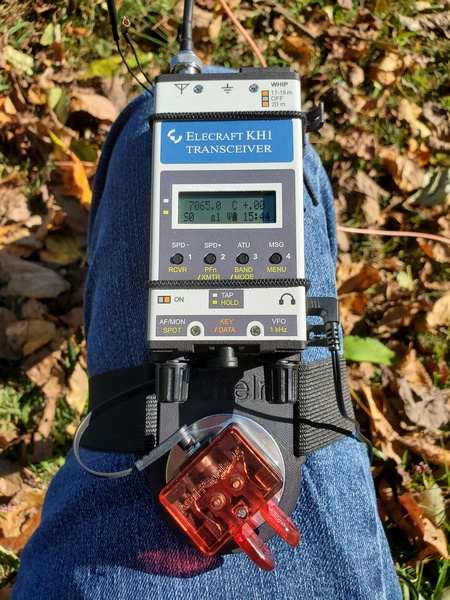
Typical picnic table setup with the 12-ft vertical and Elecraft KH1
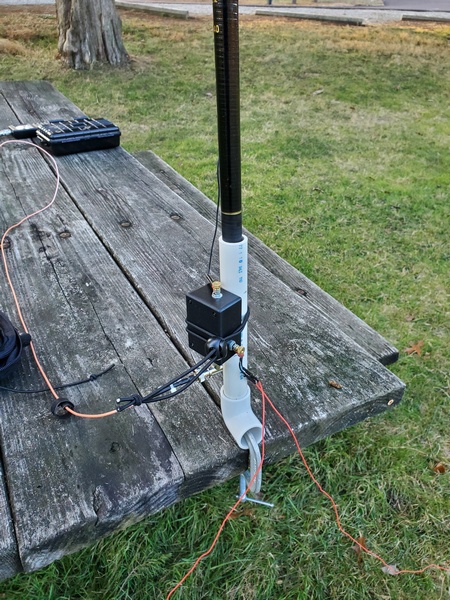
I envisioned using this antenna primarily for “picnic table-portable” operation, running a short length of coax to the radio. Using a piece of PVC pipe and a PVC elbow fitting, I built a simple mount for clamping to a table. As luck would have it, the base of the pole fits perfectly inside a ¾-inch PVC pipe. I just use a C-clamp to fasten the elbow to the table and slide the pole into the pipe. When I built the mount, I inserted a small screw partway up the pipe to give the pole a few more inches of height. A six-foot length of RG316 is more than enough to reach the radio at the other end of the table.
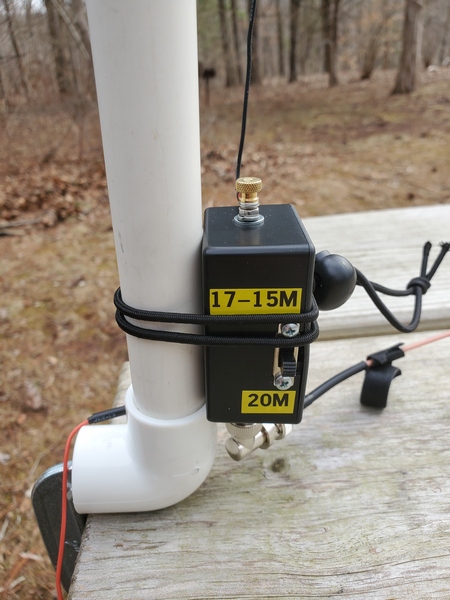
Matchbox attached to the PVC pipe picnic table mount
Testing in the Field
I don’t have a good place for antenna experimentation where I live, so it took several trips to the field to tweak the inductor. On each trip, I took readings with an antenna analyzer, made any necessary adjustments to the loading coil when I got back home, and repeated the process on the next outing. That was a tedious process, which was spread out over a few months because of winter weather.
Once I set the antenna up in the field, I found I needed far fewer turns than I originally estimated. Initially, the antenna was resonating well below the 20M band, so I removed a turn at a time. Since I was going to need to use an ATU for 17M and 15M anyway, I didn’t get too fussy about getting it exactly resonant on 20M. However, I eventually got it resonating in the 20M band, with an SWR under 1.5:1 across the band.
The good news was that, even though I hadn’t finished tweaking the coil, the KH1 easily found a match. I had five successful activations during those testing sessions, typically running 3.5 to 4 watts. I consistently worked stations in Europe on all three bands, along with some U.S. stations on the west coast. On one outing, I worked W6LEN in California on all three bands from a park here in southeastern Pennsylvania. During my final testing session with the antenna, I had a 20-minute two-way QRP QSO with DL4ISX on 15M (CW). I declared the project completed at that point.
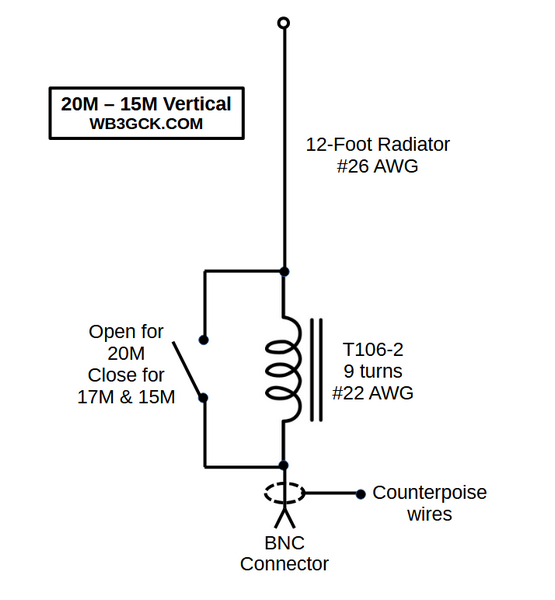
Below is a schematic showing the final configuration:
Wrap-up
So, there you have it. No revolutionary technical breakthrough here, just a fun little project that has been even more fun to use. I envision many more picnic-table-portable activations with it.
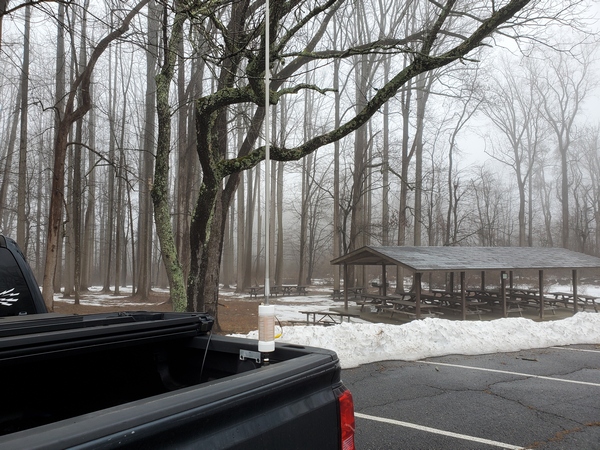
I was out and about on a rainy and foggy Friday morning. Since I was in the vicinity, I made a stop in Ridley Creek State Park (US-1414, KFF-1414) for a quick activation. I completed the activation successfully, despite some self-inflicted problems.
I pulled into a convenient parking spot. Not surprisingly, the picnic area I was in was completely deserted. Since the weather was miserable, I planned to use my Elecraft KH1 in the truck with my trusty 12-foot base-loaded whip on the back.
As I was setting up the antenna, I noticed my first issue. The spot I had hastily chosen was under a tree—a large, rain-drenched one. Rookie error! Fortunately, my 12-foot stainless steel whip went up in between the branches and didn’t appear to be touching any of them. (Note to self: Look up next time!)
Rainy and foggy morning in Ridley Creek State Park (US-1414, KFF-1414)
I finished up with the antenna and got the KH1 set up for 40M. Normally, with this antenna, the KH1 easily finds a good match on the first try. Not this time. It would find a good match (1.5:1 or better), but the SWR would occasionally jump full scale. I had to hit the KH1’s ATU button to re-tune frequently, sometimes mid-QSO. Thinking it was the wind blowing the whip into the wet branches above, I backed the truck up a foot or two to clear the tree. That didn’t help.
After stumbling through seven contacts on 40M, I went out to change the antenna tap for 20M. As I did that, I realized what the problem was. On my last activation, I was using the KH1’s whip antenna, and I neglected to set the switch for using the BNC connector. The BNC jack is always connected, but the “20M” setting puts in some additional inductance for the whip. It appears extra loading was the source of my issues on 40M. Once I corrected my mistake, things continued normally on 20M and 17M.
Despite my struggles, I completed my brief activation with 22 contacts in my log. It was good to put a few DX stations in the log:
20M: CU3DI, F1BLL 17M: OE3KAB
All’s well that ends well, I suppose. My switch error got my activation off to a shakey start, but I got it done. Having already experienced blown finals with this rig, I’m usually mindful of the antenna switch setting. Still, I used my trusty label maker to put a reminder right on the radio.
On those occasions when I do an activation with my (far) better half’s car, I have been using my Gabil GRA-7350TC antenna on an old magnetic mount. Because of a recent issue with the mag mount I’ve had for 20+ years, I finally had to replace it. Today was the first opportunity I’ve had to use the new one.
While visiting my daughter and her family over the Christmas holiday, I headed out to activate the Captain John Smith Historic Trail (US-4567). Normally, when using the GRA-7350TC and mag mount on my (far) better half’s car, I can easily get the SWR down less than 1.5:1 on 40M. This time was different; the tuning seemed very finicky. I eventually got it close enough to use with the KH1 and completed my activation. As I was packing up, I noticed some damage to the coax where it enters the mount.
This old mag mount has seen many years of service with a VHF/UHF antenna on my truck before being pressed into service with the Gabil antenna. It’s amazing it lasted as long as it did. I decided that trying to disassemble and repair it was more trouble than it was worth.
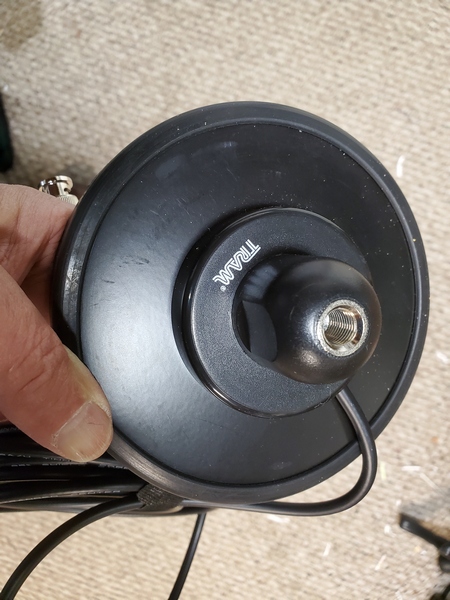
I ended up buying a Tram magnetic mount on Amazon. This one is a real beast. It’s five inches in diameter and weighs a whopping 2.6 pounds. It’s probably overkill for my intended use, but I figured the larger diameter would provide better coupling to the vehicle. (Spoiler Alert: It does.)
Tram magnetic mount
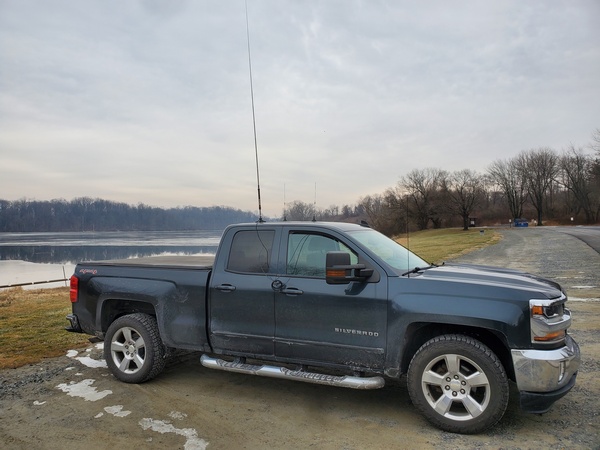
To try it out, I headed out to Marsh Creek State Park (US-1380, KFF-1380) and set it up on my truck. The attached coax is 17 feet long. That’s way more than I need, so after feeding it through the passenger-side window to my Penntek TR-35 (5 watts, CW), I coiled up the excess.
The Gabil GRA-7350TC antenna and magnetic mount on my truck
I started out on 40M and was surprised to see I could tune the Gabil antenna down to 1.3:1 SWR. That’s better than I could ever get using the old mag mount on my truck. It was slow going on 40M this morning with a lot of fading. I could only manage about nine contacts before moving up to 30M.
Marsh Creek Lake partially frozen over
Up on 30M, things picked up dramatically, but the most productive band was 20M. My contacts on 20M included Germany, France, and two from Finland. After logging 42 contacts, I pulled the plug and headed home for lunch.
So, the new mag mount should work great on my (far) better half’s car. Sadly, my old mount is now destined for the trash. I certainly got my money’s worth out of it, though.
I drove out to French Creek State Park (US-1355, KFF-1355) for an early morning activation. While I was there, I wanted to do some initial testing on an antenna I’ve been working on. With the near-freezing temperature, I picked the wrong day for antenna testing. Fortunately, the activity on the bands made the trip worthwhile.
I designed the new antenna to be attached to a picnic table, so I parked by a picnic area near a boat launch. My original plan was to set up the antenna and take some antenna analyzer readings after my activation. My impatience got the better of me, so I decided to brave the freezing temperatures and test the antenna right away. That wasn’t a smart move. By the time I got the antenna set up and took some SWR scans, my fingers were numb. I should have waited for it to warm up a little.
Doing some antenna testing prior to my activation
I was hoping to hook up my Elecraft KH1 and see how it worked with the antenna, but that wasn’t happening. After tearing everything down and packing up, I sat in the truck with my gloves on and the heater running until my fingers thawed out. Then it was time to get on with my activation.
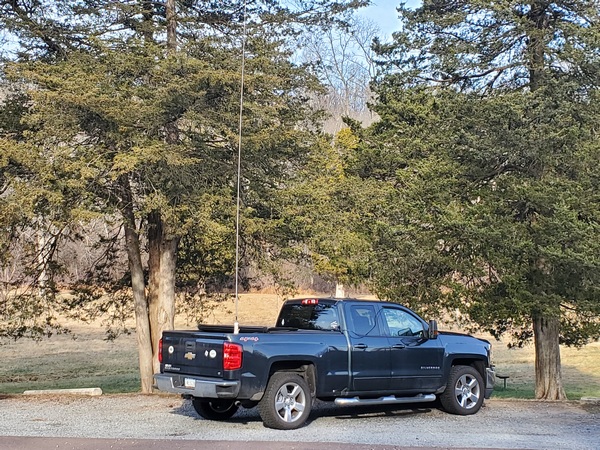
I quickly set up a 17-foot whip and my homebrew loading coil on the back of the truck. Up in the cab, I set up my trusty Penntek TR-35 (5W, CW). I went with a 17-foot whip because my band conditions app showed an unsettled geomagnetic field and poor daytime conditions on 40M. I figured the extra length couldn’t hurt.
My truck with 17-foot whip at French Creek State Park
When I fired up the TR-35 on 40M, I heard lots of activity and some very loud signals. In fact, I had to search around for a clear frequency. Once I started calling CQ, the hunters immediately pounced. I had constant pileups for the first 20 minutes. I had my first 10 contacts in about eight minutes.
About 30 minutes in, I had worked 29 stations on 40M. The 20M band wasn’t quite as productive, but it still produced 22 more contacts. Among those was one with IZ2UUG in Italy. When I pulled the plug after an hour on the air, I had 52 contacts (before removing a dupe). The moral of the story is: Don’t always go by the band condition predictions.
Hopewell Lake in French Creek State Park
Now that I’m back home, I have some tweaks to make to my experimental antenna. Once I’m convinced it works and will be useful, I’ll do a separate post on it. That might take a while, though. I plan to wait for some warmer weather for the next round of tests.
I have always spent a fair amount of my HF operating time on the 40M and 30M bands, with a little time on 20M. Lately, though, I’ve been making a point of spending more operating time on 20M through 15M (or at least as high as the rig I’m using will go). To that end, I had a little fun on 15M with my KH1 this morning.
I stopped by Norristown Farm State Park (US-4363, KFF-4363) this morning. I broke out my Elecraft KH1, which hadn’t seen much action over the past few weeks. We were under a wind advisory, so I operated from the truck and used my truck-mounted 12-foot loaded whip.
As I was setting up the KH1, I ran into an issue while removing the KH1 paddles from the radio. During an activation about a month ago, the spring between the paddles popped off. I found the spring and re-installed it when I got home. The paddles must have gotten damaged somehow, because the left paddle wasn’t moving as smoothly as it used to. Today, the spring came off the paddles again, but this time it was nowhere to be found. I wasn’t planning to use them today, anyway. For those times when I use the KH1 handheld, I have the N6ARA Tiny Paddles with a KH1 adapter. I also have a K6ARK Pressure Paddle kit on order. But I digress…
Anyway, I started on 40M, because here on the east coast it’s a quick way to make the first 10 contacts for the activation. That’s especially the case early in the morning. There was a lot of atmospheric noise on 40M this morning, but it didn’t take long to log 17 contacts. The 20M band was good for another nine contacts, and 17M produced three contacts.
Being inherently lazy, I left the loading coil tap set for 17M and tried to see if the KH1 would tune it up on 15M. The KH1 easily found a 1.2:1 match. That wasn’t surprising, since the 12 foot whip is only about 11 inches longer than a quarter-wave on 15M, and I only use one turn of the loading coil at the 17M setting.
After making a couple of 15M contacts with the antenna adjusted for 17M, I bypassed the coil completely. Again, the KH1 loaded it right up. I could have shortened the whip by 11 inches to make it a resonant quarter wave on 15M, but I didn’t have my antenna analyzer with me. Honestly, I don’t think it would have made a significant improvement in performance, anyway. Overall, I made 13 contacts on 15M, which included a handful of DX stations.
After 90 minutes on the air, I had made 42 contacts, including nine park-to-park contacts. The DX contacts today included:
20M: Dominican Republic
17M: Ukraine
15M: Czech Republic, Latvia, Spain, Italy (2), England
I was happy with how the 12-foot whip and KH1 performed on 15M. I’ll definitely be spending more time on 15M (and above) in the future.
I also have an idea for an antenna I might try to build. More on that later, if it works.
For several years my homebrew 19-foot vertical was my go-to portable antenna. Over the past two years, I’ve been using a variety of other antennas, relegating my trusty vertical to backup status under the backseat of my truck. I dusted it off recently to see how well the Elecraft KH1 would work with it.
I designed the antenna to be resonant on the 40 and 30 meter bands. On the 20M band and higher, it functions as a random wire, so a tuner is required. I was sure the KH1 would easily find a match on 40M and 30M, but I was curious to see how well it would fare on 20M through 15M.
The matching unit for my 19-foot vertical. The red jumper is used for changing bands.
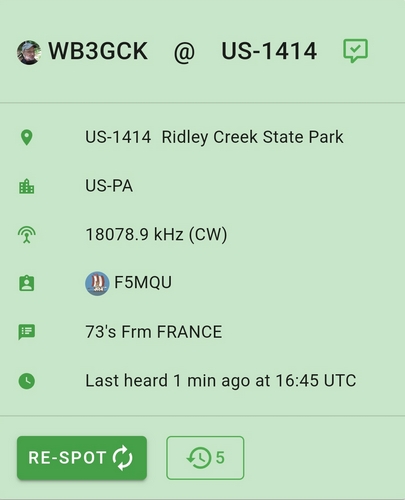
To test this out, I drove to Ridley Creek State Park (US-1414, KFF-1414). I had been to an ARES-RACES get-together that morning, so I swung into the park for a quick activation on my way home.
I set up at the edge of a field away from other park visitors. Since it was a weekday, the park wasn’t very busy, anyway. I supported the antenna on a cheap telescopic pole using my homebrew ground mount and spread out four 12.5-foot radials. From there, I ran 20-feet of RG-213 over to my camping chair, where I used the KH1 on a Tufteln KH1 knee board.
KH1 and Ashi Paddle 45 on a Tufteln KH1 kneeboard
Before I got started, I tried the KH1’s internal tuner from 40M through 15M. It easily found a decent match on each of the five bands. The SWR on 15M was 2:1, which is certainly usable for the KH1.
The 19-foot vertical on a slightly-leaning pole
Despite some unsettled geomagnetic conditions, I made contacts on each band except 15M. (I didn’t hear any activity there this morning.) The antenna really worked well on 17M, where I had back-to-back contacts with F4ILH and F5MQU. Even with the geomagnetic wackiness afoot, I managed to log 16 QSOs. Five of those were park-to-park contacts.
Spotted by F5MQU
It was good to get the old vertical out in the field again. I’ve been thinking about re-packaging it to reduce the size of the matching unit and eliminate the jumper used for band changes. That might be a good project for over the winter.
My (far) better half and I had plans to go watch our grandson’s soccer game yesterday, but I still squeezed in a short, early morning activation. I headed over to nearby Valley Forge National Historical Park (US-0761, KFF-0761) and allotted myself an hour of operating time. While I was there, I tried out a few things with my Elecraft KH1.
I set up the KH1 at a picnic table and used the whip antenna and AXE1 extender coil. I supported the antenna with a right-angle adapter from Tufteln. This was the first opportunity I had to use the adapter, so I was anxious to try it out. For my counterpoise, I used a homebrew setup with a 13-ft wire and a 20-foot extension for 40M.
The KH1 with the AXE1 loading coil for 40M/30M and the Tufteln right-angle adapter.
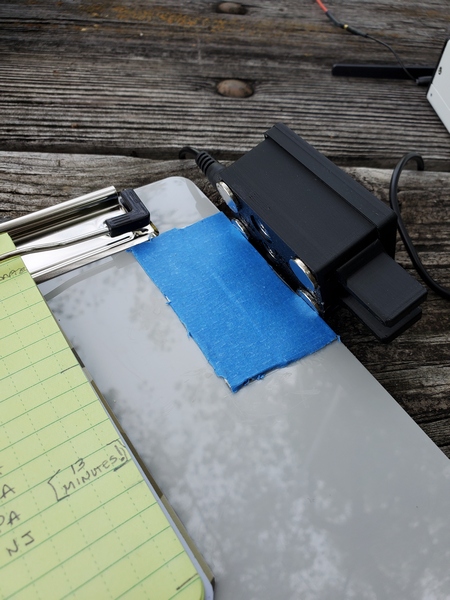
I also gave my CWMouse paddles another go. I glued four small magnets to them the night before, so I wanted to see how they worked with my clipboard. KE8PTX had a Facebook post recently in which he mentioned using painter’s tape on the metal surface of his knee board to give his paddles a little extra traction. As luck would have it, I was doing some painting this week and had some tape handy. I put some on the steel strips on my clipboard right before I left the house.
I glued some magnets to my CWMouse paddles. The blue painter’s tape helps the magnets get a better grip on the steel strips glued to the clipboard. You can also see the notation I made in my log for my 10th contact.
With everything set up, I tuned up the KH1 and got started. My results on 40M really surprised me. Although my signal reports were on the low side, I was getting some decent spots on the Reverse Beacon Network. It took only 13 minutes to log my first 10 contacts. I continued making contacts for 30 minutes, while brushing ants off of my log. (I think there was an anthill under the picnic table. Doh!)
I spent the rest of my hour-long activation on 30M and 20M. There was less activity there, but I picked up a few more contacts on each band.
When my hour was up, I packed up and gave the ants exclusive use of the picnic table. I finished up with 25 contacts in my log; I’ve done much worse with much better antennas. The KH1 did an amazing job with just the whip antenna, and my modified CWMouse paddles worked great attached to my clipboard.
As you can probably tell, I’m having fun with my new rig.
My (far) better half and I spent the past weekend with family out in central Pennsylvania. During the weekend, I squeezed in a quick, early morning POTA activation. The great band conditions made for a fun activation, but paddle problems made it challenging at one point.
On Saturday morning, I was up before everyone else. After downing a cup of coffee, I took a short drive to a boat launch on the Susquehanna River to activate the Captain John Smith Chesapeake National Historic Trail (US-4567).
We drove out in my (far) better half’s car, so I used a simple antenna setup that produced decent results in the past. I used my Gabil GRA-7350TC on a small magnetic mount. Like the last time I used it on my (far) better half’s car, I easily adjusted it for a 1.3:1 SWR on 40M. I fed the coax through the passenger side window.
Gabil GRA-7350TC antenna on a magnetic mount
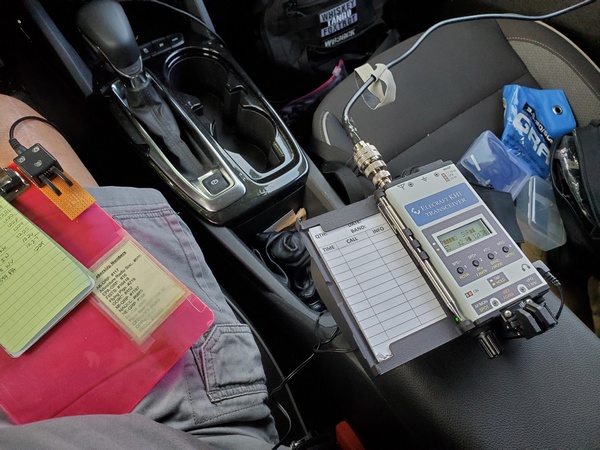
Inside the car, I set my Elecraft KH1 on the center console. I used my cheap QU-21C paddles attached to a clipboard with a homebrew magnetic mount I made for them.
The 40M band was hot with no trace of the QRM I experienced the last time I was there. It only took 14 minutes to log my first 10 contacts, the contacts came in steadily for the next 45 minutes.
I was cruising right along for about 30 minutes until my cheap paddles decided to start dropping “dits” here and there. Based on my crazy sending, I’m sure some folks thought I was experiencing some sort of medical emergency.
I frantically searched for my N6ARA Tiny Paddle that I always carry as a backup. Of course, they were nowhere to be found. I ended up using the stock KH1 paddles attached to the radio, with the KH1 on the center armrest. This setup was an ergonomic nightmare, with my elbow in the backseat area. Despite the awkward position I was in, I was able to finish up my activation.
My setup after my paddle problems started. On hindsight, I could have arranged things better to make my operating position a little less awkward.
After an hour, I had 39 contacts in my log. I was so occupied on 40M, I never got around to trying the higher bands. My log included 7 park-to-park contacts. One of those was with N4JAW (aka Ham on a Bike). It’s always fun working Jim down in Kentucky.
I also heard from my friend, Greg WA3GM. It had been a while since our last QSO, so it was great to hear him again.
Susquehanna River
The Gabil antenna and mag mount setup once again proved to be a great antenna when using my (far) better half’s car. With about 4.5 watts out on 40M, I worked stations up and down eastern U.S. and Canada and out to several mid-west states.
The QU-21C paddles, however, are a different story. This is the second time I have had issues with them. A squirt or two of contact cleaner will usually fix the problem—for a while, anyway. As they say: You buy cheap, you get cheap.
And, of course, I found my N6ARA paddles as I was packing up. Doh!
A little over a month ago, the finals in my brand new Elecraft KH1 gave up the ghost during my second outing with it. After a trip back to the factory for some TLC from the Elecraft folks, the rig safely arrived back in Pennsylvania this week. I anxiously took the little rig out to the field this morning to get re-acquainted with it.
My destination today was Evansburg State Park (US-1351, KFF-1351). With an active geomagnetic field, I knew band conditions could make for a tough outing.
Along with my KH1, I used a new antenna I bought from AD8HK Antenna Systems and received just yesterday. This antenna features a 9:1 unun with 17’9.5″ radiator and a 8’10.5″ counterpoise wire. The unun assembly has an integrated wire winder, making for a neat, compact little antenna. I mounted the antenna on a 19-foot pole and ran 20 feet of RG-316 back to the KH1.
The AD8HK 9:1 Random Wire Antenna strapped to a telescoping pole
With the KH1 resting on my knee, I did a quick check of the bands from 40M through 15M. The KH1’s internal tuner easily found a decent match on all five bands. I went back to 40M and got started.
My newly-repaired Elecraft KH1 balanced on my knee
Despite the questionable band conditions, I logged seven contacts in about 15 minutes. I made another five contacts on 20M and 17M before calling it quits. The nice shady spot where I started out was quickly becoming a toaster oven.
I ended my brief outing with twelve contacts, including four park-to-park contacts. My KH1 has been out of commission for the past month, so I spent a good portion of my time refreshing my memory on the KH1’s menus and functions. The KH1 is thoughtfully laid out, so it all came back quickly.
Today wasn’t the best day for evaluating a new antenna, but the AD8HK EFRW did a decent job. Plus, it was great to have the KH1 back on the air. Both will see more use in the field in the future.
[Update 9/9/2025: During this activation, the KH1’s output power seemed low. As it turned out, the KH1 had been inadvertently set for low power. So, I was only running about two watts. Doh! I guess I need some more re-familiarization with this rig!]