Today was the last day of a heatwave we have been experiencing this week. It was the only free day for me this weekend, so I headed out to Evansburg State Park (K-1351, KFF-1351) for an activation. Having had a heat-related issue recently, I wanted to get out early and keep it short.
I set up my trusty Penntek TR-35 (5 watts) and homebrew 19-foot vertical. As is my normal practice, I started out on 40M CW. Before I started calling CQ, I made a park-to-park contact with a station in Maryland. Things got off to a slow start, but I managed to make my first 10 contacts in about 15 minutes.
I moved up to 30M and started calling CQ. The first station to call was NJ2BB. I immediately recognized the callsign as the amateur radio station aboard Battleship New Jersey (BB-62). The New Jersey is a WWII-era battleship, which is now a museum ship in Camden, New Jersey. I chatted with the operator, Tom, for a bit letting him know I was a former U.S. Navy Radioman, I always enjoy contacting museum ships; however, this was the first time one has called me.
USS New Jersey (BB-62) in California, 1985 (DoD photo)
After logging a few more contacts on 20M, I pulled the plug. After an hour, I ended up with 28 QSOs in my log, including two park-to-park contacts. The NJ2BB contact was certainly the highlight of my outing this morning.
It’s hard to believe, but a half-century has gone by since I graduated from Navy Radioman School. The Navy decided that the 18-year-old kid was ready to do this radio stuff for real.
Following three months of boot camp, the Navy transferred me to the U.S. Navy Training Center in Bainbridge, Maryland. USNTC Bainbridge was not the most glamorous place. The barracks were run-down, World War II-vintage wooden structures with a cockroach problem.
I still remember my first day in Radioman school. The instructor gave us a sheet of paper and told us to memorize it. It was the Morse alphabet with the sound of each character. (A = DID-DAH, B = DAH-DI-DI-DIT, and so on). I also took a typing test. Fortunately, I had a typing course in high school and was able to test out of the typing training. The non-typers had to attend an after-hours crash course in touch typing.
Early on, our training focused on CW. As I recall, the requirement back then was 10 WPM, sending and receiving. The CW training also covered messaging handling, logging, and net procedures. Looking back, I think focusing on CW 8 hours a day for a few weeks was a great way to learn it. Plus, I was getting paid to do it!
We did all of our CW copying on a mill. A mill was a manual typewriter will all caps. After I got out of the Navy, I had to re-train myself to copy with a pencil since I had never done that before.
Over time, we moved on to a variety of other topics. We learned about the radio equipment we would likely be using. Radio-teletype was the primary communications mode for the fleet back then, so we also had to learn that equipment.
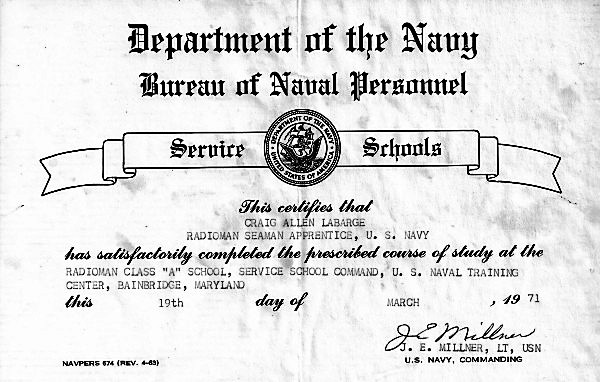
My diploma from Navy Radioman A School in March of 1971.
We spent the last week of school standing radio watches in a simulated shipboard radio room. This part of the course was called the PRAC-DECK. We set up radio circuits and sent and received message traffic. To make things interesting, the instructor would inject some equipment issues for us to troubleshoot.
On my first mid-watch (night shift), the instructor said I had to learn the most important skill I would need out in the fleet. That skill turned out to be making coffee in one in one of those 25-cup percolators. I ran into that instructor a few years later. He laughed when I reminded him about that lesson. I told him he was right about a pot of coffee being necessary for communications.
All in all, it was an interesting four months. Fifty years later, I’m still using the CW I learned back then.
I came across a news item posted in one of the U.S. Navy Facebook groups I follow. There was a fire at what is left of one of my duty stations from back in the early 1970s. It was where I went through Navy Radioman School and learned the Morse Code.
The fire at the former Bainbridge U.S. Naval Training Center in Port Deposit, Maryland. I don’t recognize the building in this picture. (Photo: Maryland State Fire Marshal/ Facebook)
I was stationed at the U.S. Naval Training Center, Bainbridge, in Port Deposit, Maryland, from November of 1970 through April of 1971. The base was very old then, but there was some history to it. Bainbridge first served as a Navy training center for new recruits (aka boot camp) during World War II. After that, it was home to a variety of Navy schools, including the Radioman School that I attended.
The old wooden barracks were pretty decrepit, by the time I got there. While the accommodations at Bainbridge weren’t the best, I still have some good memories of the short time I spent there.
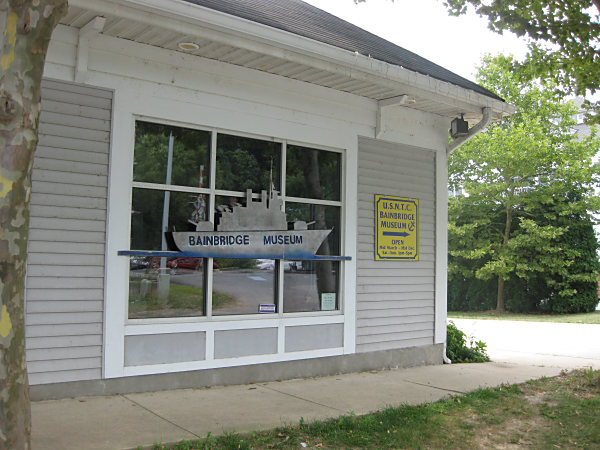
The Navy deactivated the base in 1976, and the expansive property has been mostly vacant and over-grown since then. Fortunately, the Bainbridge Museum is just down the road in Port Deposit, Maryland. They have captured a lot of old photographs and items from the old base. I paid a visit to the museum back in 2009. It was a walk down Memory Lane for sure.
The Bainbridge Museum in Port Deposit, Maryland
So, thanks to Bainbridge Naval Training Center for getting me formally trained in radio and CW. Almost 50 years later, I’m still using much of what I learned there.
The material below is from a training manual used by U.S. Navy enlisted personnel studying for advancement to the rates of Radioman 3rd Class and Radioman 2nd Class (E4 and E5, respectively). This edition, dated 1967, was still around in the early 1970s when I used it. While it may provide a nostalgic look back for former Navy radio operators, much of the material on technique may still be useful for today’s beginning amateur radio operators. Enjoy! — WB3GCK
Source: Radioman 3 & 2, Chapter 4, Bureau of Naval Personnel, Navy Training Course NAVPERS 10228-E, 5th Edition, 1967
Chapter 4 International Morse Code
The international Morse code is a telegraphic alphabet, with letters and numbers represented by sound patterns.
If you are a graduate of a Class A Radioman School, you were taught the Morse code, consequently much of this chapter may be of little interest to you. But, if this is your first acquaintance with the code – if you are striking for Radioman from the deck force, or changing to Radioman from another rating – you have many hours of hard work ahead. Do not be discouraged on this account. Many fine Radiomen learn the code for themselves.
The letters in Morse code are represented by dots and dashes; radio operators, however, substitute the expressions “dits” and “dahs,” which closely resemble the sounds of the telegraphic hand key. The groups of dits and dahs representing each letter must be made as one unit, with a clear break between each dit and each dah, and a much more distinct break between the letters. A dit is one-third the length of a dah.
You must never try to count the dits and dahs. Do not let yourself get in the habit of doing so. It is a temptation at first, but you won’t be able to count fast enough when the code speed picks up. Learn sound patterns instead. To understand what a sound pattern is, rap out the pattern beginning “Shave and a haircut.” You recognize this from its characteristic rhythm, not because it has a certain number of beats in it. You must learn the code the same way. There are 36 Morse sound patterns for the letters and numbers, plus a few others representing prosigns and punctuation marks. With study and drill you can learn to recognize each pattern as fast as you now recognize “Shave and a haircut.” The accent always falls on dahs, and you should pronounce each rhythmical combination with that emphasis in mind.
Go through the alphabet several times to get the sound “feel” of the dit and dah combinations.
MORSE ALPHABET
In the pronunciation guide for sounds of letters that follows, sounds are written as phonetically as possible. In the middle of a group, the short sound “dit” actually takes on the sound “di.” The phonetic alphabet is included in parentheses after the letters. Acquire the habit of referring to the letters phonetically.
      Letter               Pronunciation
      A (ALFA)    -------- di-DAH
      B (BRAVO)    ------- DAH-di-di-dit
      C (CHARLIE)    ----- DAH-di-DAH-dit
      D (DELTA)    ------- Dah-di-dit
      E (ECHO)    -------- dit
      F (FOXTROT)     ---- di-di-DAH-dit
      G (GOLF)    -------- DAH-DAH-dit
      H (HOTEL)    ------- di-di-di-dit
      I (INDIA)   -------- di- dit
      J (JULIETT)    ----- di-DAH-DAH-DAH
      K (KILO)   --------- DAH-di-DAH
      L (LIMA)    -------- di-DAH-di-dit
      M (MIKE)    -------- DAH-DAH
      N (NOVEMBER)     --- DAH-dit
      0 (OSCAR)    ------- DAH-DAH-DAH
      P (PAPA)    -------- di-DAH-DAH-dit
      Q (QUEBEC)     ----- DAH-DAH-di-DAH
      R (ROMEO)     ------ di-DAH-dit
      S (SIERRA)    ------ di-di-dit
      T (TANGO)    ------- DAH
      U (UNIFORM)    ----- di-di-DAH
      V (VICTOR)    ------ di-di-di-DAH
      W (WHISKEY)    ----- di-DAH-DAH
      X (XRAY)    -------- DAH-di-di-DAH
      Y (YANKEE)     ----- DAH-di-DAH-DAH
      Z (ZULU)    -------- DAH-DAH-di-dit

      Number             Pronunciation
      1----------------  di-DAH-DAH-DAH-DAH
      2----------------  di-di-DAH-DAH-DAH
      3----------------  di-di-di-DAH-DAH
      4----------------  di-di-di-di-DAH
      5----------------  di-di-di-di-dit
      6----------------  DAH-di-di-di-dit
      7----------------  DAH-DAH-di-di-dit
      8----------------  DAH-DAH-DAH-di-dit
      9----------------  DAH-DAH-DAH-DAH-dit
      0----------------  DAH-DAH-DAH-DAH-DAH
[Note: The codes shown below for Left and Right Parentheses are reversed from those shown in ITU Recommendation, ITU-R M-1677-1 (10/2009). — WB3GCK]
      Punctuation Mark    Pronunciation
      Hyphen (dash)  ---- DAH-di-di-di-di-DAH
      Parenthesis  L ---- DAH-di-DAH-DAH-di-DAH
                   R ---- DAH-di-DAH-DAH-dit
      Point   ----------- di-DAH-di-DAH-di-DAH
      Slant  ------------ DAH-di-di-DAH-dit
      Apostrophe  ------- di-DAH-DAH-DAH-DAH-dit
      Colon  ------------ DAH-DAH-DAH-di-di-dit
      Comma   ----------  DAH-DAH-di-di-DAH-DAH
      Question mark  ---- di-di-DAH-DAH-di-dit
STUDYING CODE
If you have any trouble learning Morse code, the following method may be helpful. Go through the three groupings of short, medium and long sounds with their accompanying practice words. Make up words of your own if you wish to give yourself further practice. Speak the practice words in code. Say “tee: DAH dit dit;” “mine: DAH-DAH di-dit DAH-dit dit.”
If you can speak words in code rapidly and distinctly, you will have an easier time when you learn to receive code on the receiver. The sounds are very similar.
You probably have noticed by now how numerals slow your speech in oral transmission. That is understandable – they also slow the speed of radio transmission. Headings containing procedure signs, calls, and numerals are transmitted at a slower rate of speed than straight alphabetical characters.
      Short sounds              Practice words

      E dit                     TEE ATE EAT TEA MEAT
      T dah                     MEET MINE TIME MAINE
      A di-DAH                  TEAM AIM NITE TAME TEA
      I di-dit                  MATE TAME NAME MITE
      M DAH-DAH                 MIAMI MAMA MEAN MAN MAT
      N DAH-dit                 EMIT MINT MANE TAN ITEM TINT
      Medium length sounds      Practice words

      D DAH-di-dit              MUST SAME MAMA SUIT AUTO
      G DAH- DAH- dit           MUSS OUST MUSE MUTE ATOM
      K DAH-di-DAH              TAUT MAST MASS SUET SAM
      0 DAH-DAH-DAH             WIND SEA TUM SAW OAT
      R di-DAH-dit              SUE SAT WED SUM MUD IOU
      S di-di-dit               USE SEAM WOOD DARK
      U di-di-DAH               GEORGE DOWN KIND SORT
      W di-DAH-DAH              DOOR MASK WORK GROW
                                WOMAN EDGE GAGE
                                WIGS WORM WAGER
                                WAKE KEG


      Long sounds              Practice words

      B DAH-di-di-dit          VAT VET VIM HAM SIX
      C DAH-di-DAH-dit         SAY
      F di-di-DAH-dit          HAS HAT EVE CUT
      H di-di-di-dit           CAM VEST
      J di-DAH-DAH-DAH         HEAT HAVE MUCH
      L di-DAH-di-dit          THAT EACH
      P di-DAH-DAH-dit         COAT ACHE SAVE HUSH
      Q DAH-DAH-di-DAH         ACME
      V di-di-di-DAH           CUTE BAKER CHARLIE
      X DAH-di-di-DAH          FIVE
      Y DAH-di-DAH-DAH         HOW JIMMY LIKE
      Z DAH-DAH-di-dit         PAPA QUICK QUILL
                               VICTORY XRAY YOUNG
                               ZERO BUZZ GARGLE
                               FIZZLE LYNX OXYGEN
                               WAX QUAY JERKY WHIP
                               QUEBEC


      Figure sounds

      1. di-DAH-DAH-DAH-DAH
      2. di-di-DAH-DAH-DAH
      3. di-di-di-DAH-DAH
      4. di-di-di-di-DAH
      5. di-di-di-di-dit
      6. DAH-di-di-di-dit
      7. DAH-DAH-di-di-dit
      8. DAH-DAH-DAH-di-dit
      9. DAH-DAH-DAH-DAH-dit
      0. DAH-DAH-DAH-DAH-DAH
RECEIVING
If you have carried out the recommendations made up to this point, you are ready to receive code transmitted to you on an oscillator. The ship or station to which you are attached is almost certain to have practice oscillators for your use.
An experienced Radioman will key code groups to you for your training. The sound produced by an oscillator closely resembles the sound of code from the radio receiver. The operator keying to you for practice should transmit each individual character at the standard rate of 20 words per minute. He should maintain a fairly long interval between characters. As you progress, you gain speed by shortening spaces between characters.
The standard character speed is shown in figure 4-1. Note that the characters themselves may be keyed at 20 words per minute, but that the longer intervals between characters and words materially decrease the beginner’s overall speed. Note also that the code, compared against time in the 20-words-per-minute transmission, is in the proper form of having the dit as a unit. There is one unit between each element of a character, three units between each character, and seven units between each group or word.
After learning the sound of each character at this rate of speed, it is not difficult to reduce the time between characters and to copy code at a much faster speed.
As you advance in rating, you will be required to increase your transmission and reception speed. If you learn the fundamentals well, it will be fairly easy for you to increase your speed. When copying code, if you miss a character, don’t stop to worry about it; get the next character and let the one missed go by. Be a competent operator. Make every transmission and every reception accurately. Do not place speed before accuracy.
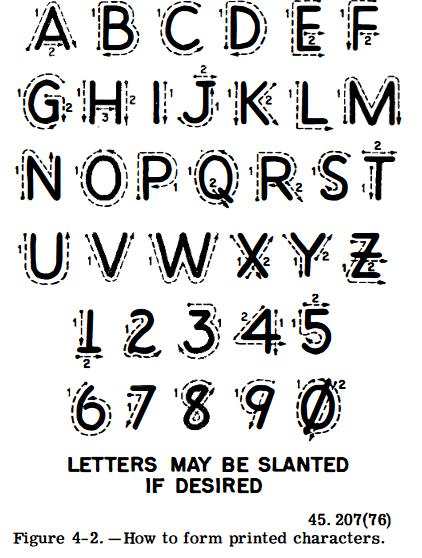
PRINTING CLEARLY
Learn to print clearly and rapidly. The messages you handle are important, and someone must read what you have written without puzzling over it. Examine figure 4-2 and compare the printed letters with your own. Notice that the sequence of strokes for some letters may be different from the way you customarily form them. As an aid to rapid printing, the more of the letter you can form with a single stroke, the better. Use this illustration as a guide to avoid confusions between printed letters and printed numerals. Especially watch the letter Z and the numeral 2. If you wish, write Z with a line through the stem (-Z). Even more important is the distinction between the capital letter O and the figure zero. In communication work, zero is always written with a slant through it (Ø). Exercise care to avoid confusion between letter I and figure 1, and also letter S and figure 5.
As your code speed increases, you will find it impossible to print rapidly enough to keep up; therefore, typewriting is a skill also required of all Radiomen. Use of a good commercial text can help you master touch-typing. A typing course for beginners also is offered by USAFI.
SENDING
Your ability to send well depends mainly upon two capabilities. First, you must know the correct sound of the character you are attempting to transmit. Second, you must know the proper method for keying with perfect control. Practicing the code aloud, as well as receiving it by oscillator, has given you a good knowledge of code sound. The proper method for keying is your next concern.
HAND KEY
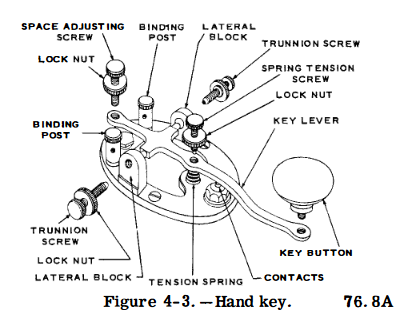
The first key you will use is the hand key. The hand key is widely used on radiotelegraph circuits and with practice oscillators. It must be adjusted properly before you can send clearcut characters. Figure 4-3 shows a hand key, with parts labeled.
KEY ADJUSTMENT
The spring tension screw, behind the key button, controls the amount of upward tension on the key. The tension desired varies with operators. Too much tension forces the key button up before the dahs are completely formed; spacing between characters is irregular, and dits are not clearly defined. If the spring tension is very weak, characters run together and the space between characters is too short.
The gap between the contacts, regulated by the space adjusting screw at the back of the key, should be set at one-sixteenth inch for beginners. This measurement does not apply to every key and operator; it is a matter of personal preference. Some operators like a closed key, others an open key. “Closed” and “open” are terms for a short and a long gap. As the student progresses, further gap adjustment may be made to suit his sending speed. Contacts that are too close have an effect similar to weak spring tension. Contacts that are spaced too far have the same effect as too much spring tension.
The final adjustment of the key is the sidewise alignment of the contact points. This alignment is controlled by the trunnion screws at either side of the key. If they are too tight, the key lever binds. If they are too loose, the contacts have sidewise play. Usually, when the sidewise alignment is correct, no further adjustment is required.
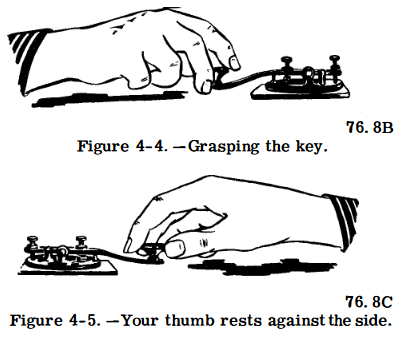
POSITION OF HAND ON KEY; WRIST MOVEMENT
Learn from the beginning the correct way to grasp the key. Do not hold the key tightly, but let your fingers rest lightly on the key knob. Your thumb rests against the side, your forefinger rests on top of the key, your other fingers are bent slightly in a relaxed position. Check figures 4-4 and 4-5 for the correct method of keying. To ensure correct movement of your wrist and forearm, your arm should lie on the operating desk. The muscle of your forearm – not your elbow – should support the weight of your arm. Your elbow should not extend over the edge of the table, because the pressure of the underside of your forearm will partly block circulation and tire you. Sit upright, with your arm in line with the key.
Your ability to transmit depends to a great extent on acquiring the proper movements of your wrist and hand while operating the key. To close the key, your wrist moves upward and your hand rocks downward toward your fingertips. To open the key, these two movements are reversed- your wrist comes down and your hand rocks back.
Make your wrist flexible. Limber it up. Correct wrist action may be developed by moving your wrist up and down like a hinge. Another exercise is rotating your hand in clockwise circles, with your wrist held in a stationary position. These exercises will relieve any undue tension you may experience when first beginning to transmit.
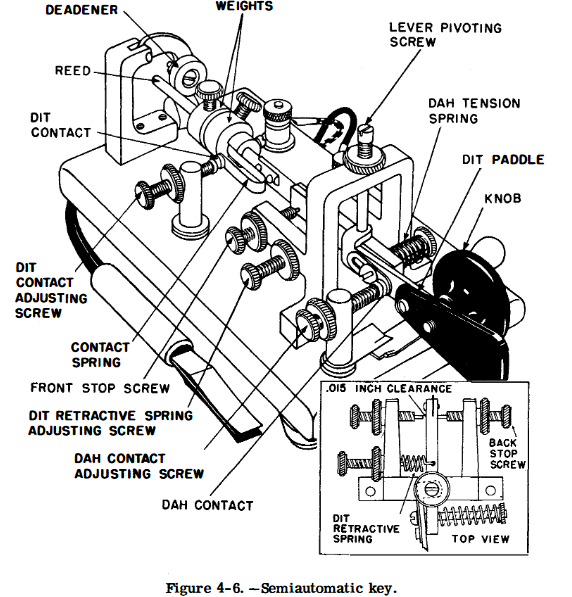
SEMIAUTOMATIC KEY
The semiautomatic key, also known as the bug or speed key, is used chiefly when operators are required to send for relatively long periods of time. It is designed to make sending easy instead of fast. Hence, perfect control of the key is far more important than speed.
OPERATION
In sending with the bug, the thumb presses the dit paddle (fig. 4-6) to the right, and the index finger forms dahs by pressing the knob to the left. The key sends successive dits when the paddle is held to the right. One dit or a series may be sent, depending on how long the thumb pressure is maintained against the paddle. One dah is formed every time the knob is pressed to the left. Dahs must be sent individually. While sending, the hand pivots at the wrist; the hand and arm motion is horizontal.
KEY ADJUSTMENT
Best operation of the semiautomatic key is obtained when it is adjusted to send dits and spaces of equal length. Adjust the key as follows, locating the parts in figure 4-6 when adjusting the key:
Adjust the back stop screw until the reed lightly touches the deadener. Tighten the locknut.
Adjust the front stop screw until the separation between the end of the screw and the reed is approximately .015 inch. Tighten the locknut.
Operate the dit paddle to the right. Hold the lever in this position and stop the vibration of the reed. Adjust the dit contact adjusting screw until the dit contacts barely touch. Tighten the locknut. This adjustment determines whether the dits will be too heavy, too light, or perfect. The adjustment must be made without flexing the contact spring.
If the dits are too fast, move the weights, located on the reed, in the direction of the deadener. If the dits are too slow, move the same weights in the opposite direction.
Adjust the dah contact adjusting screw to a clearance of approximately .030 inch.
Adjust the dit refractive and dah tension springs for the most comfortable, operation.
If the adjustment instructions are followed carefully, the bug makes 25 or more dits before stopping. The first 12 to 15 dits will be practically perfect, with the dits and spaces equal.
SENDING EXERCISES
Good operators have sending rhythm, and you can acquire it in just one way: by practice.
It may be difficult for you to key correctly at first, because your wrist is unfamiliar with the type of movement required for sending telegraphic code. Your wrist will be stiff, and you’ll have to get rid of that stiffness by a lot of practice. Don’t favor the stiffness of your wrist. If you do, your sending will be choppy.
The following exercises have been prepared carefully. Use them as an instruction guide.
Character E: The dit characters require a “goodfist.” They must be transmitted quickly and rhythmically. Make a series of Es (dits). They are made with a pronounced movement of your wrist upward, returning to the normal position after each dit. At first, maintain a fairly long interval between dits. To assist you in limbering your wrist, exaggerate the movement upward. To prevent tenseness and tiredness of your wrist, remove your hand from the key periodically and flex your wrist. After practicing Es for 15 or 20 minutes, decrease the interval between dits until you are making them rather rapidly. Each sound should continue to be a definite dit, however. Keep at it until you can control each dit.
Character I: When you feel that your wrist is limbering up, make the character I (di-dit). Start with your wrist in the normal relaxed position, raise it for the first dit, lower it quickly halfway back, and make the second dit with another quick movement of your wrist upward. Your transmission, made slowly, produces the sound di-dit. As you practice and develop more rhythm, this character acquires the sound of di-dit.
Character T: Send a series of Ts (DAH) with a good interval between them. Instead of a quick movement of your wrist upward, make aslower, more definite movement of your wrist and exert more pressure on the key. Send dahs for a few minutes, gradually shortening the interval between characters.
Character M: Now try sending strings of Ms (DAH-DAH). As with the character 1, you don’t return your wrist to the beginning position at the end of the first dah, but bring it to the halfway point and then make the last dah. With practice, you’ll soon change the hesitant DAH DAH sound to the snappy DAH-DAH. Don’t forget the correct wrist movements. If you find that your sending requires exertion of forearm muscles or that your shoulder is moving, stop and recheck your wrist motions.
Try these practice groups several times, backward and forward. Make them clearly and distinctly, spending more time on characters that cause you any trouble.
MEET EMIT MITE ITEM
Character A: The character A (di-DAH) gives you practice in making a dit and a dah together. Sending motions, in their proper order, are (1) slight pressure of your fingers alongside the key, (2) a quick surge upward of your wrist, (3) a slight relaxing of your wrist to the halfway point, and (4) a final definite upward movement of your wrist. This technique produces the sound dit DAH when you begin to practice it. But keep at it-you’ll soon have the proper di-DAH sound. Avoid tenseness; relax your forearm muscles when sending.
Character U: You’re now ready for the character U (di-di-DAH). Start slowly, sending dit dit DAH. Practice it until you get a di-di- DAH sound.
Character N: The character N (DAH-dit) requires only slight pressure on the sides of the key, a strong wrist movement upward, a half return, and a quick, short, upward motion for the dit. Practice for several minutes until you are able to send DAH-dit easily and with com- plete relaxation.
Character D, Try the letter D (DAH-di-dit). At first, with the correct wrist movement it will be DAH dit dit. But the sound you want to hear is DAH-di-dit-with a swing. Send Ds until you can transmit them with perfect control. Check yourself on the following groups. You should have less difficulty than you did with the first groups.
MINED UNITED READY MAUDE TEAMED
Character S: Go back to the dits for S (di-di-dit). Get a good position on the key and put your wrist to work. See how quickly you can change the dit dit dit sound to di-di-dit. Relax your forearm.
Character V: The letter V is di-di-di-DAH, so you’d better learn how to send it that way. Relax. If your wrist is tied up in a knot, you’ll be sending dit dit dit DAH. Move your wrist up and down easily until you are sending di-di-di-DAH with perfect control. Practice this letter carefully. It is used in every radio test.
Character 0: Correctly sent, characters is DAH-DAH-DAH. Keep at it until it stops sounding like three Ts. Test your skill with these words:
DOOM MOST ROAD MOTOR WORST MOTION WOKE ANCHOR DOMO
Character H. Character His di-di-di-dit. Send one. If it sounds similar to four Es, your wrist is too stiff. Develop the di-di-di-dit sound.
Character B: Send DAH-di-di-dit. It is the Morse code equivalent of B. Practice for perfect control, then try these groups:
SOB BASSINET BIND BESTED BEAUTY SNOB BABBITT BURST
Character K: At this point you should be prepared to tackle the other characters. They are mostly combinations of the letters you have practiced. Each one has a distinct overall sound. For instance, K should not have the sound DAH-dit-DAH. It should be DAH-di-DAH. Think of the tune “Over There.” You will realize that DAH-di-DAH has the same rhythm as OH-ver THERE-DAH-di-DAH.
Character Q: The letter Q (DAH-DAH-di-DAH) has the same rhythm as the words “Payday today.” Say in a monotone “payday today,” then say DAH-DAH-di-DAH. When transmitted, the same swing is given these combinations as when speaking or chanting them.
Remaining letters and numerals: The preceding l5 characters have taught you proper wrist movement. You know the remaining 11 letters and 10 figures. Following are 14 practice exercises. Use these exercises for self-drill.
PRACTICE EXERCISES
Practice the remaining letters of the alphabet and the numerals. When you think you’re ready for it, practice the code exercises that follow.
      1. E E E T T T A A A N N N I I I S S S H H H
         M M M O O O E E E T T T A A A N N
         I I I S S S H H H M M M O 0 0 E E E T T T
         I I I M M M A A A N N N S S S O 0 0 H H H
         E E E T T T E E E T T T I I I M M M I I I
         M M M A A A N N N A A A N N N S S S
         O O O S S S
      2. U U U V V V D D D B B B K K K C C C
         W W W J J J P P P U U U V V V D D D
         B B B K K K C C C W W W J J J P P P
         W W W J J J P P P U U U V V V K K K
         C C C B B B D D D U U U D D D V V V
         B B B P P P J J J C C C K K K W W W
         D D D B B B V V V U U U W W W J J J
      3. R R R L L L F F F G G G Z Z Z X X X
         Y Y Y Q Q Q R R R L L L F F F G G G
         Z Z Z X X X Y Y Y Q Q Q G G G Z Z Z
         F F F L L L R R R Y Y Y Q Q Q R R R
         X X X Z Z Z R R R F F F L L L Q Q Q
         Y Y Y G G G Q Q Q Y Y Y R R R
      4. 1 1 1 2 2 2 3 3 3 4 4 4 5 5 5 6 6 6 7 7 7 8 8 8
         9 9 9 Ø Ø Ø 1 1 1 2 2 2 3 3 3 4 4 4 5 5 5 6 6 6
         7 7 7 8 8 8 9 9 9 Ø Ø Ø 1 1 1 2 2 3 3 4 4 5 5
         6 6 7 7 8 8 9 9 Ø Ø 1 1 2 2 3 3 4 4 5 5 6 6 7 7
         8 8 9 9 Ø Ø 1 2 3 4 5 6 7 8 9 Ø 1 2 3 4 5 6 7
         8 9 1 2 3 4 5 6
      5. V U I Y Q Z C X G R S L K J P Q X Z R I
         F C V B W F K D S H Q Z A L K F B V R
         S T U O T M E G Y Z X V E G N I W S L H
         M U A E V U A E W Q G H V C I X Z L N
         R Y U K V U
      6. E 8 Y 7 B 6 X 1 W Ø Z 2 A 3 C 5 S 4 1 2 F
         U 1 F 5 D 8 Q 4 T 6 U 9 Q 2 E Ø S 5 U l Y
         G 2 J 4 S 3 E 5 T 7 Z 8 K 6 M 9 R l A 2 R
         S 7 W B E 9 R 2 A 3 Z 3 X 6 U 8 B 7 C 6 T
      7. MI AN SY NL TY CE DO PS CX ZW QA PK
         LN HU WC VN BM ZS CD QA IU SD LM UH
         GY TR DC VT AR YU FD SA IG WQ XT ZI
         NY OT ED BM LP YU GH BY RE DF LS
         WQ XS ZI TY BG NH JV KL MD MI AN SY
         NL TY CE DO PS
      8. EF TS 16 29 83 ZJ 45 Ø7 WR ND KW IC UX
         91 Ø2 1B LO FG 84 63 XW AC TM SU 5Ø 72
         XR RJ ZM 43 65 VH 97 LM 12 46 7Ø FC FE
         EY 34 56 27 FT FY JU IT 98 76 75 52 DE
         WE QT 13 36 57 KF RI YT 19 93 35 41 FK
         YU 96 Ø1 MC AR TH 19 25 3Ø UR BO UL
         32 Ø5 21
      9. NDT EGH RTS LYB FCC ZEX PIH CWE
         LKJ QIE NUG CVT EPL SZW QAU SH
         GBT VRT GIK GYO DCM XSD ZAU YER
         DLN URG HNB VDX ZWS QTA GHI PT
         MBY PLK RDC ESX IUP PKJ NYH GHT
         DFR VED SWN VBT XFZ RDA SEN FU
         GBC YRF DSE WNJ GVA SWQ QIX ZOT
         MEH GKD BGV CFI ATA RUR SAC LT
         NVR DAB BLM INY EGB LKO MWD SKZ
         QLD YGB NDT EGH RRS FLM FCC ME
     10. OVLH MYBL URXO HIZO VICT
         FINX SCXS HTYV IQNT UBML
         ABLB EJLN CYZB ZWCN JNDZ
         UTLZ KLAB DEFZ VNUW KFRE
     11. JICOY TXSTY 38Ø95 RDIHA
         JXTDZ OXYDW XPZSY RSPHD
         89706 CUSPI RNBRJ 65289 ZONIG
         FYEQU ARQNV RNLPT KAKOZ
         8784Ø BVGAN WKOQT SRQMT
         UJVWN 45872 YXBCX AFKOZ
         OGLCT NIHGP 12349 ATUSK
         SLEWQ
     12. OLMX MVNH UWQR NVUT KUXF
         CDEH LYHE DIPA ZQWI AYSK
         QIQA WMNW ZIHZ CAKD BTGW
         WNLI PWBU OXAD XFRJ IQCA
     13. ZMJXI URYNC 9347Ø PQAZM
         DEGVM NCBVG HUGHY 13267
         PHRAN QUECC 1289Ø MCNDH
         EUIRY WQAZX IRSVZ MCURI
         72439 OYTRW PIQAW CNJWO
         OWQAJ OISKM 1Ø7Ø6 DGFHG
         KSBOU
     14. UTHA VNCB RFDS EDCD CXVD
         RWQI MNJF STRO TNBL UJHK
         NIOQ JUYR GBNX VCXT RJTU
         BCDV CGFH 5781 JGVX HGJD
PRACTICE MAKES PERFECT
Continue sending to yourself with the practice key and oscillator. If you can operate with another striker, so much the better. Sit down at an unused operating position and tune in some slow code. It is not hard to find, especially on amateur frequencies. Copy as best you can. Don’t worry too much about missing letters. Get what you can, no matter how little it is. As your speed picks up, tune in faster code. If you find you are copying a certain speed solidly, the code is too slow. Keep it faster than you can copy comfortably.
You will need lots of practice. Class A Radioman Schools ashore run a full day, and for months a man copies code several hours daily. Make the transition from pencil copying to the typewriter as soon as possible.
As you gain skill, try copying the 18-wpm to 20-wpm fleet broadcasts. Devote as much time as possible-15 or 20 hours per week-not just an hour now and then. Do not be afraid to use some of your off-duty time. Simultaneously, begin to learn how to hold down a circuit. One of the best ways to do this is to spend several watches logging circuits that other operators are manning. At the end of every watch, compare your log with that of the regular operator, and question him about anything you do not understand. That way you see procedure in use and gain practice in copying many fists.
Learn to copy behind. If you are recording B as D, S as I, J as W, and so on, you are copying too close. The farther behind the better. At first, listen to one character while setting down the previous one. Try to fall back one letter more. Listen for the character while carrying one in your head and setting down the one before that. Once you have the knack, you will find copying behind is easier, faster, and more accurate. The faster the code, the farther, you must stay behind. Watch an oldtimer copy press at 35 or 40 wpm. You will find he is carrying anywhere from 5 words to a sentence in his head.
One further word of advice: It is common for a student learning code to hit a plateau. The regular progress to higher speeds stops, and for a time the student finds himself unable to copy faster than a certain speed. If this happens to you, just stay with it until your speed picks up. Never lose confidence in the knowledge that any man of ordinary ability can learn the code if he puts in the necessary time and work
For a variety of reasons, the past week has been a slow one for me, radio-wise. However, I did notice on my calendar this morning that today is the 42nd anniversary of my first ham radio license. Wow! Where has the time gone?
Forty-two years ago, I had finished up my 4-year enlistment as a Navy Radioman and had just started school studying electronics. I had plans to get my ham license, so I began to blow the dust off of my rusty CW fist. Although the Navy trained me in Morse code, I never really had many opportunities to use it. Also, I had never copied code without a typewriter (or “mill” as we called them in the Navy) so I had to learn how to copy CW with pencil and paper.
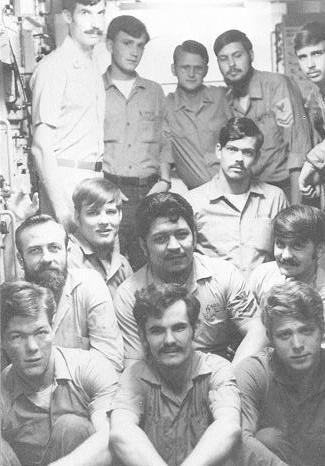
Radio gang aboard the USS LaMoure County (LST-1194) in 1974. I’m standing in the back, second from the right (with my eyes closed).
Once my code was back up to snuff, I contacted a local ham, Bob Rothrock K3MAZ (SK). Years earlier, he restored an old console radio that my grandmother had given me. Bob was the only ham I knew at the time and he graciously administered my Novice exam and helped Elmer me along when I had questions.
After receiving the callsign, WN3YSV, it took several months to put a station together and get on the air. I found a used Heathkit DX-60 transmitter and paired it up with a Realistic DX-60B shortwave receiver I already had. Anxious to get on the air, I quickly threw together a low dipole for 15 meters. I picked 15 meters only because the dipole would fit easily across the backyard.
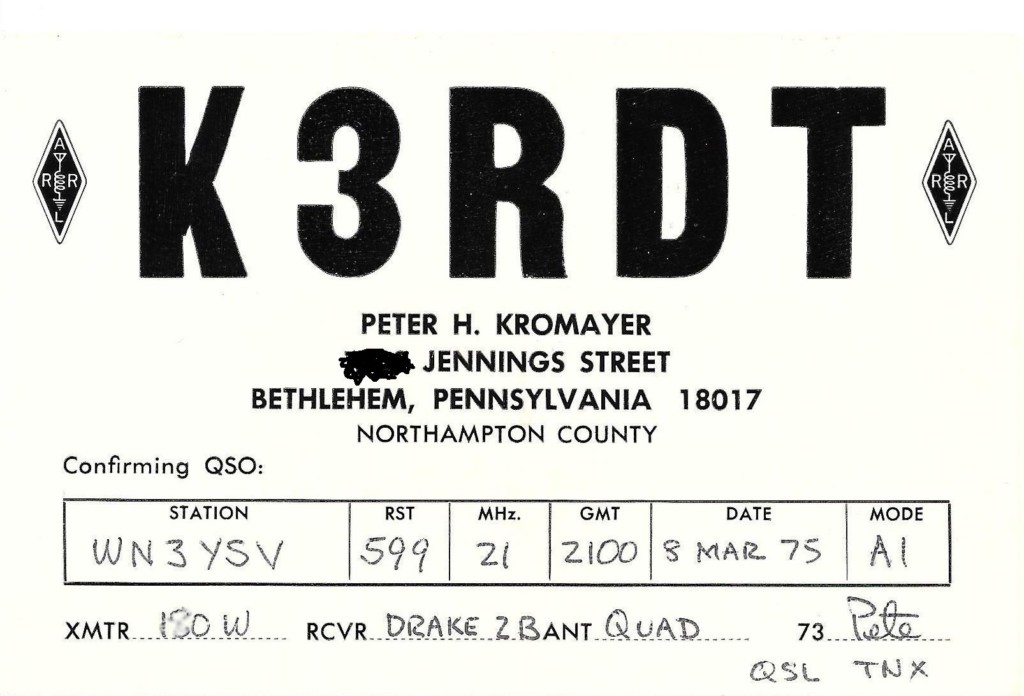
When I finally got on the air, I nervously called CQ a few times and was answered by K3RDT. I was excited to hear someone calling me and I’m sure my sending reflected my nervousness. I had never had a conversational CW exchange before. As it turns out, Pete was only about a mile away from me. He helped other novices get on the air and seemed happy to be my first contact.
A few days after that shaky QSO, I received my first QSL card. On the card Pete questioned my choice of 15 meters and encouraged me to figure some way to get on 40 meters. Of course, he was right. I eventually rigged up a 40-meter dipole and ran across the roof of the house and across the backyard. Although I made some nice contacts on 15 meters, the 40-meter novice band was where the action was for me. I also became interested in QRP early on. I built a little one-watt transmitter during that time and made a few contacts with it.
QSL card from my first ham radio contact with K3RDT. It was 599 both ways, since we were only about a mile apart.
After a little over a year of operating, I moved away to start a new job. My ham radio gear got packed away and I focused on my career and raising a family. It would be another 15 years before I got back on the air with my current callsign. Ham radio was definitely better the second time around.
Even after all these years, the thrill has never subsided. This radio stuff is still like magic to me.