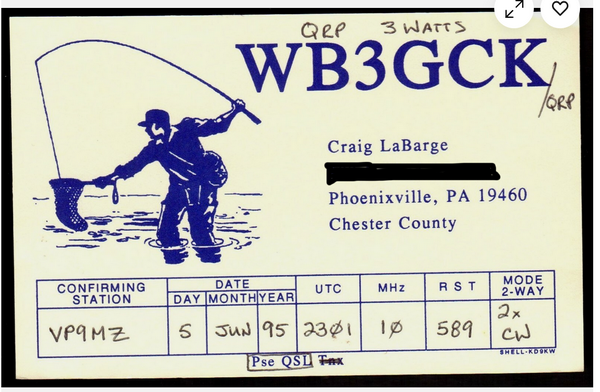
Several years back, a friend of mine said he found one of my old QSL cards for sale on eBay. It was a card I sent to a DX ham almost 31 years ago. While poking around on eBay recently, I saw it was still for sale.
I sent this card to VP9MZ in Bermuda for our 30M CW QSO back in June 1995. The card shows a fisherman, representing one of my other hobbies. The eBay seller, located in Canada, is asking $6.95 Canadian ($5.08 US).
My old QSL card someone is selling on eBay
I went back through my old paper logbooks and found the QSO. I was running my old MFJ-9030 (about 3 watts, CW) into my raingutter antenna. In the remarks column, I made a note that he remembered me. Apparently, we had worked each other previously. My log entry also shows that I received his QSL card via his QSL manager. While I was on that page of the logbook, I saw another QSO with him 5 days later.
One part of me is insulted that my card hasn’t been sold after being up on eBay for years. On the other hand, I’m not really sure why someone would want to buy it.
I have boxes of QSL cards I have received over the past 50+ years. Hmmm…. Maybe I should start selling them on eBay.
I bought the Evolve III Maestro E-Book about nine months ago. Having used it for various ham radio applications during that time, I thought I’d offer some updated thoughts on this inexpensive laptop.
Spoiler alert! There really isn’t anything I dislike about the Evolve III laptop. Sure, it’s not the speediest machine ever built, but it has stood up to every task I’ve thrown at. I regularly use it at home for Winlink, NBEMS, and VarAC. I’ve also used it for these modes in the field for ARES-RACES exercises.
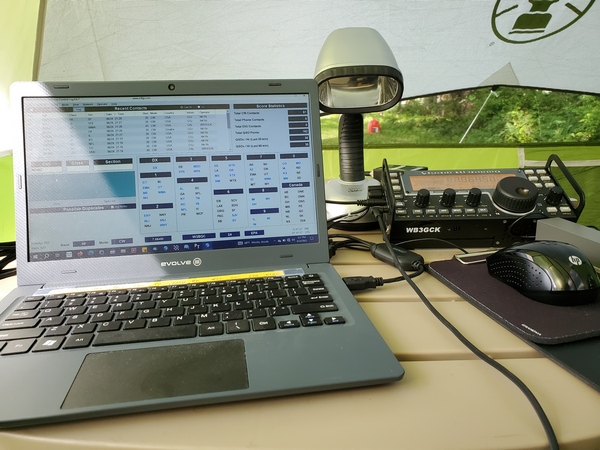
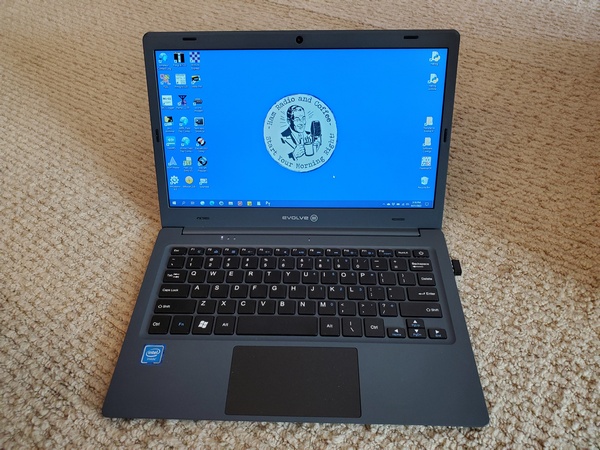
The Evolve e-book in use during this year’s Field Day
Power Considerations
Besides its small size and low cost, the thing I like best about the Evolve III is its battery life. Depending on what I’m doing, I can get eight to ten hours of run time. That’s way more than I need for my typical portable outings.
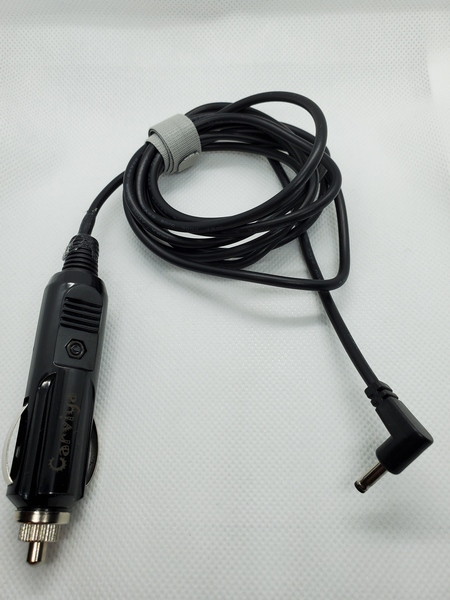
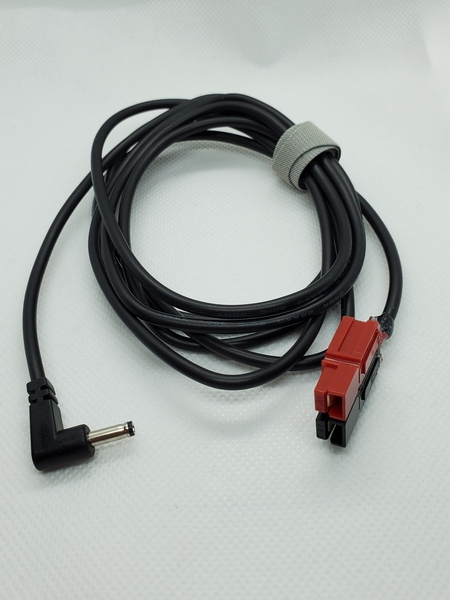
Since the “wall wart” charger it came with outputs 12VDC, I can charge the laptop from a 12V battery. For charging in the field, I bought a 6-foot cable on Amazon that has a 3.5mm x 1.35mm coaxial power connector on one end. On the other end, I added a 12V accessory plug (cigarette lighter type). I also built a second cable with an Anderson Powerpole connector.
A charging cable I built with a 12V cigarette lighter type plug
A 12V charging cable I built with a Powerpole connector
For Field Day, I operated all day without having to charge the laptop. I couldn’t have done that with other laptops I have used in the past. Before turning in for the night, I connected the Evolve to a 17 A-H gel cell battery to charge it overnight. (I had a fused 12V socket installed on the battery.) When I woke up during the night, it was fully charged, so I disconnected it. The Evolve lasted the rest of Field Day without further charging.
Field Day Configuration
My Field Day configuration made full use of the Evolve’s capabilities. I used it for logging, connecting to our shared log file via Wi-Fi. I also used one of the two USB connectors to drive my WKmini Morse interface to send CW with my KX3.
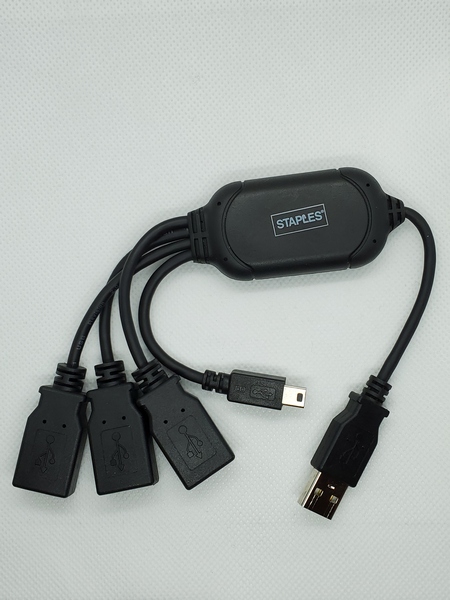
Since I only had one more USB connector available, I used a 3-way USB splitter to accommodate the other devices I needed to attach. I had the receiver for my wireless mouse attached to one port on the splitter and the KX3’s rig control cable connector to another port. I used the third port to connect a thumb drive, which I used for exchanging files with another Field Day participant.
This is a USB splitter I bought at Staples years ago. The extra USB ports came in handy during Field Day.
For backups, I had my N3FJP Field Day logger configured to save backup files to an SD card. Since my backup files included the entire networked log, I had everything I needed to submit our group’s entry on my laptop when I got home.
With all that going on, the Evolve performed flawlessly.
Some Additional Thoughts
I recently heard from a couple of hams who received Evolve laptops with a USB-C charging port. This is a recent design change, I suppose. I don’t have any hands-on experience here, but I think this might actually simplify things in the field. A 12V socket connected to the battery and a commercial 12V cell phone car charger should be all you need to charge the Evolve. Most cell phones and devices seem to favor the USB-C connectors these days, so suitable 12V car chargers are easy to come by.
So, if you couldn’t tell, I’m a big fan of the Evolve III Maestro E-Book. So far, I feel the $89 I paid for it was money well spent. I’m hoping I can get several more years of good service from it.
You’ve most likely heard hams talking about the Evolve III laptop over the past few months. I had been hearing about these little laptops being snapped up at prices as low as $60. Several ARES-RACES colleagues have been happy with them, and there’s even one running 24 x 7 as a VARA FM digipeater in our Emergency Operations Center. So, I had to buy one and judge for myself.
So, what is attracting hams to this laptop? Of course the low price is attractive to frugal hams. It’s also small (11.6-inch display) and light, making it useful for portable operation. Speaking of portable operations, you can charge the Evolve III from a 12-volt DC source. Out in the field, you can charge this laptop from the same type of 12-volt battery used to power your rig.
Evolve III Maestro E-Book
Despite its low cost and small size, it’s a capable little machine. It runs the Windows 10 Pro Education operating system, and has two USB ports and a micro SD memory card slot. A 1.1 GHz Celeron processor runs the laptop, and it has 4 GB of RAM and 64 GB of data storage.
Micro Center stores have been selling them for $59.99 with a limit of five per customer. When I checked my local store, they were out of stock, so I bought one on Amazon for about $89. (Still a bargain, I think.) These laptops are obviously clearance items, since the Evolve website shows newer models running Window 11.
My plan for this little laptop is to use it for logging during QRP-portable operations, especially Field Day and Winter Field Day. I also want to use it for digital communications during ARES-RACES exercises and deployments.
Getting started with the Evolve III was the same as any other Windows 10 device I’ve owned. The initial Windows setup didn’t take long, and I was ready to install some software. I started by installing the software I use for logging, e.g., N3FJP ACLog, SKCC logger, HamRS, N3FJP Field Day Logger, etc. Everything ran without issues.
Next I installed the software I need for ARES-RACES. First up was Winlink Express, along with VaraFM and SoundModem. Then, I installed the Narrowband Emergency Messaging System (NBEMS) software, i.e., fldigi, flmsg, and flamp. Over the past two weeks, I’ve been making solid connections to a local Winlink node on 2M using VARA FM. The NBEMS software has also been working great during our local ARES-RACES digital nets.
After using the Evolve III daily for the past few weeks, I really like it. The keyboard has a good feel to it, and the display looks good. I used it outdoors in the shade and the display was still readable. You might need to crank up the brightness, though.
Is it the fastest laptop? No way. Is it fast enough? Absolutely. I’ve heard of hams running FT8 on these things with no issues. You would think the 64GB of storage would be a limitation. However, after installing the ham radio applications I use, I still had about 24GB left. Just in case, I took advantage of the Micro SD card slot and added an extra 128 GB of storage.
I’m really impressed with the battery life. Depending on what I’m doing, I get more than eight hours of operation on a charge.
Lately, it seems like my house is where computers go to die. I’ve had a laptop and a desktop go belly-up in recent months. Given what I paid for the Evolve III, if it dies, I won’t feel a tremendous loss.
My (overly) fastidious approach to logging my ham radio contacts has been well-documented. Since I upload all of my contacts to the Logbook of the World (LoTW), I like to reflect my locations accurately in the TQSL software. When you do most of your operating while portable, that can add up to a lot of locations to deal with. I’ll show you my approach to dealing with locations in TQSL.
How It Started
As best I can recall, I started using LoTW about six or seven years ago. I started creating new locations in TQSL for every place I operated away from home. So, there were lots of campgrounds that my (far) better half and I frequented, along with an assortment of parks and other places my radio has been to. Then, along came National Parks on the Air, followed by Parks on the Air. Before I knew it, I was scrolling through a long list of locations to find the one I wanted for an upload to LoTW.
One approach to paring down the list, I suppose, would be to go in and delete the one-off locations I’m not likely to visit again. That, however, conflicts with my inherent packrat nature. (That also explains the boxes of assorted leftover screws I have in the basement.)
One thing I noticed is that many locations in my list shared the same attributes, e.g.: state, county, grid square, etc. For example, all the parks in northern Delaware I activated recently are all in the same county and grid square. (Fun fact: Delaware only has three counties.) Based on this observation, I came up with an approach to tame my locations list and make it easier to scan the list to find a particular location.
My Location Naming Convention
I ended up deleting most of my locations is TQSL and created some new ones using the following naming convention:
STATE_COUNTY_GRID
The STATE is just the standard two-character abbreviation. The GRID is the four-character grid square. Here are some examples from my locations list:
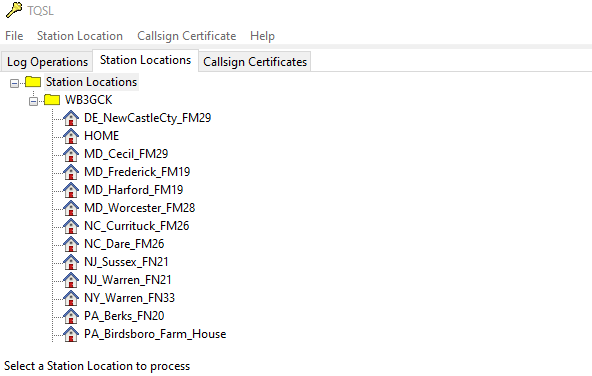
TQSL automatically stores the locations alphabetically, so it’s easy to scroll through the list to find the location I’m looking for. I kept one or two of specifically named locations for frequently used places like “Home.”
My “Station Locations” pane in TQSL showing some of the locations I have stored
While this works for my situation here in the States, operations in other countries would likely need some tailoring. I’ll cross that bridge when I get to it. Also, if you have certificates for more than one callsign, you’ll need to account for that.
Where Am I, Anyway?
To use this approach, I need to know what county and grid square I’m in. There are a couple of resources I use to do that. Before I get on the air from a portable location, I use these resources on my Android phone:
What County am I In. When I access this website from my cell phone, it shows the county I’m in, along with the zip code, address, and coordinates.
Easy QTH Locator. When you launch this app, it uses your phone’s location services to show your grid square, along with your coordinates and elevation.
Once I have determined the county and grid square I’m in, I jot this information down in my notebook or take screenshots from the apps on my phone.
These are the resources I use, but a web search will yield lots of similar tools you can use. I should also note that I have no financial interest in these apps.
Wrapping Up
This could very well be another case of over-thinking on my part. Regardless, I’ve been using this approach for a while now, and it has been working out for me. I’d be interested in hearing your method of managing portable locations for LoTW.
Oh, and before I forget… Remember to make regular backups of your TQSL locations, certificates, and preferences. Someday you’ll be glad you did.
I haven’t bought any new ham radio toys lately, so I decided to upgrade the homebrew passive CW interface I use for contesting. I had been looking at the K1EL WKmini USB keyer for a while. I recently bought one, and it fit my needs exactly.
I’m not a big contester, but for Field Day, Winter Field Day, and some POTA activations, I key the radio using macros in the logging software. For years, I used a passive interface built into a DB-9 connector, along with a USB-to-RS-232 adapter. The interface consists of a resistor and a 2N2222 transistor. It served me well, but occasionally, there were some hiccups. With this simple interface, the logging software on the laptop is doing all the CW work. Once in a while, I noticed some timing issues in the code sent.
The WKmini is based on the WinKeyer 3 chip and designed for use with contesting logging software. The WKmini takes on the work of generating the CW, so it eliminates those timing issues. The logging software sends commands and data to the keyer, and the keyer does the rest.
The other nice feature is the paddle input. This feature allows me to instantly send CW manually when needed. I was able to do this in my previous setup, but it was a bit more complicated. The WKmini keyer is a more simple, elegant approach. Its small form factor makes it ideal for portable operating.
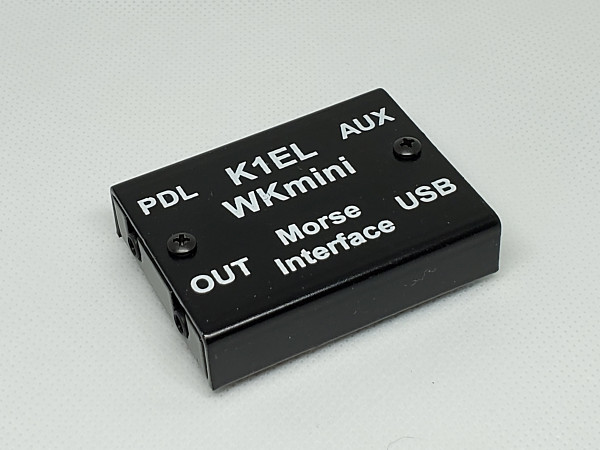
The WKmini Morse Interface from K1EL Systems. This compact device measures 2.25″ W by 1.75″ D by .5″ H.
The WKmini was incredibly easy to set up. I connected the keyer to my laptop, and Windows immediately recognized it. I used the free K1EL WKscan utility to determine which COM port the keyer was using. I connected the keyer to my KX3 using a stereo patch cable with 1/8-inch connectors. Using the K1EL WK3demo utility, I was successful in keying up the radio and sending some code.
The last thing I needed to do was to configure my N3FJP logging programs to use the WKmini instead of the old passive interface. The WKmini doesn’t have any external controls; the logging software provides the necessary settings. There is a long list of software that supports WinKey keyers, including the N3FJP suite of software. The User Manual covers the N3FJP software, which was helpful. So, with a few mouse clicks, I was in business. All of this testing and setup took less than 15 minutes.
Like other K1EL keyer products I own, the WKmini is a solid performer. I’m hoping to give this little gem a workout during Winter Field Day later this month.
All too often, I hear about some unfortunate ham who lost their computer-based log files due to some hardware or software failure. I don’t know about you, but just the thought of losing a decade or more of QSO data gives me the chills.
Back in my working days as a Systems Engineer, I was called upon a few times to develop contingency plans for large computer systems and networks. While working on those projects, I would continually ask myself, “What would we do if…”
As a result of all that, I still think about backup plans and backups for those backups. One customer once told me I was a belt and suspenders kind of guy; one method of holding up my pants just wasn’t enough.
The Problem in a Nut Shell
Storing your log files—or any data that’s important to you—in one place is a recipe for disaster. Hard drives can and do fail. (Been there, done that.) If your log file only exists on that failed hard drive, you’re out of luck.
The obvious solution is to keep a copy of your log somewhere other than your hard drive. I’ve had computers fail on me a few times over the years, and I was thankful I had backup copies of my important files.
External Storage Media
The easiest way to backup your log files is to create copies of them on removable storage media, such as an external hard drive, USB flash drive, or SD memory card.
The cost of storage devices has dropped significantly over the years. You can get a 1TB external hard drive these days for less than $50. I have a 1T USB-connected drive that I use to backup all of my data, including my log files.
If you’re just concerned with backing up your log files, a USB flash drive or an SD memory card is an inexpensive way to go. I often see 32GB flash drives for less than $10. I also use a thumb drive for an extra nightly backup of my logs. (Remember the belt and suspenders thing?)
If you’re an N3FJP ACLog user, you have an easy way to back up your logs. You can configure ACLog to save a backup each time you close the program. So, if you attach an external storage device (flash drive, SD memory card, etc.) to your computer, your backups will happen automatically. I do this with SD memory cards on each of my laptops. So, when I’m logging in the field with no Internet access, I’m still backing up my logs. More belts and suspenders.
Off-Site Storage
Back in the day, the computer systems I worked with regularly transported copies of their backups to another location across town. These off-site backups ensured that copies of data would survive a catastrophic event in the computer room. Hopefully, none of us ever face that situation.
For off-site storage, you could make a copy of your log data on removable media and take it to another location for safe-keeping. I’m too lazy for that. Thanks to the magic of the Internet, however, there are ways to do this electronically—and for free.
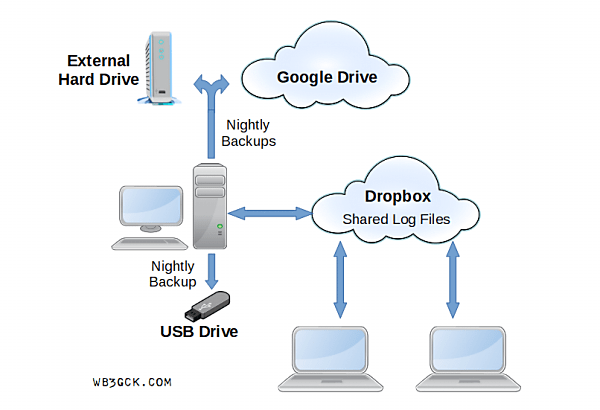
An easier way is to use cloud-based storage. There are several cloud storage providers, and most of them offer a no-cost option. I use Dropbox and Google Drive for my ham radio logs.
I keep my main log files (N3FJP ACLog and SKCC Logger) in a Dropbox folder that gets replicated to all of my computers. This approach allows me to run those logging programs on any of my computers using the same database. It also keeps a copy on Dropbox’s server. For good measure, I also backup my logs to Google Drive. (There are the belt and suspenders again.)
I would be remiss if I didn’t mention Logbook of the World as an off-site backup method. If you routinely upload to LoTW, you have a backup of at least the rudimentary information about your QSOs (callsign, date, time, band, mode, etc.). In my case, there is information in my logs that isn’t captured by LoTW. So, restoring from LoTW would be the last resort for me.
My approach to backing up my logs might be overkill, but I can always restore my logs in the event of a computer failure.
Making It All Happen
I make nightly backups of all my logs to an external hard drive, a thumb drive, and Google Drive. If I was disciplined enough, I could manually copy the necessary files to all three locations. Knowing me, though, that probably wouldn’t be a very reliable option.
So, I use backup software to automate all that. I use a paid version of SyncBakSE, but there are lots of other options available. I know Windows has a built-in backup capability, for example, but I have no experience using it.
Wrap-Up
Admittedly, my approach is somewhat overkill, bordering on paranoia. I’m not suggesting that you should do the same; I’m just offering up some possibilities for your consideration.
Regardless of how you do it, please make regular backup copies of your logs or any other data that’s important to you. Someday, if your computer goes belly-up, you’ll be awful glad you did.
I’m not much of a programmer. I’ll be the first to admit that. But, now and then, I manage to cobble together a useful script using the Python programming language to make short work of repetitive, tedious tasks. Here’s an example.
I described my process for logging contacts in a previous post. Part of that process is keeping track of where I was at the time and what rig I was using. My main log in N3FJP’s ACLog uses the other fields feature to implement the ADIF tags, MY_QTH and MY_RIG. Adding that information to ADIF files being imported into my main logging program was time-consuming.
I had been using ADIF Master to add these fields and populate them. I still highly recommend ADIF Master but I wanted to see if I could automate things using Python.
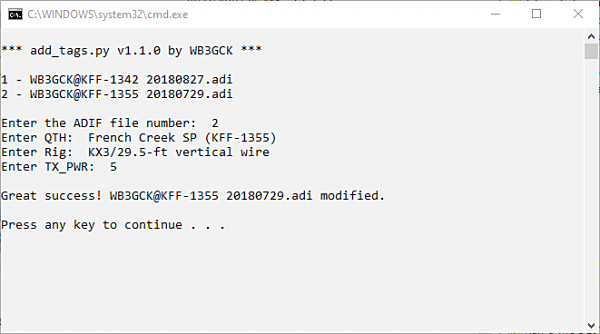
What I ended up with is a script that prompts me to enter my location and rig. If the ADIF file doesn’t already include a tag for TX_PWR, the script prompts me to enter my transmit power also. It then generates these new tags and inserts them in each record in the file. It takes me about 15 seconds to execute the script.
As I noted earlier, I’m no programmer. So, this code might not be the most elegant—or “Pythonic,” as they say—way to approach the problem. However, it does exactly what I needed.
Source Code
__author__ = "Craig LaBarge WB3GCK"
__email__ = "wb3gck at arrl.net"
__contact__ = "https://wb3gck.com/contact/"
__date__ = "5/03/2019"
__version__ = "v1.1.0"
# This script is used to add my custom tags to ADIFs exported from SKCCLogger or other programs.
# The script expects:
#     Files in ADIF located in the same working directory as the script
#     ADIF files must have a ".adi" or ".adif" extension.
import os
import sys
def listfiles():
    """This function finds all ADIF files in the working directory and prints out a listing with index
    numbers.  It returns a list of available ADIF files."""
    logs = []
    count = 1
    for filename in (os.listdir('.')):
        if '.adi' in filename:
            logs.append(filename)
            print(str(count) + ' - ' + filename)
            count = count + 1
    if not logs:   # Check for empty list; e.g., no PDFs found
        print('')
        print('Ooops! No ADIF files found!!  \nTerminating script...\n')
        sys.exit()
    else:
        print('')
        return logs
print('\n*** add_tags.py ' + __version__ + ' by WB3GCK ***\n')
# Prompt the user for the integer number corresponding to the desired message file.
# Check to make sure the input is within the proper range
good_file = False
file_choice = ''
file_list = listfiles()  # Get a list of ADIF files
file_in = ''
while not good_file:
    file_in = input('Enter the ADIF file number:  ')
    if not file_in.isdecimal():  # Check for non-numeric input
        print('Input must be a numeral!  Try again, Pal!')
        continue
    else:
        file_nr = int(file_in) - 1
    if file_nr < 0 or file_nr > (len(file_list) - 1):  # Check for out of range input
        print('Input out of range.  Better try that again, Bucko.')
    else:
        file_choice = file_list[file_nr]  # Sets the selected file name
        good_file = True
# Check the selected file for the presence of a TX_PWR tag
if ('TX_PWR' in open(file_choice).read()) or ('tx_pwr' in open(file_choice).read()):
    has_pwr = True
else:
    has_pwr = False
# Prompt user for the MY_QTH value
my_qth = input(r'Enter QTH:  ')
qth_tag = '<MY_QTH:' + str(len(my_qth)) + '>' + my_qth + ' '
# Prompt user for MY_RIG value
my_rig = input(r'Enter Rig:  ')
rig_tag = '<MY_RIG:' + str(len(my_rig)) + '>' + my_rig + ' '
# Prompt user for TX_PWR if there is no TX_PWR in the selected file
good_pwr = False
tx_pwr = ''
pwr_tag = ''
if not has_pwr:
    while not good_pwr:
        tx_pwr = input('Enter TX_PWR:  ')
        # Check for numerals and decimal points only
        try:
            val = float(tx_pwr)
            good_pwr = True
        except ValueError:
            print("Hey Bucko! Numerals and decimal points only!!")
    pwr_tag = '<TX_PWR:' + str(len(tx_pwr)) + '>' + tx_pwr + ' '
# Create the replacement tag
if not has_pwr:
    new_tags = qth_tag + rig_tag + pwr_tag + '<EOR>'
else:
    new_tags = qth_tag + rig_tag + '<EOR>'
# Modify the selected ADIF file
file = open(file_choice, 'r')
filedata = file.read()
# Replace the target string
if '<EOR>' in open(file_choice).read():
    filedata = filedata.replace('<EOR>', new_tags)
elif '<eor>' in open(file_choice).read():
    filedata = filedata.replace('<eor>', new_tags)
else:
    print('Are you sure this is a valid ADIF file?? \nTerminating script...')
    sys.exit()
file = open(file_choice, 'w')
file.write(filedata)
print('\nGreat success! ' + file_choice + ' modified.\n')
How to Run It
I run this script on a Windows machine, so this section is focused on that operating system. For Linux and Mac, you might need to do some research.
Make sure you have Python 3 installed on your computer. If not, you can get it for free at python.org.
Place the ADIF file you want to modify in the same folder as the script file.
Open a command window and navigate to the directory containing the script and ADIF file.
Start the script with the command: python add_tags.py. I use a Windows batch file to save some typing. Depending on how Python is installed on your system, you might be able to just double-click the script file.
Following the prompts, enter the necessary information. That’s all there is to it.
Screenshot of the add_tag.py script running
Some Precautions
This script doesn’t check to see if you have already modified the ADIF file. If you have, you’ll end up with redundant fields in your ADIF file. Your logging program probably won’t like that.
Always keep a backup of your ADIF file or have an easy way to regenerate it. If you make a mistake in one of your inputs, just start over with another copy of the ADIF file.
I’ve only included a minimal amount of error checking in the script, so it’s far from bullet-proof. Double-check each input carefully before pressing <ENTER>.
Disclaimers
Of course, no article on software is complete without a disclaimer or two.
Use this script at your own risk. It works for me, but I make no guarantees that it will work for you.
I can’t offer any technical support or tailor it to your application.
So there you have it. If you find yourself having to routinely add fields to an ADIF file—maybe not, but you never know—feel free to modify this script to suit your needs. It should be easy to adapt it to add other ADIF tags.
If you want to dabble in Python programming, Google is your friend. There are tons of resources out there for learning Python.
Going all the way back to my Novice days in the mid-70s, I’ve always been a bit anal… er… diligent, when it comes to logging contacts. Years ago I started using logging software and that diligence persists. Over the years, I’ve evolved to a logging process that I’m sure some would find overly complex. It’s actually not that bad and it works well for me.
I use a variety of methods to capture QSO information. Eventually, everything ends up in one central log. From there, all QSOs are uploaded to Logbook of the World (LoTW). The diagram below shows how everything ties together.
Overview of my logging process. In the end, all contacts end up in the Main Log.
Here are the main components of my logging system:
ACLog. I use this software by N3FJP for my main log. All QSOs, no matter how they are made or logged wind up in here. Because most of my HF operating is done while portable, I added a few custom fields to keep track of where I was (MY_QTH), what rig I was using (MY_RIG) and what power I was running (TX_PWR). Everything in my main log gets uploaded to LoTW. ACLog makes it very easy to do that. For casual operating at home, I enter the contacts directly into ACLog. Same goes for paper logs from portable operations with just a few contacts. For larger batches of contacts, I might resort to other methods.
ADIF Master. I use this great piece of freeware a lot. It allows me to take an ADIF file and easily add in the custom fields I keep track of and do a quick bulk edit to populate the fields for all QSO records in the file.
Fast Log Entry (FLE). I wrote about this software in an earlier post. This came in handy last year for National Parks on the Air activations. When I used paper logs for activations, FLE gave me a fast way to enter the QSO data and generate an ADIF file.
SKCC Logger. I use AC2C’s SKCC Logger software to log all of my Straight Key Century Club contacts. This software does automatic lookups from the SKCC member database when you enter a callsign. It also helps keep track of award levels and generates award applications. From SKCC Logger, I generate an ADIF file for further editing and importing into ACLog.
fldigi. Every now and then I get on a digital mode kick. Initially, I use fldigi’s internal log and export an ADIF file. I haven’t worked JT65 or JT9 in a while but, when I do, I export an ADIF file from the WSJT-X software.
HamLog. When I’m away camping for a few days, I use HamLog on Android cellphone to log my contacts. If I have a cell connection, I can do QRZ.com lookups while logging a contact. I export an ADIF file when I get home. After, editing the ADIF and successfully importing it into ACLog, I go back to HamLog and clear out the log file so I’m ready for the next trip.
Contest Loggers. When I use a specialized contest logging program for a contest… Well, you know the drill. I export an ADIF file, edit in my custom fields, and ingest it into ACLog.
So, that’s it in a nutshell. It probably sounds complicated but it has all become second nature to me. I’m not suggesting that you do the same but, perhaps, some of the utilities and techniques will be useful to you.
I recently discovered a very useful piece of software. Fast Log Entry (FLE) is a small text editor that lets you quickly get your QSO information from paper logs onto your computer. I originally installed FLE about a month ago but I didn’t immediately see its benefits. After taking a closer look at it, I have now added into my logging utility “toolbox.” FLE is a free download from DF3CB, although donations are welcomed. It is a Windows application but it runs great on Linux under Wine.
Here’s a typical use case for me. Quite often, I’m operating portable and logging my contacts in a small notebook. If there’s a small number of contacts, I could just enter them into N3FJP’s ACLog, which I use for my main log. However, entering into ACLog can be a little tedious if I have a significant number of contacts to deal with. This is where FLE comes into play.
FLE provides a simple, keyboard-only, way of entering the information. It uses a very simple format for the information. To get started, you enter the date in the format YYYY-MM-DD. Then, enter the band (e.g., 40m, 20m, etc.). Similarly, for the mode, you can just enter it (like “CW” or “SSB”). See the screenshot below for an example.
Fast Log Entry (FLE) main screen
You can now start entering your contacts. Once you enter a contact at a particular time, you only need to enter the portion of the time that changed for the next contact. For example, let’s say you worked a station at 1510 and another at 1511. After you enter the contact at 1511, you only have to enter “11” (i.e., just the minutes) for the next contact. If you run a string of stations, you only need to note the time periodically in your paper log (say every 5 or 10 minutes). FLE will interpolate the time for your contacts after you enter them if you like. Also, there’s no need to worry about capitalization; FLE takes care of that. You can enter RST (send and receive) information, or let it default to 599 or 59. You can populate the “comments” field by enclosing the comment in angle brackets <>. You can also add grid square information by prefacing it with a pound sign, like “#FN20.”
After you have finished entering your contacts, you can easily export an ADIF (Amateur Data Interchange Format) file for ingesting into your logging program. FLE will also let you create a Cabrillo file for contest submissions.
My brief attempt at describing FLE probably doesn’t do it justice. I recommend going to the author’s website to download a copy and taking it for a spin. Be sure to check out the step-by-step instructions on the website. Another great resource is a video by VK5PAS. He gives a very thorough introduction to FLE and explains it much better that I can. Although his video is targeted at the WorldWide Flora and Fauna program, it is a great tutorial on using FLE.
So, if you do a lot of portable operating with paper logs (think SOTA, NPOTA, IOTA, WWFF, etc.), take a look at FLE.
I’m planning to take part in ARRL’s National Parks on the Air (NPOTA) event next year. In fact, I plan to activate Valley Forge National Historic Park on New Year’s Day. It will likely be cold so I plan to operate “stationary-mobile” from the cab of my pickup truck. I suspect there will be a lot of “chaser” stations so I’m planning to use a computer for logging and sending CW.
I considered a couple of options. One is to use N3FJP’s ACLog on my Windows laptop. I use ACLog for my main log and I’m very comfortable with it. The drawback is that my Windows laptop might be a bit large for the cramped cab of my little truck. That led me to using my little Acer netbook computer, which runs Ubuntu Linux.
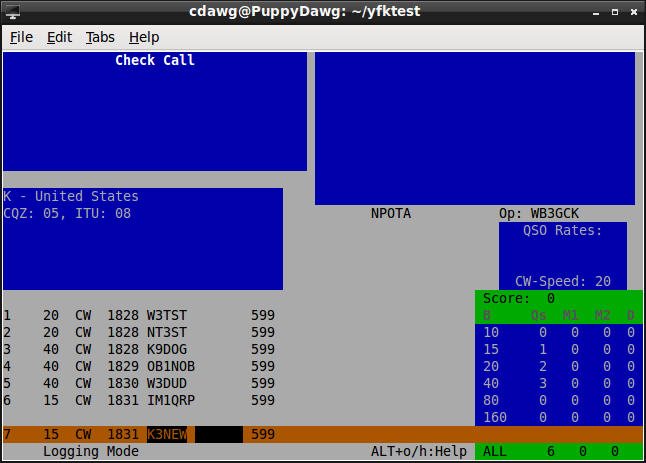
In my search for a contest-type logger for Linux, I tried several programs before stumbling across one called YFKtest. YFKtest satisfied my three main requirements for a logging program:
It has to be simple to use with keyboard input only; I don’t want to have to use a mouse.
It needs to provide programmable CW messages and be able to key my transmitter.
It has to have the ability to export logs as ADIF files that I can import into my main log.
YFKtest main entry screen
Fabian DJ1YFK is YFKtest’s original author while Bob Finch WY9A currently maintains the software. Since it has been around for a while, the code base is stable. YFKtest is a PERL program, so it runs under Linux. It supports a large number of contests, including some QRP contests. It generates CW over a serial or parallel interface, as well as via Winkey. It works with the same serial interface that I use with the N3FJP software, so that’s a plus. If you are so inclined, YFKtest will do rig control using the hamlib utilities. It also generates ADIF, Cabrillo and contest summary files.
YFKtest screenshot showing my custom CW messages
Installation on Linux was straight-forward. The user interface is a bit “old school,” compared to other logging software. It was, however, easy to configure and use. For NPOTA use, I took the “DXPED.def” definition file for DXpeditions and made a few minor tweaks to it. To give myself some peace of mind, I created a cron job in Linux that automatically backs up my log files to an SD memory card every 15 minutes.
YFKtest is hard coded for “599” or “59” signal reports. There may be a way to accommodate honest signal reports, but I haven’t explored that yet. Since LoTW doesn’t use signal reports, this is a non-issue for NPOTA logging.
Bob Finch’s support is top-notch. During my initial testing with it, I reported a bug in the ADIF files. In a day or two, Bob uploaded a fix. You can’t complain about support like that.
So, I’m going to give YFKtest a shot for my New Year’s Day operation. I’m anticipating a lot of NPOTA activity on the first day and that YFKtest will help me keep up with it!