After some damaging storms this week, we were blessed with some great weather for the weekend. Today was a perfect day to head outdoors for the annual Cookie Crumble QRP Contest.
The Cookie Crumble is a QRP contest run by Tim Carter W3ATB and Emily Saldana WC3R. It was inspired by the cookies that Emily used to make during the 2016 National Parks on the Air event. You get bonus points for working stations designated as Cookie Monsters. What’s unique about this contest is that you lose points for working Burnt Cookie stations. In any event, it’s a lot of fun.
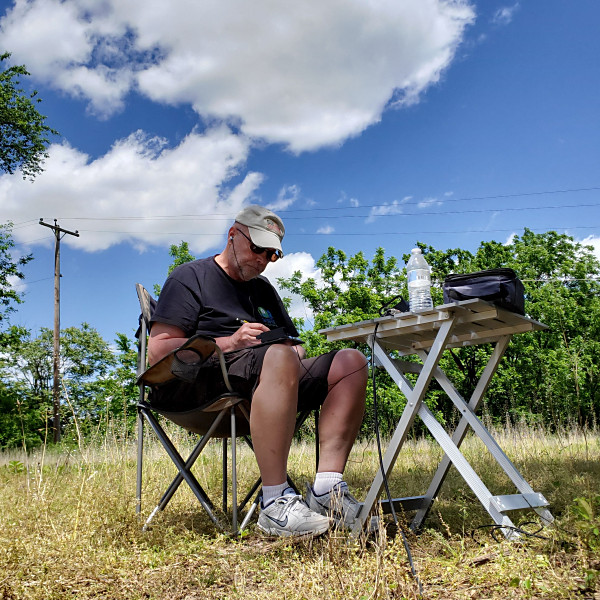
My set up for the Cookie Crumble QRP Contest.
This year, I headed out to my daughter’s farm to operate from one of the fields. My setup was almost identical to the setup I used last weekend. I used a half-square antenna made from cheap speaker wire, along with my KX3. I set up my chair under a shady tree—for a while, at least.
I wasn’t out for too long, but I worked 10 stations in the contest. One of those was a Cookie Monster station. Fortunately, I didn’t encounter any burnt cookie stations.
Some of the highlights from today included:
My first QSO was with my old friend, Carter N3AO, down in Virginia. It was great to hear him again.
I worked VE2DDZ, who was doing a joint Cookie Crumble and SOTA activation. Malcolm had a great signal into Pennsylvania.
Outside of the contest, I worked WD8RIF who was doing a Parks-on-the-Air (POTA) activation from Ohio.
WB3GCK hard at work (or hardly working) in the Cookie Crumble QRP Contest.
After a while, I began to lose my shade and I was starting to get a little sunburned. Right before I started tearing down, I heard another old friend, Dan KA3D, very faintly. I gave him a couple of calls but, sadly, he couldn’t hear me. We were probably a little too close for 40M. Maybe next time.
It was a great day to be outside playing radio. I also got some more on-the-air experience with my homebrew half-square antenna, which I’ll document in my next post.
Thanks for Tim W3ATB and Emily WC3R for running this fun contest.
It was a beautiful day yesterday, here in southeastern Pennsylvania. I hadn’t done any portable operating lately, so this was a perfect day to get out there to test a new antenna I built.
I headed back out to the property my daughter and son-in-law own. They are in the process of restoring an old farmhouse on a large piece of land. Like my last outing there, I had the place to myself.
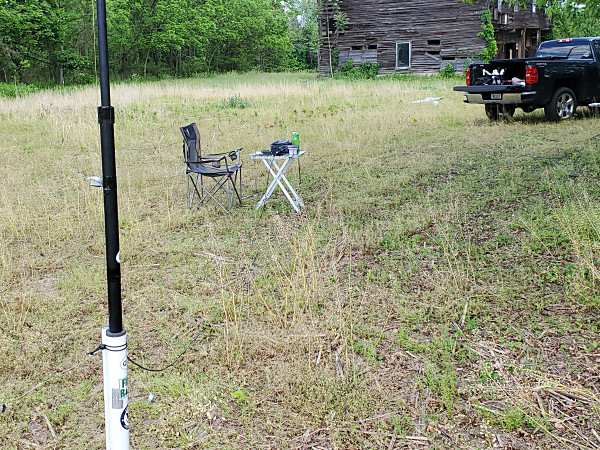
I mentioned in a previous post that I had built a half-square antenna out of speaker wire. So, I set it up in what had been a cornfield and gave it a go.
My setup out in what had been a cornfield. The old barn in the background is slated to be replaced later this year.
The bands were wall-to-wall with participants in the CQ WW PX Contest. While I was playing around with the antenna, I worked several contest stations on 40M, 20M, and 15M. Running five watts, I was able to work most of them on the first call. Contesters, of course, have exceptional ears.
All in all, I was pleased with the half-square antenna. I used a slightly different approach to this antenna, which gave me some multi-band capabilities. The KX3 was able to load it up from 80M through 6M. A detailed post on this speaker wire antenna project is in the works.
After two months away from it, it sure felt great to be back out in the field again playing with the radio.
I mentioned in a previous post that I was going to venture into the digital voice modes. Well, I did. I was successful in getting a hotspot up and running, although I did hit a snag along the way.
Yeah, I know; as usual, I’m late to the party on this stuff. Up until now, I’ve had only limited experience with D-Star. Years ago, I used a borrowed Icom ID-1 for 1.2GHz data during a couple of ARES-RACES exercises. I hadn’t used D-Star again until I bought a Kenwood TH-D74A six months ago. Even then, I had only used D-Star to check into a local ARES-RACES net over a nearby D-Star repeater.
My local ARES-RACES group here in Chester County, PA, held one of our monthly Tech Rallies using Zoom. Jim WA3NOA gave an interesting talk on digital voice hotspots. Inspired by Jim’s talk, I went ahead and ordered an MMDVM hotspot from Amazon.
While waiting for the hotspot to arrive, I started studying up. I found lots of great articles and videos out there. W6GPS’s videos on the TH-D74 and D-Star were particularly helpful. Following one of his videos, I picked a hotspot frequency and programmed it into my radio.
The hotspot arrived a few days later. I was immediately struck how tiny this thing is. The instructions that came with it were sparse but clear enough to get started. I was able to successfully connect my laptop to the hotspot’s internal WiFi hotspot and access the Pi-Star configuration screens.
MMDVM Hotspot in use
Long story short… Before too long, I had the hotspot connected to my home WiFi network and had the D-Star section configured. I keyed up my radio and received the expected D-Star response from the hotspot. Then, I tried to connect to some reflectors. No matter which one I tried, I got a “reflector is busy” message on my radio. Hmmm…
I sent screenshots of my hotspot configuration screens to Jim, but he didn’t see anything out of wack. I next focused on my WiFi router. I tried connecting the hotspot to other WiFi networks. No joy.
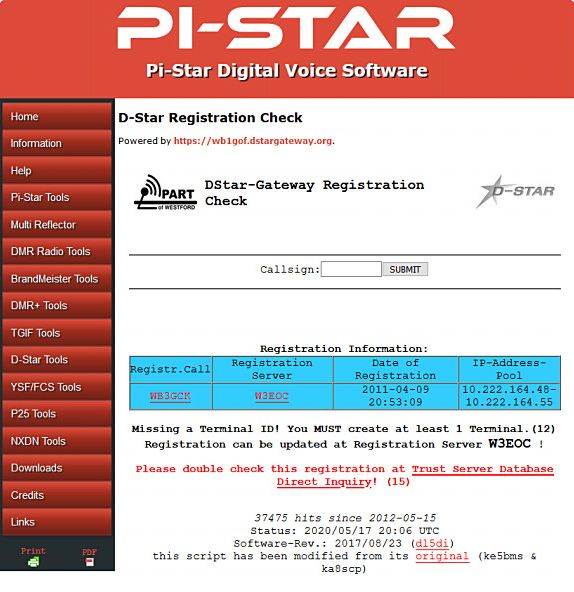
Finally, I went out and checked the status of my D-Star registration. That showed that my registration from way-back-when was missing a Terminal ID. An email exchange with WA3NOA confirmed that was likely my issue. My D-Star registration password no longer worked, so I reached out to Jim W3BIF, the admin for the W3EOC D-Star repeater.
My faulty D-Star registration. This turned out to be the cause of my hotspot problem.
The next morning I had an email from W3BIF saying he had straightened out my incomplete D-Star registration. Within minutes, I was connected to a reflector and having a QSO with a ham in Georgia. He reported that my audio sounded great.
I used to be one of those guys who thought this stuff isn’t real ham radio. I guess I’ve come around a bit. I won’t be giving up CW any time soon, but I will admit it has been fun playing around with this new (to me)mode over the past week.
Over time, I might branch out to try some other digital voice modes. In the meantime, you can often find me monitoring D-Star reflector, REF20A or REF30C.
I haven’t been posting much here lately. The COVID-19 pandemic and other family obligations have been cutting into my ham radio activities. Nevertheless, I do have a few projects in the works.
A few weeks ago, I started another project in my ongoing series of speaker wire antennas. This one will be a variant of the bi-square antenna. This antenna has the potential to be a little more field-friendly than the delta loop I tested last month. It’s all built; I just need to get out somewhere to set it up and see how it works.
I’ll file my next project under the category of Old Dogs/New Tricks. Back in December, I bought a Kenwood TH-D74a HT. That gave me the ability to reach a nearby D-Star repeater. This week, I purchased an MMDVM hotspot to go along with it. I plan to spend some time in the coming days getting it set up. I’m hoping to be able to eventually connect to the DMR talk groups used by my ARRL section and local ARES-RACES groups. Fortunately, my local group has some experienced hotspot users I can consult if I run into any snags. Wish me luck.
Sadly, our camping season with our little QRP Camper is off to a late start. State park campgrounds in our area have been closed due to pandemic. We have reservations at a state park in Maryland next month, however, and it looks that might be our first trip of the year. I’m looking forward to a little QRP-portable operating from the camper.
My local QRP club has started making plans for Field Day. We have a set of social-distancing guidelines we’ll be following this year. We’ll be limiting the number of participants, keeping our tents at least 10 feet apart, and eliminating common eating areas. Also, we won’t be sharing stations and equipment. This year’s Field Day will be different, for sure.
Other than that, I’ve been active on our local ARES-RACES nets, and I have been checking into the Pennsylvania NBEMS Net on Sunday mornings.
You can also find me on 40M or 80M CW in the evening. I usually hang out around the SKCC watering holes.
I’ll be posting more on all of this stuff in the coming weeks. Until then, stay safe, and I’ll see you on the air.
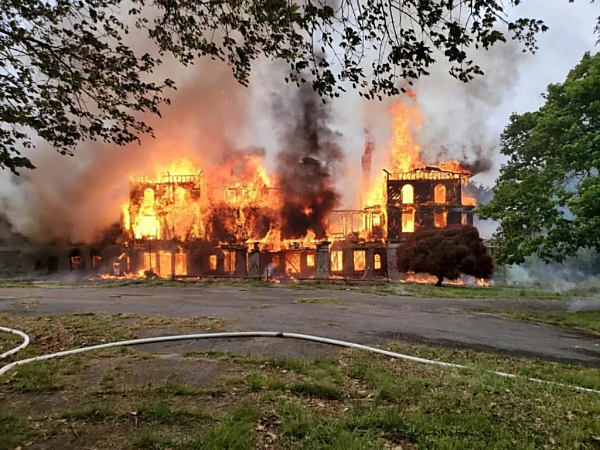
I came across a news item posted in one of the U.S. Navy Facebook groups I follow. There was a fire at what is left of one of my duty stations from back in the early 1970s. It was where I went through Navy Radioman School and learned the Morse Code.
The fire at the former Bainbridge U.S. Naval Training Center in Port Deposit, Maryland. I don’t recognize the building in this picture. (Photo: Maryland State Fire Marshal/ Facebook)
I was stationed at the U.S. Naval Training Center, Bainbridge, in Port Deposit, Maryland, from November of 1970 through April of 1971. The base was very old then, but there was some history to it. Bainbridge first served as a Navy training center for new recruits (aka boot camp) during World War II. After that, it was home to a variety of Navy schools, including the Radioman School that I attended.
The old wooden barracks were pretty decrepit, by the time I got there. While the accommodations at Bainbridge weren’t the best, I still have some good memories of the short time I spent there.
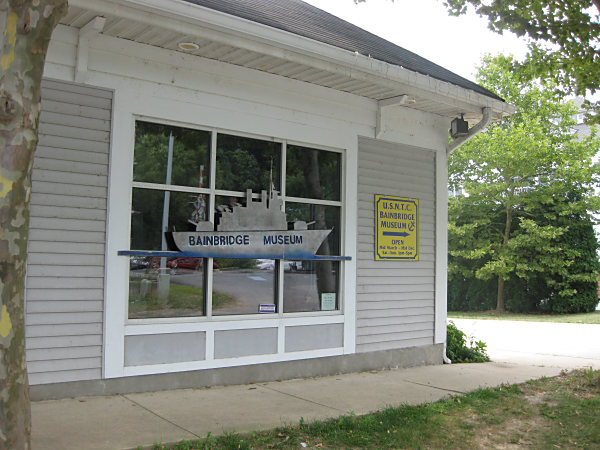
The Navy deactivated the base in 1976, and the expansive property has been mostly vacant and over-grown since then. Fortunately, the Bainbridge Museum is just down the road in Port Deposit, Maryland. They have captured a lot of old photographs and items from the old base. I paid a visit to the museum back in 2009. It was a walk down Memory Lane for sure.
The Bainbridge Museum in Port Deposit, Maryland
So, thanks to Bainbridge Naval Training Center for getting me formally trained in radio and CW. Almost 50 years later, I’m still using much of what I learned there.
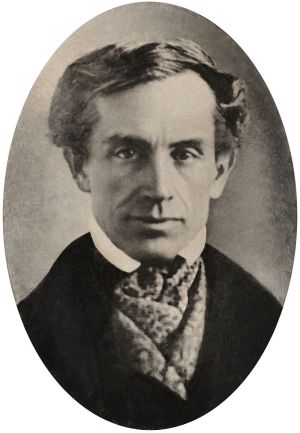
It’s that time of year again. Today is Morse Code Day. Celebrated each year on April 27th, Morse Code Day coincides with the birth of Samual F.B. Morse (1791-1872).
Samuel F.B. Morse (circa 1840)
Morse contributed to the development of the single-wire telegraph and developed the encoding method, which bears his name. But, of course, you probably already knew that.
I’m always amazed that I still use a means of communication that was first used in 1844. CW has been my favorite mode since I learned the code in Navy Radioman school nearly 50 years ago.
So, have a happy Morse Code Day. I hope to hear you on the air today!
[This is an updated version of an article that originally appeared on my QSL.NET website.Although it’s twenty years old, I still occasionally hear from people who have built similar tuners.]
Antenna tuners (more accurately referred to as “transmatches”) make great homebrew projects; they are reasonably simple to build and, when finished, provide a useful piece of equipment. Every shack should have (at least) one. I built this one a couple of decades ago, and it’s still in use.
WB3GCK Z-Match Tuner – front panel
For this project, I decided to try my hand at building a Z-Match tuner from scratch. This type of tuner has been around for a while. While the Z-match can take on several variations, what distinguishes it from other circuits is that it is a resonant circuit that uses a fixed inductor.
WB3GCK Z-Match Tuner – rear panel
Z-Match tuners became very popular within the QRP community years back, thanks primarily to articles in QRP journals by Charlie Lofgren W6JJZ and the emergence of Z-Match tuners in kit form. Emtech sold its wildly popular ZM-2 kit commercially and the NorCal QRP Club began selling their BLT tuner kit (a W6JJZ design) like hotcakes.
Some Pros and Cons
Why the popularity? Here are some advantages that the Z-match design offers:
Matches balanced loads without the use of lossy baluns.
Being a parallel resonant circuit, the Z-match can provide some band-pass filtering for your receiver and harmonic attenuation for your transmitter.
A well-designed Z-match tuner has a high Q and is more efficient (less lossy) than other types of tuners.
The fixed inductor simplifies construction (no taps or rollers needed).
Using a toroid inductor and some small poly-film variable capacitors, the Z-match can be built into a very compact package. This sort of thing usually appeals to QRPers.
There is, of course, no free lunch here. Here are some disadvantages of the Z-match design:
Tuning is usually very narrow and can be a bit touchy sometimes
The range of impedances that can be matched is not as great as in other designs, such as the “T” configuration.
Design and Construction
I make no claims of originality for anything in my version of the Z-match. I based it on a classic design which was first appeared in SPRAT #84 (see the G3YCC web site for a schematic of the original design). This design, by the way, is similar to the one used in the Emtech ZM-2.
I incorporated a few modifications in my version, based on an article by W6JJZ (“The Z-Match: An Update”, QRP Quarterly, July 1995, pp 10-11). First, instead of the T-200-2 toroid specified in the SPRAT article, I used a T-200-6 core. W6JJZ recommends the Type-6 core over the Type-2 because it provides a higher Q over most of the HF range. The number of turns has to be adjusted for the Type-6 core, due to differences in permeability. Here again, I went with W6JJZ’s suggested turns count. Another reason for choosing the T-200-6 core was that I happened to have one in my junk box. How convenient!
Z-Match Tuner Schematic
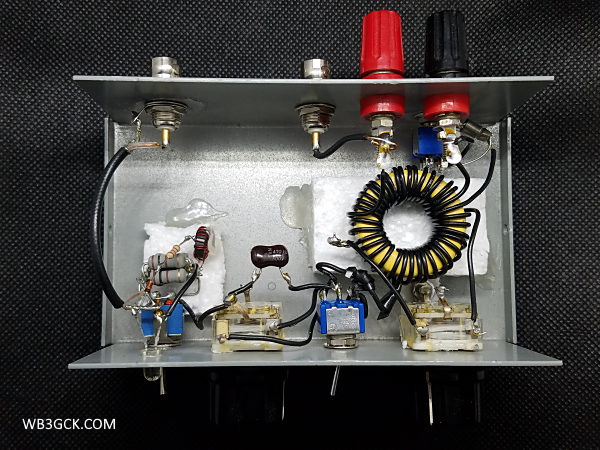
The coil was wound using some #22 solid hookup wire (from Radio Shack) which I had laying around. The secondary winding is wound between the turns of the primary to ensure tight coupling. I added a toggle switch to ground one side of the secondary winding to accommodate single-ended loads (like a random wire). A piece of styrofoam was glued to the bottom of the enclosure to provide some support for the toroid and to keep it away from metal surfaces.
WB3GCK Z-Match Tuner – Inside view
Another W6JJZ modification I used was the inclusion of a DPDT (center off) toggle switch to provide some flexibility with the input capacitor. Using this switching arrangement, I can select between one section of the capacitor, both sections in parallel, or both sections in parallel with a fixed 470pF mica capacitor. The extra input capacitance can sometimes be helpful on the lower frequencies.
The capacitors are poly film variable capacitors (2 sections @ 365pF each), which were originally purchased from Mouser Electronics. Unfortunately, Mouser no longer carries them, and I don’t know of another commercial source. I should have purchased a truckload of them when they were available! Similar capacitors with smaller values are still available if you look around.
The SWR bridge I used is a Dan Tayloe LED SWR indicator from a kit that was offered years ago by the Arizona scQRPions. It uses a resistive bridge circuit with a single LED to indicate a null when the bridge is balanced. For the 50-ohm resistors in the bridge, I substituted 2 100-ohm, 1-watt resistors. The bridge will handle a typical 5-watt QRP rig without flinching and could probably handle a bit more than that.
SWR Bridge Schematic
The whole thing was packaged in an enclosure which measures 3 x 5 x 2 inches. It certainly could have been built into a smaller package, but I had this enclosure on hand and decided to put it to use.
On the Air
To use the Z-Match, adjust the capacitors for a null in the background noise in your transceiver. That will get you close to a match. Then, switch in the SWR bridge, apply some RF, and tweak the capacitors for minimum brightness on the LED. There may be some interaction between the two capacitors, so you might have to go back and forth between them a time or two.
For an initial test, I hooked it up to the famous—in my mind, at least—WB3GCK Downspout Antenna. The little Z-match loaded up the downspout on 40 through 10 meters with no problems. On most bands, I could get the LED indicator to go completely out. On one or two bands, I couldn’t get it completely extinguished, but it did give a definite null. Double-checking with a second SWR bridge indicated that the SWR was 1.5:1 or less in this condition. While tuned up on 40 meters, I had a quick QSO with a station near Chicago from here in southeastern Pennsylvania with 3 watts.
Wrap-Up
This little Z-Match tuner was one of my favorite—and most useful—projects. It’s a great accessory for QRP rigs that lack an internal tuner or SWR meter.
Like many of you around the world, I’m under a stay-at-home order, due to the pandemic. Taking advantage of my new-found spare time, I decided to take care of some overdue antenna maintenance.
I’ve been using my rainspout as my main antenna at home since 1993. It’s a compromise antenna, but it has given me a way to get on the air from my real estate-challenged home. Normally, I do some routine maintenance on it annually, but I’ve been lax lately. It’s been about two years or more since I’ve cleaned up the connections. This was the perfect time to get caught up.
My normal maintenance routine is to re-do the connections at the downspout. The connections are subject to exposure to the elements on the outside and rainwater coming down the inside. The downspout is on a south-facing side of the house, so the sealant on the connections also takes a beating from the sun.
Sometimes, my maintenance reminder is when I notice a change in antenna performance. Typically, it’s a change in the tuning. I might notice, for example, problems loading up on one or more bands. This time, it was an increase in noise levels.
So, I headed out to the downspout and removed the screws I use to make the connection. I had to scrape off enough of the sealant I use to get a screwdriver in there. Next, I took some light sandpaper and sanded around the connection points. A few times over the years, I drilled new holes for the connections. This time, I just needed to clean things up a bit.
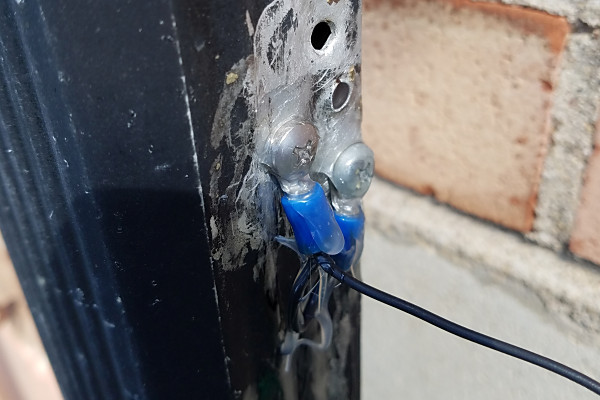
I use two ring lugs, jumpered together, to make the connections (see photo). My rationale is that two connections are better than one. If needed, I replace the ring lugs and the screws, but this time, they were still in good shape. I just cleaned them up a bit and reinstalled them. I finished up by resealing everything with a generous amount of Goop® sealant/adhesive.
This is the connection to the downspout. Two ring terminals, jumpered together, are used to ensure a good connection. I used a liberal application of Goop sealant to weather-proof the connections. (A second coat was applied after this picture was taken.) You can see some holes from previous connections. (Note to Self: Do some touch up painting on the downspout!)
Next, I moved indoors and turned my attention to the ground connections.
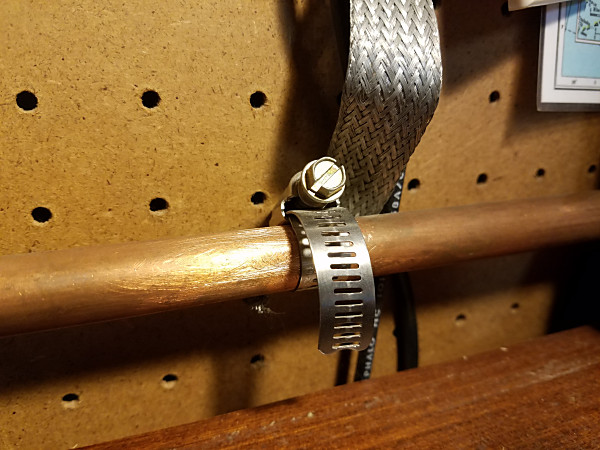
I have a 1/2-inch copper pipe that I use as a ground bus for my station. The pipe runs across the back of my radio desk to an incoming cold water pipe about 6 feet away. I use hose clamps and braided strap to make the connections to it. The 1:1 unun that feeds the wire out to the downspout is also grounded to the pipe with a braided strap and a hose clamp. The pipe itself is connected to the incoming water pipe with hose clamps and a short braided strap.
I couldn’t remember the last time I cleaned up these connections, so, it was time to get busy. I removed the connections to the copper pipe ground bus and cleaned up the pipe with light sandpaper and steel wool. I reinstalled everything, making sure the connections were tight.
Turning on my transceiver, I was pleasantly surprised with the fruits of my efforts. My local noise levels have always been high, and 40M has been the worst lately. The noise was S5 or S6 at times, but now it was down to S1 or S2. The noise on 80M was also an S unit or two lower.
One of the ground connections at the operating position. The braid strap goes to the ground terminal on my 1:1 unun. The other end of the copper pipe ground bus uses hose clamps and a short piece of braid to connect to the cold water pipe coming into the house.
I wish I had taken care of this maintenance sooner. Next time, I’ll try not to procrastinate.
Stay safe in these difficult times. I’ll see you on the air.
Here’s an example of what can happen when you have a hunk of cheap wire and a little too much time on your hands.
Years back, I did a write-up on a simple, random wire antenna made from a 50-foot roll of speaker wire from a local dollar store. I nick-named it the Dollar Store Special. I had a similar roll of wire in my junk box, so I set out to see if I could build another useful portable antenna from it.
This time out, I wanted to build something more elaborate than a random wire. After some sketching with a pencil and paper, I came up with this simple portable delta loop.
There are certainly better ways to construct a delta loop. However, I just wanted to see if I could build a functional antenna using only cheap speaker wire. So, with that in mind, here’s how I did it.
The Design
The antenna I built was inspired by a portable delta loop designed by Doug DeMaw, W1FB. [1] Doug’s multiband delta loop was designed for the 40M band and used a 300-ohm balanced feeder.
According to Doug’s book, this type of antenna should work well on the fundamental frequency and higher. For the next band below the fundamental, he suggests connecting the feeder wires together and using it like a random wire. I figured I’d just try loading it up as is to see what happens.
Given that I constrained myself to a 50-foot roll of speak wire, I scaled my antenna for the 20M band. Using the formula, 1005 divided by the frequency in megahertz, I calculated a total length of 71 feet (21.6 meters) for the center of the 20M band. That would leave some of the two-conductor wire for an improvised balanced feeder.
Feeding the delta loop in a corner (with the apex of the loop pointing up), gives the antenna vertical polarity with a low take-off angle.[2] As with most antennas, higher is better. However, this antenna is still quite useful at practical heights in the field.
Since a tuner will always be necessary, I expended no effort trying to optimize the design.
Construction
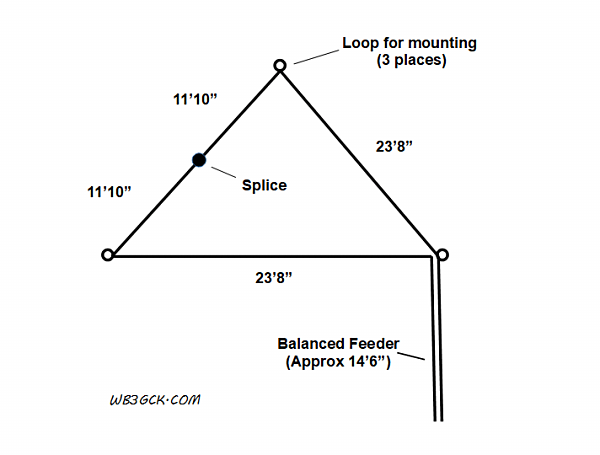
Schematic diagram of the delta loop antenna
If you’re a visual person like me, refer to the diagram to help make sense of the directions below.
Measure off 35.5 feet from one end of the speaker wire. Place a small zip-tie around the wire at this point.
Separate the 35.5-foot end of the speaker wire into two separate wires.
Strip and solder the loose ends of the 35.5-foot wires together. Put some electrical tape or shrink tubing over the splice.
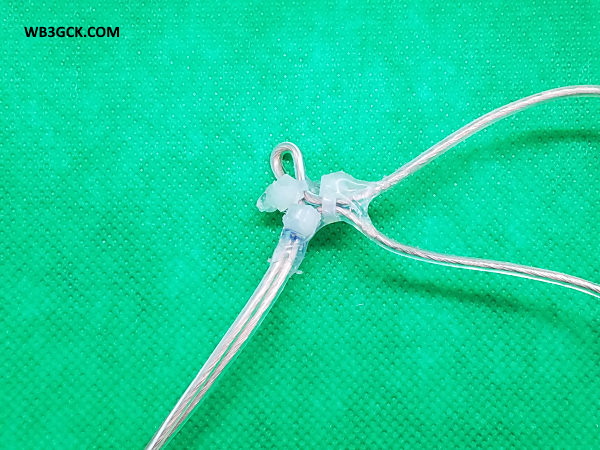
Make 3 small loops in the wire, as shown in the diagram. You can see an example in the accompanying photo. These are going to be the attachment points. I used some Goop® adhesive on the zip-ties to help hold things in place.
Finally, install some spade terminals on the ends of the shorter conductors. These will be used to attach the antenna to your tuner or balun.
Example attachment point. This is the feedpoint of the antenna. The two wires to the right are part of the loop antenna, while the wires towards the bottom serve as the balanced feedline. I used some Goop® adhesive on the zip-ties to help hold them in place.
Deployment
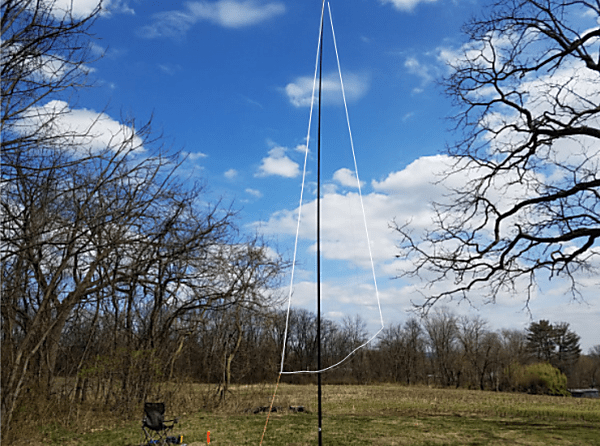
For my initial tests, I used a 28-foot Jackite pole to support the antenna. I only partially-extended the pole, such that the bottom of the antenna was about 4 to 5 feet off the ground. I used some nylon twine and a couple of tent stakes to tie off the two bottom corners.
This is the delta loop set up for my intial testing. The light-colored wires were difficult to photograph, so I enhanced them for visibility.
The setup was somewhat more complicated than most portable antennas I use. It took me about 20 minutes to get it set up, but I suppose that wasn’t too bad for my first time.
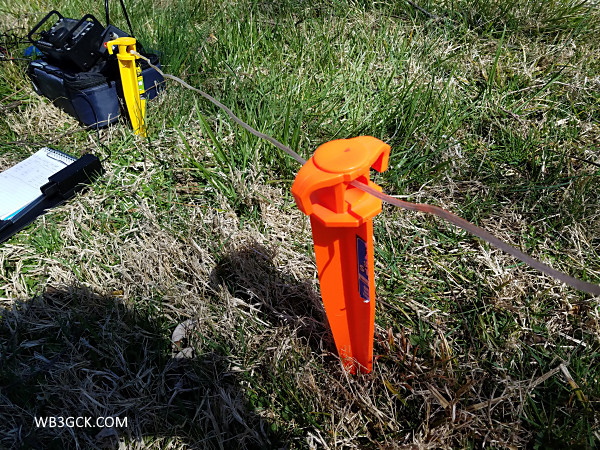
I used a couple of large tent stakes to keep the feedline off the ground. I connected the antenna to my KX3 using a 4:1 balun and a 1-foot piece of coax.
I used a couple of large tent stakes to keep the balanced feedline portion of the antenna off the ground.
Results
I first did a quick check to see what bands the KX3’s internal antenna tuner would handle. I found that I could load it up on every band from 60M through 6M, although I couldn’t get the SWR below 2:1 in the low end of 40M. That’s not surprising for a 20M loop, I suppose. I did have a usuable match between 7.030 and 7.060, where I normally operate.
I was only about 50 yards away from some powerlines, but the loop seemed quiet on receive.
On 20M, a French station answered my third CQ. I also made contacts with Missouri and wrapped up with yet another French station.
From the signal report the last station gave me, this antenna appears to do reasonably well with DX on 20M running QRP. It was a chilly and windy day, so I didn’t stay out there to try for contacts on other bands.
Wrap-Up
Although my initial outing with this antenna was promising, I need to spend some more time using it on bands other than 20M. In any event, it was a fun—and cheap—antenna project.
73, Craig WB3GCK
References:
[1] DeMaw, D. (1991). Technical Bits & Pieces. In W1FB’s QRP Notebook (2nd Edition, pp. 157–161). Newington, CT: QST. [2] DeMaw, D., & Aurick, L. (1984, October). The Full-Wave Delta Loop at Low Height. QST, 24–26.
With the COVID-19 pandemic, I have been spending a lot of time at home lately. We had some decent weather today, so I went out to do some portable operating while practicing social distancing.
My daughter and son-in-law recently purchased an old farmhouse that they are restoring. The farmhouse is located on a large piece of property with plenty of room for QRP-portable operating. No one was there today, so I had all that acreage to myself. That made the social distancing thing easy.
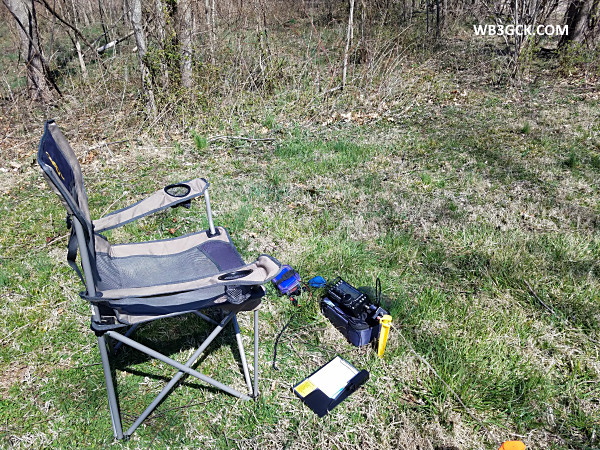
I had a portable delta loop antenna that I built a year or two ago but never tested. Today seemed like a good time to try it out. I set the antenna up behind an old barn and operated my KX3 from a camp chair. (I’ll be doing a detailed write-up on this antenna soon.)
My operating position today
I spent some time seeing which bands the KX3 would tune. Once that initial testing was done, I tuned up on 20M and started calling CQ. After the third CQ, I received a call from fellow SKCC member F8FSC in France. We both struggled with fading, but I was thrilled that he heard my meager 5-watt signal.
I bumped my power up to 10 watts to improve my odds. I heard N3PDT calling CQ from Missouri and gave him a call. We exchanged SKCC numbers and chatted for a bit.
Tuning down the band, I heard F6HKA booming in from France. I sent my callsign once, and he got it the first time. Bert gave me a 549 and said I was peaking at 569. We exchanged SKCC numbers and chatted for about 10 minutes before signing. I’ve worked Bert many times, and it’s always a pleasure.
It was sunny but somewhat chilly and windy out there today. As I was working Bert, though, it started getting cloudy. I was starting to feel the cold, so I figured it was a good time to pack up and head home.
It felt great to be playing radio outside and not thinking about the pandemic.