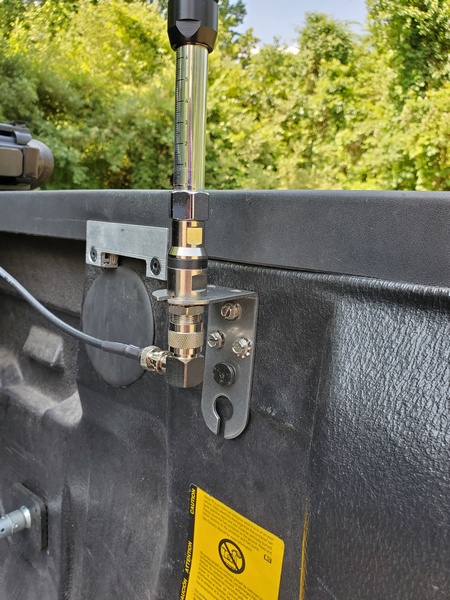
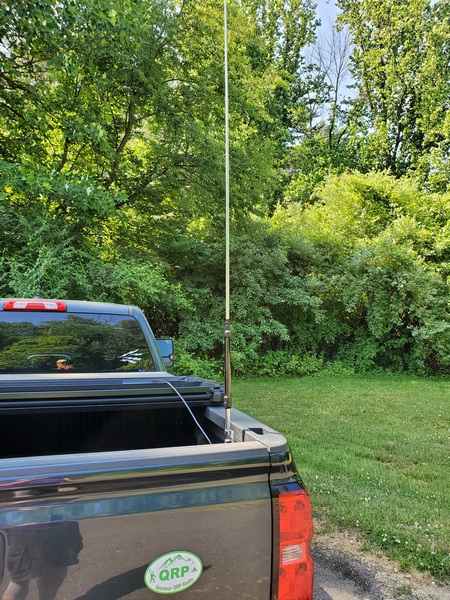
Back in December, Becky Schoenfeld W1BXY, Editorial Director for ARRL’s On the Air magazine, asked me if I would be interested in writing a detailed set of step-by-step instructions for my Drive-on Portable Antenna Support. Naturally, I said I would.
I submitted my manuscript, along with an all-new set of pictures. The article was published in the current issue (May/June 2024) of On the Air (pages 20-22).
If you’re interested, have a look. ARRL members have access On the Air as part of their membership.
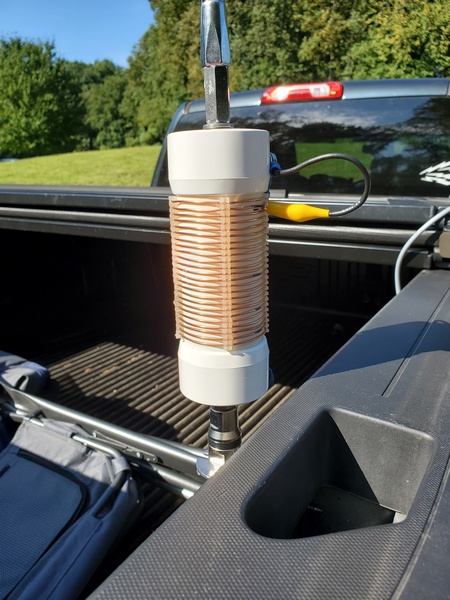
I’ve been toying with buying a 17-foot telescopic whip for some time now. I didn’t really have a pressing need for it, since my 12-foot whip has been doing a great job for me. As a result, I kept talking myself out of buying it—until now. When I heard the news that MFJ was shutting down production, I figured I might as well buy one while they’re still available.
With no additional matching, you can adjust the MFJ-1979 to cover the 20M band and higher. I figured this whip coupled with my “Junk Box Coil” should easily cover 40M through 20M with the antenna fully extended. The four-foot height advantage over my 12-foot whip, should yield some performance improvement. With my older, larger coil, operation on 80M might be possible.
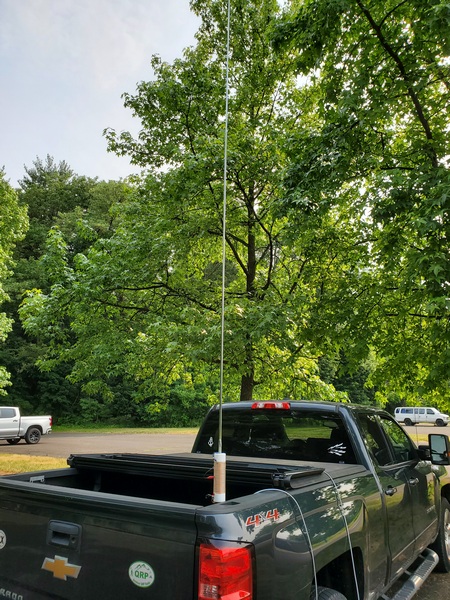
To test my assumptions, I made a trip to Evansburg State Park (US-1351, KFF-1351), where I was one activation away from a POTA “Repeat Offender” award. Like my last visit, it was raining, and I seemed to be the only one in the park.
I set up the 17-foot whip and coil on the back of the truck and quickly identified the proper tap for 40M. I used a Sharpie pen to mark the tap location. (The coil now has two sets of marks.) Despite an impending geomagnetic storm, I made my first 10 contacts in about 12 minutes. Not too bad for an early activation on a Friday morning.
The MFJ-1979 17-foot whip mounted on my “Junk Box Coil.”
After about 25 minutes, I switched to the 30M band and marked the tap location on the coil. I picked up eight contacts on 30M before giving 20M a try. It was no surprise that the SWR was a flat 1.5:1 with the entire coil bypassed. Although conditions on 20M seemed a little weak, I logged five more contacts before pulling the plug. I ended up with 25 contacts in the log. No DX or park-to-park contacts today, unfortunately.
For part of the activation, I used a plastic bag to keep the rain off the coil. When I got home, I brought the coil and the whip inside and dried everything off. While I had the whip extended, I measured the actual length. By my measurements, it’s 16 feet 11 inches long.
Based on this brief test, I made a few observations:
Compared to my older 12-foot MFJ whip, I don’t think the quality of the MFJ-1979 is as good. The older whip just seems to telescope more smoothly. Some online reviews mention problems keeping the antenna from collapsing after using it for a while. In an effort to avoid problems like that, I’ll be extremely careful when extending and collapsing the whip.
Performance on 40M, 30M, and 20M should be better than the 12-foot whip, given the additional length. A big difference? Given today’s band conditions, it was hard to tell.
With the 17-foot whip and my coil, I can cover 40M. 30M, and 20M without adjusting the length of the whip. However, the 12-foot whip gives me 40M, 30M, 20M, and 17M without adjusting the whip. This lines up perfectly with the bands on my TR-35.
I won’t be retiring my 12-foot whip anytime soon. I think for most POTA activations, I’ll stick with the 12-foot whip out of convenience. For contesting and activities like Winter Field Day, I will probably go with the 17-foot whip. I have an old 20M mono band QRP rig I want to put back on the air in the near future. The MFJ-1979 should be perfect for that.
I mentioned in an earlier post that I bought my Elecraft AX1 antenna not long after they came out. Although I carried in my pack as a backup antenna for a few years, I never used it much. That changed last year, when I started giving it some serious use. It’s now one of my go-to options for casual, impromptu portable operation.
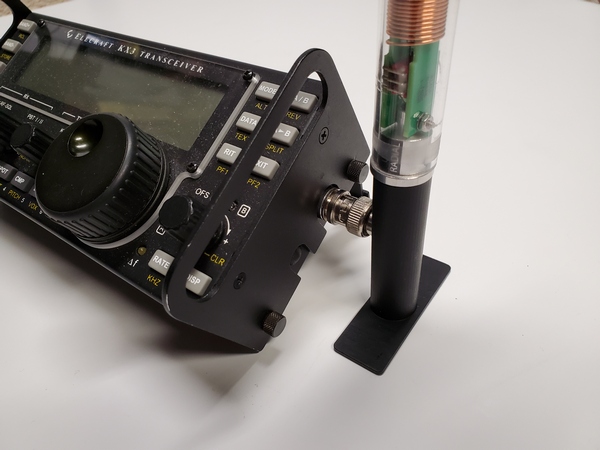
Of course I bought a few accessories for the AX1. I typically use the AXB1 Bipod with the AX1 attached directly to my KX3. While that works fine, I saw mention of an interesting alternative to the bipod, the Byonics KX3 AX1 Stand. My curiosity got the better of me, so I ordered one.
It’s a clever little 3D printed stand that weighs next to nothing. To use it, attach the BNC elbow adapter to the AX1 and set it in the stand. Scoot the stand up to the radio and connect the AX1 to the radio. That’s it!
The Byonics KX3 AX1 Stand
I set it up at home, and it seems pretty stable. The thing I like about it is that there are no adjustments. Since Byonics makes these stands for specific radios, the KX3 version won’t fit a KX2 and vice versa. That’s not a problem for me, since I don’t currently own a KX2. The Elecraft bi-pod, of course, can be adjusted to fit either radio.
I’m looking forward to trying it out in the field sometime soon.
Sometimes I get excited over some of the most trivial things. This is one of those times.
I wrote about my Junk Box Loading Coil in a recent post. I normally keep the loading coil and my 12-foot telescopic whip antenna stashed away under the backseat of my pickup truck, so it’s handy for spur-of-the-moment activations. I also keep a couple of Jackite poles and some other gear under there. While the coil is pretty rugged, I just didn’t feel right about cramming it in there unprotected. By pure dumb luck, however, I stumbled on the perfect storage solution.
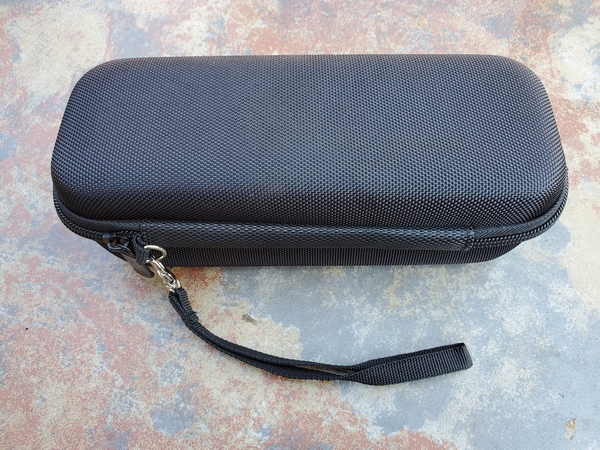
While mindlessly browsing the Internet a while back, I stumbled across something on a Chinese seller’s website (Temu.com) that caught my eye. It was a storage case that was probably made for something no longer sold. I’d provide a link, but products quickly come and go on this website. The website listed it as “Simple Portable Storage Zipper Bag, Travel Electronic Tools Organizer, Zipper Container.” Wow. That’s a mouthful.
I had seen similar cases on eBay, but not in this particular size. Given the listed dimensions, I thought it might be a good fit for my homebrew loading coil. At the time I placed my order, it was selling for $7.98 USD.
This is the case I bought to use with my Junk Box Loading Coil.
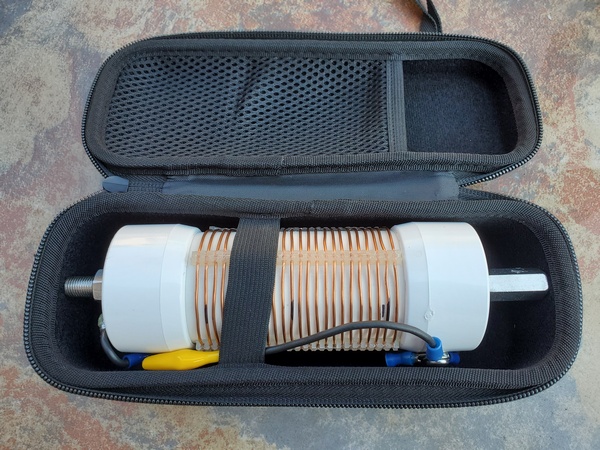
The container, along with a few other things I ordered, arrived on my front porch eight days after I placed my order. Voila! The case was a perfect fit for my loading coil. In fact, it looks like it was custom made for it. It’s semi-rigid, so it affords some degree of protection. It’s definitely not elephant-proof, though. There’s an elastic strap inside that helps hold everything in place.
My Junk Box Loading Coil tucked away in its new storage container
I’m not exactly sure what this case was intended to house, but it’s perfect for my application. So now, my coil will stay clean and protected, while waiting under the backseat of my truck for my next POTA activation.
Whenever I buy parts for a project, I always buy one or two extras. Over the years, I’ve amassed a sizable collection of random parts. Some of it will never be used, but sometimes my collection of parts has just what I need for something I want to build. I like when that happens.
A while back I wrote about an old homebrew coil I resurrected and paired with a 12-foot telescopic antenna. The coil, while effective, was built to use with a much shorter whip and is larger than what I need. I scoured my junk box and came up with most of the parts I needed to build a scaled-down version.
I should note that I built this coil specifically to use with my old MFJ-1956 12-foot telescopic whip. In this configuration, this coil covers 40M through 17M. So, if you have a different whip or want to cover different bands, you’ll need to modify the design accordingly.
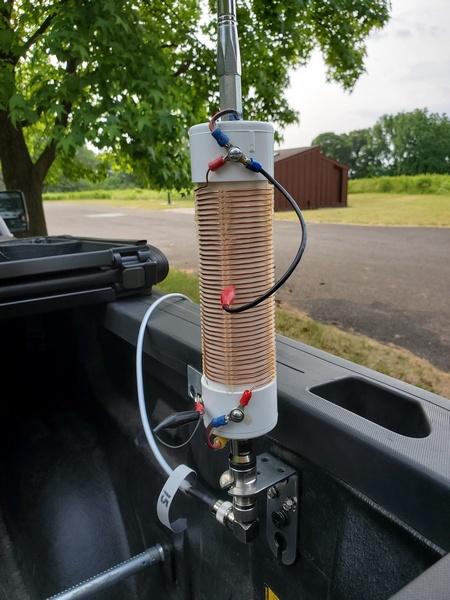
Completed loading coil. Used with a 12-foot telescopic whip, it tunes from 40M through 17M.
I used the old coil as a guide to determine the number of turns I needed to cover the bands of interest, adding two turns for good measure. Using an online shortened vertical calculator, I figured I would need about 13.4μH to load the 12-foot whip on the 40M band. Using an online coil inductance calculator, I estimated the total inductance of my coil to be 14.8μH. So, it covers 40M with a turn or two to spare.
The new coil assembly measures 8.25 inches end-to-end, making it 2.25 inches shorter than the old coil. While it’s about 3.3 ounces lighter than the old coil, this new coil still weighs in at a hefty 10.8 ounces.
Parts List
With a few exceptions, my junk box provided the parts I needed to build the coil.
5-3/8 inches of 1.5 inch PVC pipe
(2) PVC end caps for 1.5 inch PVC pipe
(4) pieces of nylon grommet edging, 3.25 inches each. (The material I used has about 8 notches per inch)
16 gauge bare copper wire, approx. 12.5 feet
(1) 3/8-24 coupling nut, 1-1/8 inches long
(1) 3/8-24 x 1-1/4 inch stainless steel bolt (bottom mounting stud)
(1) 3/8-24 x 1 inch stainless steel bolt (top bolt)
3/8 inch flat washers & lock washers
(2) #10 x 3/4-inch self-tapping screws
Approx. 6 inches of RG-174 coax
Small alligator clip
Misc: ring lugs for ⅜-inch & #10 screws
Construction Notes
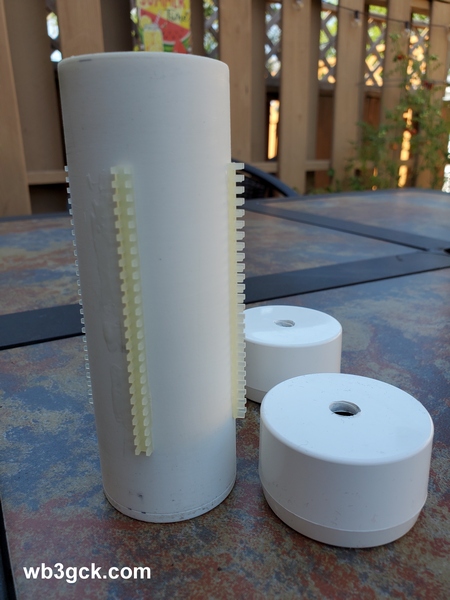
As shown in the accompanying photo, I drilled the end caps to accommodate the ⅜-24 bolts. The 1-1/4 inch bolt was used for the bottom of the coil, along with a flat washer and a lock washer. The 1-inch bolt was used for the top, along with flat washer, lock washer, and the coupling nut.
This is the coil form with the four strips of grommet edging glued on. The ends were drilled to accommodate the 3/8-24 bolts.
The coupling nut was one item I didn’t have in my junk box. My local hardware store is well-stocked, but they didn’t have them with the ⅜-24 thread. I eventually found what I needed on Amazon. It was a little pricey, but I didn’t have any better options at the time.
After cutting the PVC pipe to length, I temporarily installed the end caps. Then, I cut four pieces of the grommet edging to length and glued them on, using Goop® adhesive. Unfortunately, I can’t provide a part number and source for the edging. A local QRPer, Ron Polityka WB3AAL (SK), gave me several pieces many years ago. I’m pretty sure Panduit was the manufacturer. My stash was nearly depleted, but I had enough left for this project.
Before assembling the end caps, I made two short jumpers, each with a ⅜-inch ring lug on one end, and a smaller ring lug on the other. Then I tightened everything up. I left about a ½ inch of thread on the top bolt to go into the coupling nut. I was careful to ensure that my whip antenna would fully thread into the coupling nut.
Before winding the bare wire on the coil form, I installed a ring lug on one end. I drilled a pilot hole in the side of the lower end cap and used a self-tapping screw as a connection point. When you wind the wire on the coil form, try to get the turns as tight as you can. (I didn’t do as good a job winding the coil as I would have liked.) Once I finished winding the coil, I cut the wire to length and installed a ring lug. I used some more Goop adhesive on the grommet edging to hold the turns in place.
The last step was to build the clip lead. For this, I used a piece of RG-174 coax. There’s nothing magical about the RG-174; stranded hookup wire would be fine. I used RG-174 primarily because of its flexibility, plus the shield would be a good RF conductor. (The center conductor was unused.) I crimped and soldered a ring lug to the braid on one end, and soldered an alligator clip to the braid on the other end. Then I used another self-tapping screw on the top end cap to connect everything together.
On the Air
I wrote about my initial tests of the coil in a previous post. Using an antenna analyzer, I determined where to place the tap for each of the four bands. I then used a permanent marker to mark these locations on the coil, so I can quickly change bands without resorting to the antenna analyzer.
This is the completed loading coil installed on my truck for a POTA activation.
With the antenna mounted on my truck, the SWR is higher than I would like on 40M and 30M. This is not unlike other shortened, base-loaded verticals I’ve used in this configuration. An additional counterpoise wire or two might help. Also, grounding the bottom of the coil and feeding it a couple turns up from the bottom would provide a precise match on the lower bands. I’ve used that technique in the past. That configuration , however, is a bit more complicated to implement, given the way I plan to use this coil. So, I just use a tuner to keep the radio happy, and the antenna seems to work fine.
Wrap-up
My older, larger coil worked fine; so technically, this project was unnecessary. But, since I had most of the parts on hand, what the heck. It was a fun project, and I’m sure it will see a lot of use in the future.
In a recent post, I wrote about a vertical antenna I put together with an old homebrew loading coil and a 12-foot telescopic whip. I intended to add some marks on the coil for each band, so I could eliminate the need for an antenna analyzer during band changes. This time, I actually remembered to bring a permanent marker and got it done.
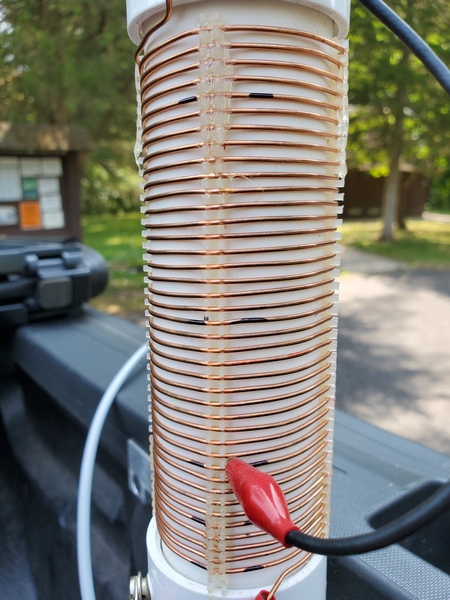
I drove up to Evansburg State Park (K-1351/KFF-1351) this morning for a quick POTA activation. Before I got going, I used my antenna analyzer to determine the tap points for each band. I used a Sharpie® marker to mark the coil for 40M, 30M, 20M, and 17M. Since the coil has sufficient inductance to load the 12-foot whip on 60M, I also marked that band (the top-most mark on the coil). Before I started operating, I went back and checked each tap location to confirm repeatable results. Using a Sharpie marker is a decidedly low-tech approach, but it serves the purpose.
My homebrew loading coil. If you look closely, you can see the marks I added. As shown, the coil is tapped for the 30M band.
To change bands now, I just move the tap to the appropriate mark. I still use an antenna tuner to deal with any minor variations I might encounter. Now I can change bands in the time it takes to move the coil tap and hit the “tune” button on the tuner.
Despite the so-so band conditions this morning, the 12-foot whip performed well. In less than an hour of operating, I made 18 contacts. Most of my contacts were on 40 and 30. There were two park-to-park contacts I’m aware of.
The 12-foot base-loaded whip in use at K-1351
My operations were interrupted for a chat with a curious park ranger. I gave him my standard Parks on the Air spiel. He had encountered POTA activators in another state park, so he had some familiarity with the activity. After a few minutes, he left to look into a reported issue on one of the hiking trails.
So, I’m pretty satisfied with this antenna. It has a length advantage over my Gabil GRA-7350TC antenna. Comparing coil dimensions, I suspect it also has an efficiency advantage over the Gabil antenna.
Regardless, I now have another useful option in my antenna arsenal.
While going through my stash of old parts, I came across a coil assembly I built over 20 years ago. Originally, it was part of a homebrew antenna inspired by the MFJ-1622 Apartment Antenna; but I used it over the years with a variety of whip antennas while “stationary-mobile.” As I moved on to other antennas for my portable operations, the coil was relegated to the junk box and forgotten—until now.
I also had an old MFJ-1956 12-foot telescopic whip that I haven’t used in years. It was stashed away in the basement waiting to become part of a new antenna project. Having just installed a ⅜-24 antenna mount in the bed of my pickup truck, I thought the coil and whip might work well with it.
The coil is a beast. It’s made from 1.5-inch PVC pipes and wound with bare copper wire—16 awg, I think. I used four strips of nylon grommet edging material to keep the turns evenly spaced. (I don’t remember where I got the grommet material, but it’s similar to this Panduit product.) The coil is about 5.4 inches long and 2 inches in diameter with 40 turns. Using an online calculator, I figured the coil is approximately 25.4 μH.
The homebrew coil I built more than 20 years ago.
The coil assembly weighs in at a hefty 14.1 ounces, and the overall length is 10.5 inches. The whip is 24 inches collapsed and weighs 9.6 ounces, so it wouldn’t be my choice for a backpacking antenna. However, on my truck, it should do fine.
Using another online calculator, I reckoned the coil should be more than enough to resonate the 12-foot whip on the 40M band and possibly the 60M band. Since the whip, coil, and mounting bracket all use ⅜-24 hardware; it was just a matter of slapping it all on the truck to see what how it would perform.
To test it out, I made a trip to Valley Forge National Historical Park (K-0761, KFF-0761) this morning. With a minor geomagnetic storm underway, the forecasted band conditions looked pretty dismal. I also got an early start, since we were expecting some severe storms around mid-day. So, I wasn’t expecting much, in the way of contacts.
I mounted the antenna on the back of the truck and broke out the antenna analyzer. It took a bit of fiddling to find resonance on 40M. The lowest SWR was around 3.8:1. That’s not great, but my little Elecraft T1 tuner handled it with no difficulties. On the air, I was getting some decent spots from the Reverse Beacon Network, and I made about 8 contacts before moving to 30M.
My homebrew coil and 12-foot whip mounted on the back of my truck.
The SWR on 30M was down to about 2:1. Again, the T1 made sure my TR-35’s finals stayed happy. I made one park-to-park contact on 30M before moving up to 20M
The SWR on 20M was about 1.3:1 across the band. I made another seven contacts here, before stopping to do some experimenting with the antenna.
I checked 17M and measured an SWR of about 1.2:1 across the band. I didn’t try to make contacts on 17M. Instead, I went back to 40M to pick up a few more contacts before shutting down.
I intended to bring a Sharpie® pen along to mark the coil for each band to speed up band changes. Of course, I forgot to bring one along. Oh well, I’ll do that next time. For 15M and above, I’ll need to bypass the entire coil and shorten the length of the whip accordingly.
The static crashes were getting louder, and I heard thunder off in the distance. So, I called it quits. Just as I shut the rig off, the heavy rains started. I quickly took down the antenna and packed up to leave.
Despite the lousy band conditions and heavy QRN, I ended up with 18 contacts. I had three park-to-park contacts today. And, as it turns out, this was my 20th POTA activation at Valley Forge, earning me a “Repeat Offender” award for this park.
It looks like this mash-up of antenna parts works pretty well. I’ll give it another shot in a few days. Hopefully, the weather and band conditions will be better.
Regular readers of this blog know that my homebrew 19-ft vertical is my go-to antenna for “stationary-mobile” operations. I use a low-tech mounting system in the bed of my truck involving a plastic milk crate, a cargo bar, and some bungees. When we go on our annual vacation to North Carolina, unfortunately, I have to remove the crate to free up storage space. I plan to activate a park or two while on vacation this year, so I wanted to come up with an alternate antenna arrangement.
I bought the GRA-7350TC antenna with this specific scenario in mind. Previously, I tested this antenna with a magnetic mount that I had stashed away in the basement. Although a couple of successful POTA activations proved its viability, I wanted something better than my little mag mount.
Browsing around on Amazon, I found a stainless steel bracket with an SO-239 to ⅜-24 mount. I was reluctant to drill holes in my truck, but I thought a couple of small holes in the truck’s bed wouldn’t be too bad. So, I placed an order.
The Sirio M1 stainless steel antenna mounting bracket I found on Amazon
The bracket arrived the next day. It’s really heavy-duty and possibly overkill for my application. My local hardware store had an excellent selection of stainless steel hardware. I bought some #12 x 1-inch sheet metal screws and some star washers.
The next step was figuring out exactly where to mount it. I had to make sure that I could still close the truck bed cover without hitting it. By dumb luck, I chose a spot where I could use one of the screws that fastens the truck’s bed liner. This placed the mount close to where I wanted it. Then, it was a quick task to drill pilot holes for the three additional screws. Mechanically, it felt solid, and an ohmmeter check confirmed continuity to the truck’s body.
The bracket installed in the bed of my truck with the antenna installed. The black screw is an existing screw I took advantage of.
I gave the new mount a trial run at Ridley Creek State Park (K-1414, KFF-1414). It took me about a minute to get the antenna set up on the mount, and it was a perfect fit. I ran an 18-foot length of RG-8x coax (much longer than I really needed) to the Penntek TR-35 inside my truck.
Using an antenna analyzer, I first tuned it up on the 40M band. I couldn’t get the SWR down below 2:1. This also happened when using the antenna on a magnetic mount, too. I’m guessing a different length of coax or a counterpoise wire might help. In any event, I tuned the antenna to resonance and used a tuner to keep the rig happy. The first QSO was a station in Georgia who gave me a decent signal report.
The Gabil GRA-7350TC antenna in use
The SWR on 30M was a bit lower but still above 2:1. Again, I had no problems making contacts with the antenna. On 20M and 17M, the SWR was down to about 1.2:1 or thereabouts.
Despite the time spent fiddling with the antenna, I logged 13 contacts, with three park-to-park QSOs. I also worked W1HNJ on 40M and 30M. As part of Museum Ship Weekend, they were operating the radio console from the hospital ship, SS Hope. The radio console is now part of the Chatham Marconi-RCA Wireless Museum on Cape Cod, Massachusetts.
I still have some tinkering to do, but I think the mounting bracket will work just fine. I won’t be retiring my homebrew vertical anytime soon, but the GRA-7350TC gives me another option when the need arises.
I looked at my log the other day and saw that I had only made a measly two HF contacts this month. Between the grandkids’ school functions, soccer games, horseback riding competitions, and my knee issues; I haven’t had much time for my QRP-portable activities. I set out to change that this morning with a drive to Valley Forge National Historical Park (K-0761, KFF-0761).
A few weeks ago, while nursing my injured knee, I made an impulse purchase. After watching some YouTube videos, I went on Amazon and bought a Gabil GRA-7350TC antenna. The last thing I needed was another antenna—I blame YouTube and Amazon. Actually, it wasn’t a totally frivolous purchase; I have plans to use it during a trip later this summer.
I also bought the matching GRA-ULT01 MK3 tripod for the antenna, which I planned to try out today. I put together some radials to use with the tripod setup.
As I headed out the door this morning, I grabbed an old magnetic mount base I had from an 2M/440 antenna. Since I bought the GRA-7350TC with the ⅜-24 stud mount, the antenna was a perfect fit for the mag mount. I figured I’d give that a try, while I was trying out the antenna.
It was raining when I got to the park this morning, so I kept things simple and tried out the mag mount. In doing so, I learned something about my six-year-old truck: The hood isn’t made of steel. The rest of the truck is, but not the hood. Who knew? (Probably every Chevy Silverado owner but me, I guess.) I ended up putting the antenna on the roof where I could easily reach it. Inside the truck, I used my Penntek TR-35 (5 watts).
The Gabil GRA-7350TC on a magnetic mount from an old 2M/440 antenna.
The sliding coil adjustment made tuning up a snap. Using my old MFJ-226 antenna analyzer, it only took a minute or two to get the antenna tuned up on 40M. I’m not a big fan of having to take an antenna analyzer out in the field, but this was relatively painless. Band changes only took about a minute. Most of that time was setting up the antenna analyzer for the band of interest.
I used the new antenna on 40M, 30M, and 20M with decent results. In the end, I had 16 contacts, including five park-to-park QSOs. I’m sure my little magnetic mount wasn’t providing the best ground in the world, but at least I know it’s usable in a pinch.
Hopefully, June will provide more opportunities to get out portable. Since my old knee has been feeling a little better recently, I’m hoping to get back on the bike again at some point. I already have some ideas for a bike mount for the GRA-7350TC.
I made a quick run down to Ridley Creek State Park (K-1414) for an early morning POTA activation. For a few minutes, though, I thought I might fall short of the 10 contacts needed to complete the activation.
I dusted off my old MFJ-1820T 20M whip antenna and thought I’d try it out on my window mount. Inside the truck, my Elecraft T1 tuner loaded it right up. After calling CQ a few times, I checked the Reverse Beacon Network (RBN). The first spot I received was from Costa Rica. So, the antenna seemed to get out OK. I was running about five watts from my TR-35.
The MFJ-1820T 20M whip on my old window mount
Things got off to a good start on 20M. I had a steady stream of callers for the first several minutes, and I was getting strong RBN spots to the west of me. Then, things slowed down. It was five minutes before the next QSO. Then another six minutes after that. I was beginning to consider the prospect of a busted activation when activity picked up again. I suspect it was just a bit too early on a Sunday morning.
After I had 11 contacts in the log, I switched to the Elecraft AX1 to give 17M a try. I didn’t hear much activity there, and the RBN wasn’t seeing me at all. I stayed with the AX1 and went back to 20M.
The activity on 20M started picking up this time around. When I wrapped things up, I had 20 contacts in the log, with two park-to-park QSOs. I didn’t have any DX contacts today, but I did work two Idaho stations.
I continue to be amazed at what you can do with five watts and one of these little whip antennas.