You might have heard the old proverb: For the want of a nail, the kingdom was lost. It means that even the smallest of details can prevent a successful outcome. That was true for me today.
I went out into the garage this morning and noticed that my bike had cobwebs on it. I guess the spiders were trying to tell me that I was overdue for a ride. I decided to take advantage of the beautiful weather and take a ride to blow the cobwebs off of the bike—literally.
Of course, I planned to do some portable operating during my ride. After some thought as to what I needed to bring, I gathered everything up and started stuffing the radio gear into my pannier bags. I put everything into the truck, loaded up the bike, and off I went.
I went to one of my favorite trails, the Schuylkill River Trail, and rode a couple of miles up to Lower Perkiomen Park. I found a bench away from the trail and proceeded to unpack my radio stuff.
I frantically searched through my pannier bags only to conclude that I must have left my antenna bag at home. A phone call to my (far) better half confirmed that my bag of antenna parts was indeed at home. Although I used a checklist, I made the fatal mistake of checking off the antenna bag before actually packing it in the pannier bags. Doh!
My bike loaded up with everything I need for operating QRP in the park—except for my antenna!
I didn’t get to operate from the park today, but it was still a great day for a ride. And, the cobwebs are gone.
On one of the several ham radio mailing lists I subscribe to, there was some recent discussion about unusual antennas. You know—bed springs, light bulbs, and the like. It brought to mind a memorable QSO I had 27 years ago.
In the July 1993 issue of QST, Rod Newkirk W9BRD (later VA3ZBB, now SK) wrote an article about building small, multi-turn loop antennas[1]. If his name doesn’t ring a bell for you, Rod wrote the “How’s DX?” column in QST from 1947 to 1978 and coined the term, “Elmer.”
Although I never actually built one of Rod’s loops, I found the article fascinating. At the end of the article, Rod noted that he conducted his loop antenna experiments in the partially-underground cellar of his Chicago home. Remarkable!
Fast-forward to September 1993. I went downstairs to my basement shack one evening and fired up my old MFJ-9030 on 30M CW. I had three QSOs that night; one of them was with—you guessed it—W9BRD.
During our QSO, Rod mentioned that he was using one of his experimental mini-loops indoors in his shack. When I told him I was running 5 watts into my rainspout, he sent back, “Hey, if it’s metal, load it up.” According to my log, we chatted for about 12 minutes before signing.
Needless to say, that contact put a smile on my face. It was the kind of QSO I really enjoy—one with a station using an unusual set-up or operating in a unique location. I guess you could say this QSO checked both of those boxes. Not to mention that I had just worked a very well-known figure in Amateur Radio.
QSL card from W9BRD documenting our unusual QSO in 1993.
I fired off a QSL card to Rod to acknowledge our QSO and to let him know that I enjoyed his loop article. Before too long, I received a card back from Rod. His typewritten note on the back of the card continued the theme of our QSO. It read, in part: “Hey, if your XYL uses gold or silver thread for that needlepoint, let’s try loading it up, Craig.” He also wrote about his experiences with rainspout antennas, including his attempt to feed a particularly stubborn one.
Rear of W9BRD’s QSL card
From articles I have read, it’s clear that Rod had a penchant for assembling and experimenting with unusual antennas. His daughter, Amanda, once wrote: “He especially loved discovering how much of a signal he could achieve with his various objects: the coffee cans, cookie tins, piles of wire and boxes and tidbits—out of which he wrung quite magical things.”[2]
When it comes to unusual antennas, Rod was a man after my own heart. Over the past 27 years, his words from our QSO have been my mantra: “If it’s metal, load it up!”
Thanks for the inspiration, Rod.
73, Craig WB3GCK
References: [1] Newkirk (W9BRD), Rod. “Honey, I Shrunk the Antenna.” QST, July 1993, pp. 34-35, 39. [2] Newkirk (WN9PMC), Amanda. “On Being W9BRD’s Daughter.” K9YA Telegraph, Vol 11, Issue 9, September 2014, pp. 2-3. (K9YA Telegraph website)
Today was the annual running of the Skeeter Hunt contest sponsored by the New Jersey QRP Club. It was a miserable day for a portable QRP contest, but it was a lot of fun nonetheless.
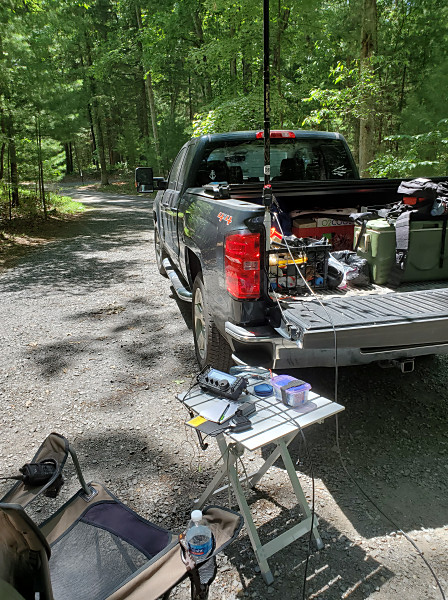
Since it was raining here in southeastern Pennsylvania, I opted to operate from my truck from a local park. I mounted my trusty homebrew vertical on the back of my truck and fired up my KX3.
I started on 40M, and the Skeeters were swarming. It only took me a minute to log my first Skeeter. I had a steady stream of contacts for the first half-hour or so. I heard lots of familiar callsigns, and I added a fair number of new ones to my log.
My location for the 2020 Skeeter Hunt contest
With the steady rain, it was a little uncomfortable in the truck. It was getting warm, but if I opened my window too far, I got rained on. So, after about 2 hours I decided to call it quits. I ended up with 24 contacts in the log. It wasn’t the best I’ve ever done, but it certainly wasn’t the worst.
WB3GCK operating in the NJQRP Skeeter Hunt contest and sporting my Skeeter Hunt t-shirt
As always, I extend my thanks to Larry W2LJ for coordinating this great contest. It’s always a good time.
Once again, our family headed down to the Outer Banks of North Carolina for our annual vacation. Naturally, I made ham radio a part of my vacation.
We rented the same house in Corolla that we were in last year. It’s a great place that overlooks the Currituck Sound. Plus, I already knew what to expect, radio-wise, and how to set things up.
After a long but uneventful drive down on Saturday, we arrived at the rental house. So did some thunderstorms. Despite the weather, it didn’t take us too long to get unpacked and settled in.
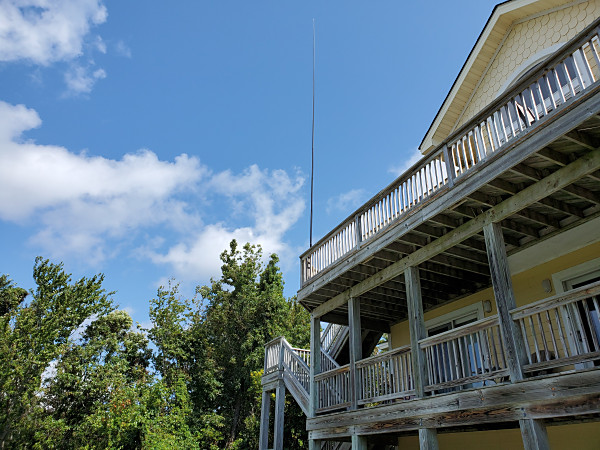
After the storm had passed, I took a few minutes to set up an antenna for HF. I kept things simple this year. I strapped my 31-foot Jackite pole to the railing on the 3rd-floor deck and set up a 30-foot vertical wire and 9:1 unun. I ran 25 feet of coax down to the second-floor deck, so I had a shady place to operate during the day.
My 31-foot Jackite pole strapped to the railing on the 3rd story deck of the rental house. I operated from the deck below with a great view of Currituck Sound.
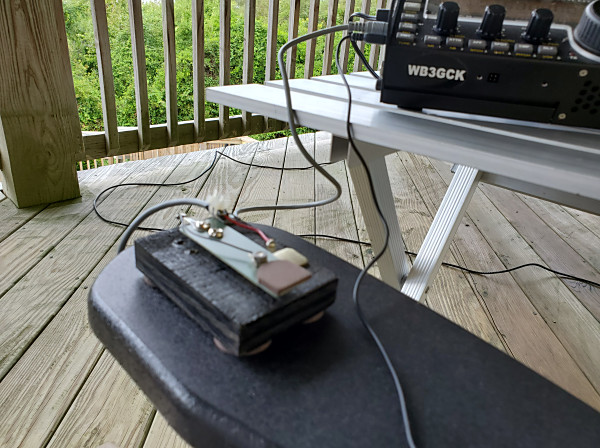
After a late breakfast on Sunday, I took my KX3 out to the deck to catch a little bit of the monthly SKCC WES contest. This month’s theme was Homebrew Keys, so I brought along one that I made a couple of years ago. The band conditions weren’t great, but I ended up with 10 QSOs before pulling the plug and heading for the pool.
My homebrew key for the SKCC Weekend Sprintathon (WES). For a bunch of junkbox parts, it has a suprisingly good feel.
During the WES, I encountered much more RFI coming from the house than I experienced last year. To my good fortune, whatever was making the racket stopped after a while, and things improved somewhat. For most of the week, I still had some S2-S3 noise at times, but it was manageable.
For the remainder of the week, I did a little casual operating each morning, while I still had shade out on the deck. I spent the rest of the day doing the usual Outer Banks vacation stuff—swimming, crabbing, and just hanging out with my family.
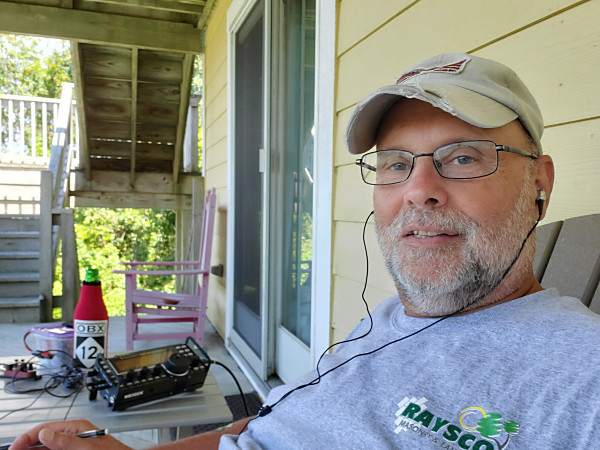
WB3GCK operating in Corolla, NC, on the Outer Banks (with a cold “807” on the table)
Most of my contacts this week were casual rag-chews along with a few POTA stations here and there. During the week, John W3FSA worked me twice from Maine. It’s always good to chat with him.
For something different, I checked into the Outer Banks Area Wide Net on Thursday evening, while enjoying the sunset from the deck. I used my handheld to access one of the linked repeaters in a system that covers the entire Outer Banks. The net had a friendly mix of locals and visitors to the area.
For the most part, the weather was great this week—sunny, hot, and rain-free. Things got a little unsettled on the last day, though. There were storms in the area, but I still got in some more time on the air before tearing down the antenna and packing up the radio. My last QSO of the week was on SSB with my friend, Glen NK1N, who was doing a POTA activation in New Jersey.
I always say that our annual vacation on the Outer Banks is the shortest week of the year. That was true again this year, as the week just flew by.
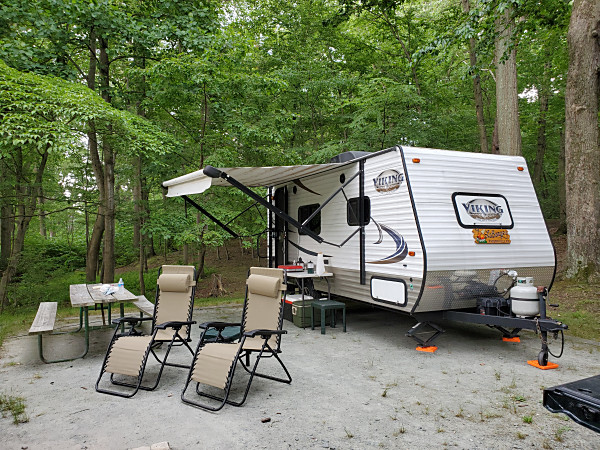
Because of the ongoing issues with the pandemic, my (far) better half and I decided that we would be doing our camping close to home this year. Fortunately, French Creek State Park near Elverson, Pennsylvania, is a beautiful park and only about 35 minutes from home.
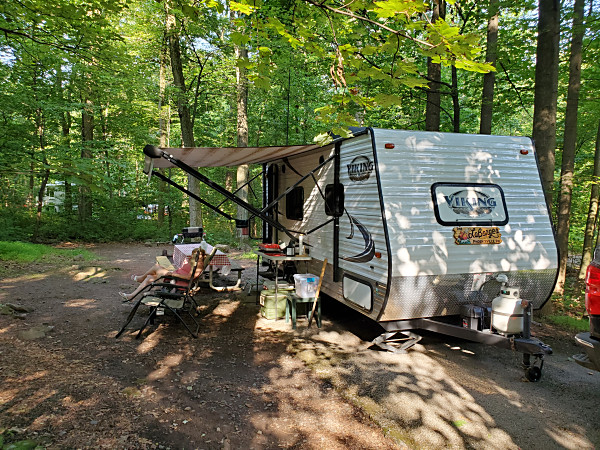
We hitched up the trailer Friday afternoon and headed up to the campground. The weather was hot and humid, but it was a few degrees cooler than back home.
Our campsite at French Creek State Park
After dinner, I put up my trusty 29.5-foot wire vertical back near the woods. I fired up my KX3 to make sure everything was working. As I tuned around on 40M, I heard KF9UP doing a POTA activation in Indiana. It took a couple of tries, but I worked him for a park-to-parkcontact. After that, I joined my (far) better half out at the campfire.
My trusty Jackite pole supporting a 29.5-foot wire vertical and a 9:1 unun
On Saturday, my daughter and her family were coming up to visit the campsite. I didn’t have a lot of time for ham radio, but I managed to squeeze in a quick POTA activation. (French Creek State Park is K-1355 for POTA and KFF-1355 for WWFF.)
Band conditions weren’t the best, and our site was in a low spot. Despite all of that, I was able to log 14 contacts in about 45 minutes or so. Four of them were park-to-park contacts. The grandkids arrived after that, and I spent the rest of the day hanging out with them.
I got on the radio for a bit on Sunday morning, while the coffee was perking. I didn’t hear much of anything on 40M, so I called CQ for a while. I was getting some decent spots on the Reverse Beacon Network, but I got no takers. Although we had the campsite until 3 PM, we decided to head home a little early to avoid packing up in the heat.
After the issues we had on our last camping trip, it was nice to have a rain-free and problem-free weekend with the camper.
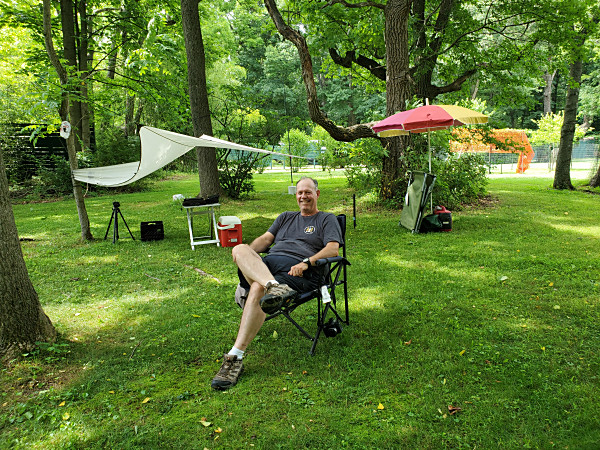
A few of the Boschveldt QRP Club members descended upon Pine Grove Furnace State Park over the weekend for some camping, hiking, and radio. Although the weather was hot, we had a rain-free weekend and a good time hanging out with old friends.
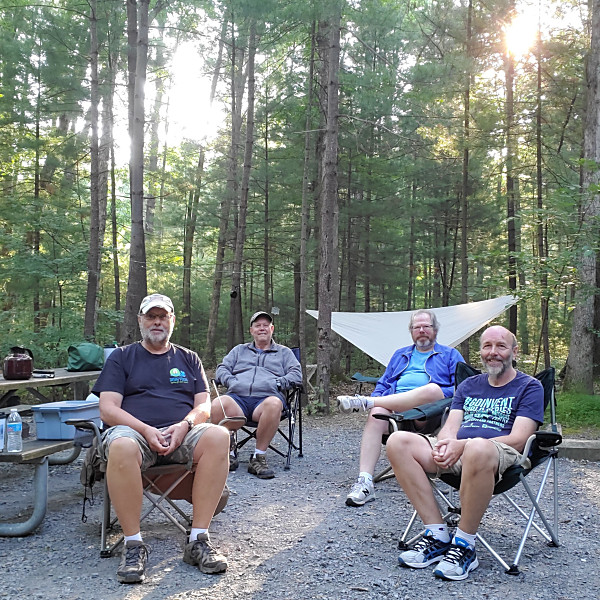
Located in Cumberland County in south-central Pennsylvania, Pine Grove Furnace is a beautiful park with a wooded campground. For this trip, there were four of us occupying two campsites: Ed WA3WSJ, Glen NK1N, John NU3E, and me, WB3GCK.
(L-R) WB3GCK, WA3WSJ, NK1N, and NU3E at Pine Grove Furnace State Park
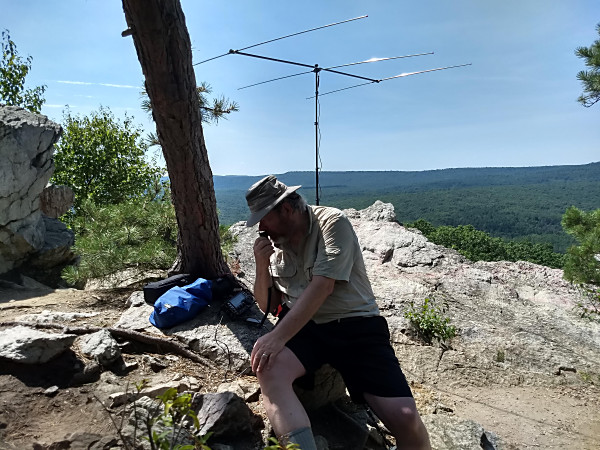
On Saturday, Ed, Glen, and John set out to hike the Pole Steeple Trail, a short but steep trail leading to a scenic overlook. NK1N was planning to operate in the CQ Worldwide VHF Contest as a Hilltopper station, and the others went for the view. Ron WA8YIH and his family also came out for the day to join them for the hike.
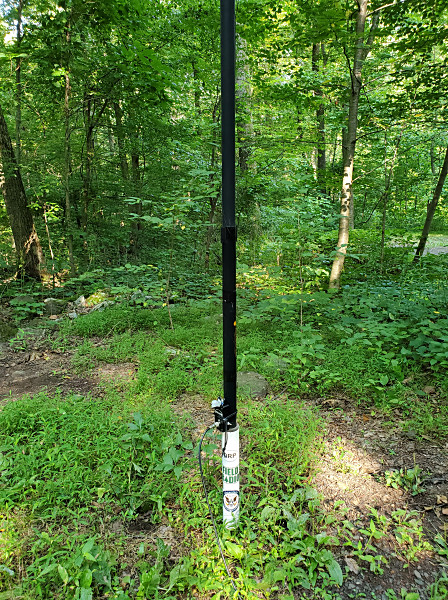
I decided not to challenge my knees with the steep climb and opted to stay back at the campsite for a POTA activation. (Pine Grove Furnace is K-1398 for POTA and KFF-1398 for WWFF.) I set up my 19-foot vertical on the back of my truck and fired up my KX3 at 5 watts.
WB3GCK set-up for a POTA/WWFF activation at Pine Grove Furnance State Park.
Despite my low power, I managed to put 27 CW contacts in the log, including one park-to-park contact. At one point, I took a break from my activation to work NK1N on 6M SSB and 2M FM, along with NU3E on 2M FM. I was happy with the 30 contacts, given that this was a short, impromptu activation. Due to the lousy cell phone coverage in the campground, I was unable to spot myself. So, I’m grateful to the kind folks who stumbled upon my QRP signal and spotted me.
NK1N operating in the CQ Worldwide VHF Contest from the Pole Steeple Trail. (Photo by NU3E)
Following the hike, the other guys stopped for well-deserved ice cream before returning to the campsite. Their tales of hiking the steep trail in the high heat confirmed that I was right in opting out. With my knee issues, that hike would have been risky for me.
After breakfast on Sunday, we started packing up before the temperatures heated up again. On my two-hour drive home, I was able to talk to WA3WSJ and NU3E at various times on 2M, and that helped to make the drive seem shorter.
It was great hanging out with the Boschveldt crew again, but it’s also great to be back in air conditioning again.
This year has presented some challenges, but the members of the Boschveldt QRP Club were up for those challenges. We adapted to the current situation and held our annual Field Day outing—with suitable precautions, of course.
We convened at the same location we’ve used for the past few years. A local businessman graciously allows us to camp on a section of his property for the weekend. We had the following members in attendance this year: Ed WA3WSJ, Glen NK1N, Ed K3YTR, Ron WA8YIH, John NU3E, and me.
Now, here’s where things changed a bit. Due to the COVID-19 pandemic, we implemented some guidelines:
Tents had to be at least 10 feet apart—no problem, given the large field we were on.
No central food preparation area. Each member was responsible for providing and cooking their food.
No sharing of radio equipment
Maintain social distancing, especially around the campfire.
No outside visitors
This year we operated in the 4A Battery category—using QRP, of course. We ran 4 HF stations, plus a satellite station and a VHF/UHF station.
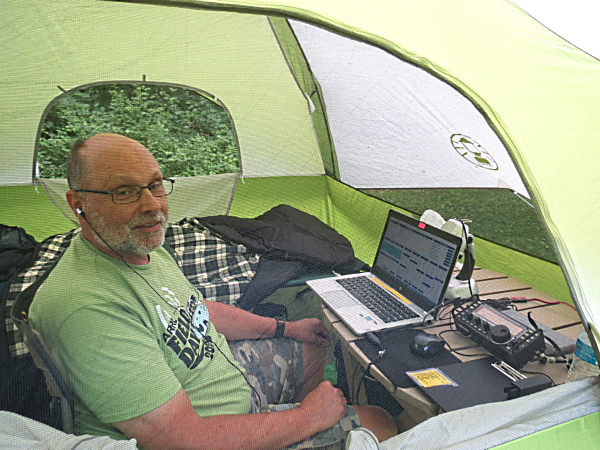
As usual, I ran CW on 40M and 80M, with my tent serving as both my sleeping quarters and radio shack. I ran my KX3 into a 53 foot inverted L. I used a 17-AHr gel cell for my rig and a deep cycle battery to charge my laptop.
Yours truly, WB3GCK, operating CW from my tent. (Photo by WA3WSJ)
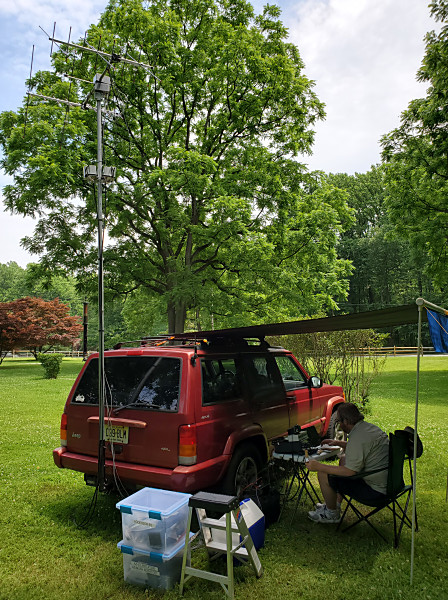
Glen NK1N worked the satellites and had a slick setup for his Jeep. The Jeep also served as his sleeping quarters. There’s a lot of tree cover at this site, so Glen set up in an open spot near the entrance to the property. As a result, he had his best year ever from this site.
NK1N working the satellites
Glen NK1N took a break from the satellites to tune into the W1AW digital broadcasts to copy the Field Day Bulletin. He also checked into the paNBEMS on Sunday morning to pass our Field Day radiogram to the EPA Section Manager.
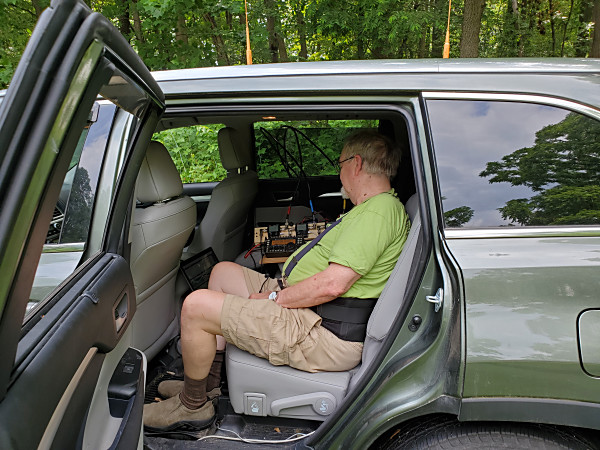
Not far from the satellite station, Ed K3YTR operated the VHF/UHF station from his car. Like last year, Ed slept in a slick, little teardrop trailer he rented for the weekend.
K3YTR working VHF and UHF from his car.
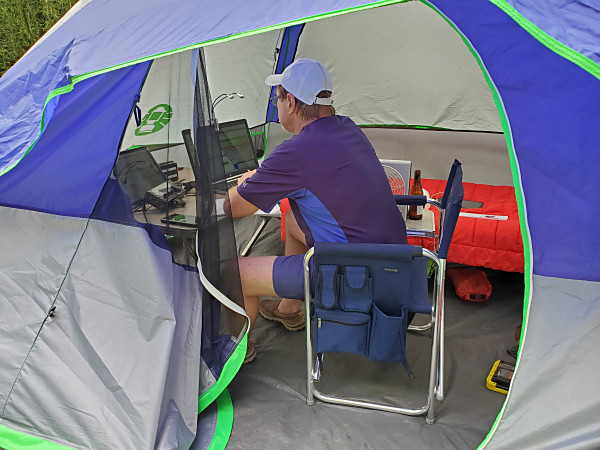
Ron WA8YIH operated both digital modes and phone from his tent/sleeping quarters. He also used a KX3 with an inverted L. Ron supplied the firewood for our evening campfires, which is a traditional feature of a Boschveldt Field Day.
WA8YIH operating FT8 from his tent
John NU3E has been a member of this group for a long time, but this was his first Field Day with us. John operated CW on 15M and 10M using a KX2 with a dipole. John used his backpacking tent for lodging.
NU3E operating CW. This was John’s first Field Day with the Boschveldt QRP Club.
Ed WA3WSJ operated CW on 20M, using his KX2 and an inverted L. Ed spent the first night on a cot underneath a tarp. He also had a neat sleeping setup in his car. He used that on Saturday night, due to the weather forecast.
WA3WSJ taking a break. Ed’s station is in the background.
Field Day for the Boschveldt QRP Club is by and large a social event; we aren’t in it for the score. Sure, we operate, but there are lots of breaks and plenty of socializing. We had a campfire each night and exercised our tradition of roasting marshmallow Peeps®. (If you haven’t tried roasting Peeps®, you haven’t lived!)
The initial weather forecast for Saturday looked dire. We were under a severe thunderstorm watch for Saturday afternoon and evening. Instead, we only had some light rain on Saturday morning. The rest of the weekend was dry and storm-free.
Despite our social distancing protocols, we had a fun weekend. It sure was great to be out of our homes and camping with old friends again.
After months of closed state park campgrounds due to the pandemic, I was finally able to go camping in our little trailer. I was expecting a relaxing and peaceful weekend, but what I got was something different.
Back before the pandemic shut everything down, I made a reservation at Elk Neck State Park in Maryland for Father’s Day weekend. So we headed out on Friday for the delayed start of our camping season.
We had a great campsite; it was large, private, and surrounded by woods. The site didn’t have electricity for the camper, but we often camp that way. Propane and battery power are all we need for a weekend of camping in the camper. After getting situated, we had dinner and enjoyed a relaxing campfire. And, of course, my antenna went up, and I set up the radio.
Our campsite at Elk Neck State Park in Maryland. This was literally the calm before the storm.
During the evening, the trailer battery started to fade. Eventually, it died altogether. It’s a 100 Ah deep cycle battery that has served us well for several camping seasons. Without it, we had no lights, the propane refrigerator wouldn’t start, and we had no water for the toilet. (I can hear the backpackers out there laughing right now.)
Fortunately, I had an extra 35 Ah battery I could press into service as a backup. After swapping a few connections, we were back in business. We used some alkaline battery-powered lights inside the camper to minimize the current draw on the smaller battery.
On Saturday, we awoke to some great weather and watched a deer pass by in the woods. Radio-wise, I started the day with a CW chat with KB4GYT in South Carolina. But, as the morning progressed, we started hearing some rumbling off in the distance. By mid-day, the storms moved in, and it continued to rain the rest of the afternoon.,
To our good fortune, the rain let up around dinner time. As we were finishing our dinner, however, we heard the propane gas detector in the trailer starting to chirp. That chirp meant we had another depleted battery on our hands.
At that point, we could have reverted to tent camping mode, using our battery operated lights and making use of the campground bathroom facilities. (We had other workarounds for using the toilet in the trailer, but I’ll spare you those details.) We had two coolers, so we could deal with the loss of the refrigerator. Plus, we still had another battery for charging phones and running a fan. We tent-camped for many years, so we’ve done all this before.
In the end, we decided we didn’t want to spend our time implementing workarounds for our workarounds to extend our stay one more night. We had to be out by mid-day the next day, anyway. So, we took advantage of the remaining daylight to hastily pack up and head home.
In between the thunderstorms and dealing with trailer battery issues, I managed to make a half-dozen contacts. Of those, two were Parks on the Air (POTA) park-to-park contacts. At times, the static crashes made radio reception difficult. I can only imagine what my 5-watt signal sounded like on the other end.
It was nice while it lasted. Well, most of it was, anyway. Instead of camping, I’ll spend Father’s Day getting my tent camping gear together for Field Day next weekend. Oh yeah… and shopping for a new battery.
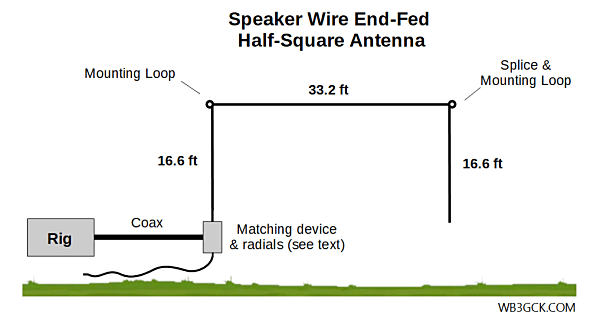
I’ve been intrigued by the half-square antenna for some time now. I don’t have the real estate to put one up at home, so I built one for portable use. Like my other speaker wire projects, this antenna is built from a 50-foot length of cheap, two-conductor wire.
You can think of the half-square as two quarter-wave verticals spaced a half-wavelength apart. It provides some gain over a quarter-wave vertical and has a low take-off angle. The half-square has a bi-directional pattern with lobes broadside to the antenna and nulls off of the ends.
Normally, the half-square is fed with coax at the top of one of the vertical elements and functions as a single-band antenna. The coax should be kept perpendicular to the vertical leg, to avoid interaction. That arrangement, however, would be somewhat awkward for a portable antenna.
For expediency in the field, I went in a different direction. I decided to feed it at the bottom of one of the vertical legs, which is a high impedance point. I use a 9:1 unun to reduce the high input impedance to something easier for a tuner to handle.
I designed this antenna for the 20M band, but I wanted to use it on other bands as well. By using the 9:1 unun to feed the bottom of the antenna, I’m able to squeeze some more bands out of it. A tuner is required, of course.
Refer to the accompanying diagram to help make sense of the following steps.
Separate the speaker wire into two 50-ft wires
On one of the wires, install a spade lug at one end. This will be the connection to your matching device)
From the spade lug, measure up 16′ 7.2″ and make a small loop using two small zip-ties.
From the second wire, cut a length that is about 16′ 9″ or so.
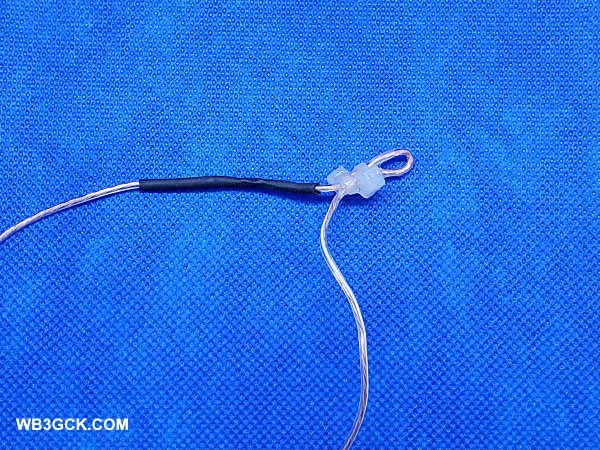
Strip and splice the smaller wire to the end of the larger wire. After soldering it, I covered the splice with heat-shrink tubing.
Next to the splice, make another small loop, using two zip-ties.
At the end of that wire, twist the wire to form an attachment loop. When you do this, make sure you have 16′ 7.2″ from the splice to the attachment loop.
I applied some Goop® adhesive to the loop at the end of the wire to hold it together. I also added Goop® to each of the other attachment loops.
As is my usual practice, I added some Goop® to where the wire enters the spade lug to add some strain relief.
At this point, the antenna is finished. You can, however, cut the leftover wire in half to make two radials for 20M (approximately 16 feet, give or take). I installed a spade lug on each of these wires and twisted the other ends to make a small loop. You guessed it; I put Goop® on these wires, as well.
This photo shows the splice and one of the mounting loops used in the Speaker Wire Half-Square.
Matching
[Update (6/17/2020) – After initially publishing this post, I received some great feedback from readers. As a result, I have updated, clarified, and expanded this section.]
For my first couple of outings with this antenna, I used a 9:1 unun as a quick and dirty way to get it on the air. I run about 18 feet of RG-8x coax from the unun to the radio. There’s nothing particularly critical about the coax length, but I would recommend a minimum of 16-feet for 40M and up. The exact length of the radials isn’t critical either since they’re laying on the ground. In fact, you can probably use the antenna without them. In this case, you’re relying on the coax shield for the counterpoise.
While the 9:1 worked fine, there are more efficient ways to match this antenna. I plan to continue experimenting with other methods to match the high-impedance input on 40M and 20M.
I haven’t tested them myself, but the end-fed halfwave tuners from Pacific Antenna and QRPGuys should work on 20M and 40M. They use a parallel resonant circuit and are designed to match an end-fed halfwave (EFHW) antenna.
An EFHW transformer, like the ubiquitous 49:1 transformer, should also work. You will likely need to do some pruning on the antenna to get the SWR where you want it.
Finally, a simple L-Match antenna tuner with a tapped inductor in series and a variable capacitor across the output looks like it may be the best solution for me. It should handle the high impedances on 40M and 20M, and work on other bands like a random wire tuner. This will definitely be part of my next round of experiments.
Deployment
Deploying this antenna is a snap and takes me about 5 minutes. I use two collapsible poles to support it. I attach one corner to a partially-extended 28-foot Jackite pole. The feed point of the antenna is about 3 feet off the ground.
These are the two poles I used to support the Speaker Wire Half-Square. Unfortunately, the wire is too thin to be visible in this picture.
I use a 20-foot Black Widow pole (actual length about 19.5 feet) to support the other end. I support this pole with an appropriately-sized screwdriver shoved in the ground. The handle of the screwdriver fits snugly inside the bottom section of the pole. After attaching the other corner of the antenna to top of this pole, I extend the pole and remove the bottom cap. Next, I walk the pole back until the horizontal section is taut. Then, I just shove the screwdriver in the ground and place the pole over it.
With appropriate trees nearby, you might be able to eliminate one or both of the poles. I’m not usually that lucky.
Results of Field Testing
I was pleased with the results of my initial field tests with the half-square. The internal tuner in my Elecraft KX3 was able to load the antenna from 80M through 6M. (Since the antenna’s input impedance is low on 80M, I wouldn’t recommend using the 9:1 there.) The SWR was 1.2:1 or better on all bands with the tuner.
During my first outing with the half-square, I was able to make contacts on 40M, 20M, and 15M at 5 watts with no difficulty. The antenna is a half-wavelength on 40M, and it appears to play well on that band. I had numerous Reverse Beacon Network spots on 40M showing a signal-to-noise of 20db or better.
I also used it in the field during a recent QRP contest with similar results. Signals were strong on 40M, and I worked Georgia and Quebec on 20M.
This was hardly a rigorous scientific evaluation, but I’m happy with this antenna so far. One of these days, I’d like to do some modeling to see what the radiation patterns look like on the various bands. In the meantime, I’ll do some more experimenting with impedance matching.
Wrap-Up
This was an easy and fun project. It certainly made good use of a roll of cheap speaker wire. After using this antenna in the field a couple times, I have officially added it to my arsenal of portable antenna options.
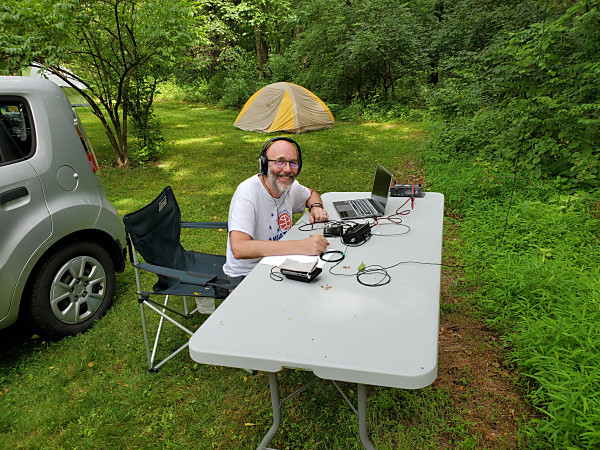
After some damaging storms this week, we were blessed with some great weather for the weekend. Today was a perfect day to head outdoors for the annual Cookie Crumble QRP Contest.
The Cookie Crumble is a QRP contest run by Tim Carter W3ATB and Emily Saldana WC3R. It was inspired by the cookies that Emily used to make during the 2016 National Parks on the Air event. You get bonus points for working stations designated as Cookie Monsters. What’s unique about this contest is that you lose points for working Burnt Cookie stations. In any event, it’s a lot of fun.
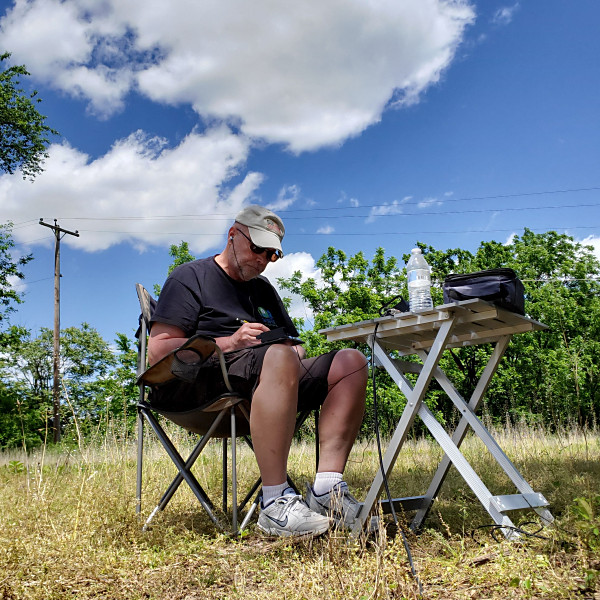
My set up for the Cookie Crumble QRP Contest.
This year, I headed out to my daughter’s farm to operate from one of the fields. My setup was almost identical to the setup I used last weekend. I used a half-square antenna made from cheap speaker wire, along with my KX3. I set up my chair under a shady tree—for a while, at least.
I wasn’t out for too long, but I worked 10 stations in the contest. One of those was a Cookie Monster station. Fortunately, I didn’t encounter any burnt cookie stations.
Some of the highlights from today included:
My first QSO was with my old friend, Carter N3AO, down in Virginia. It was great to hear him again.
I worked VE2DDZ, who was doing a joint Cookie Crumble and SOTA activation. Malcolm had a great signal into Pennsylvania.
Outside of the contest, I worked WD8RIF who was doing a Parks-on-the-Air (POTA) activation from Ohio.
WB3GCK hard at work (or hardly working) in the Cookie Crumble QRP Contest.
After a while, I began to lose my shade and I was starting to get a little sunburned. Right before I started tearing down, I heard another old friend, Dan KA3D, very faintly. I gave him a couple of calls but, sadly, he couldn’t hear me. We were probably a little too close for 40M. Maybe next time.
It was a great day to be outside playing radio. I also got some more on-the-air experience with my homebrew half-square antenna, which I’ll document in my next post.
Thanks for Tim W3ATB and Emily WC3R for running this fun contest.