Regular readers of this blog know that my homebrew 19-ft vertical is my go-to antenna for “stationary-mobile” operations. I use a low-tech mounting system in the bed of my truck involving a plastic milk crate, a cargo bar, and some bungees. When we go on our annual vacation to North Carolina, unfortunately, I have to remove the crate to free up storage space. I plan to activate a park or two while on vacation this year, so I wanted to come up with an alternate antenna arrangement.
I bought the GRA-7350TC antenna with this specific scenario in mind. Previously, I tested this antenna with a magnetic mount that I had stashed away in the basement. Although a couple of successful POTA activations proved its viability, I wanted something better than my little mag mount.
Browsing around on Amazon, I found a stainless steel bracket with an SO-239 to ⅜-24 mount. I was reluctant to drill holes in my truck, but I thought a couple of small holes in the truck’s bed wouldn’t be too bad. So, I placed an order.
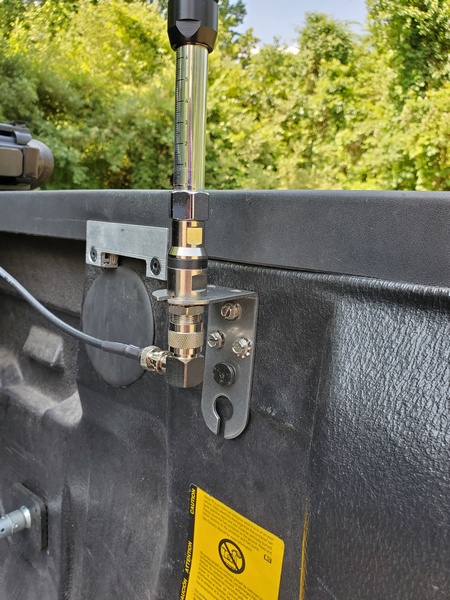
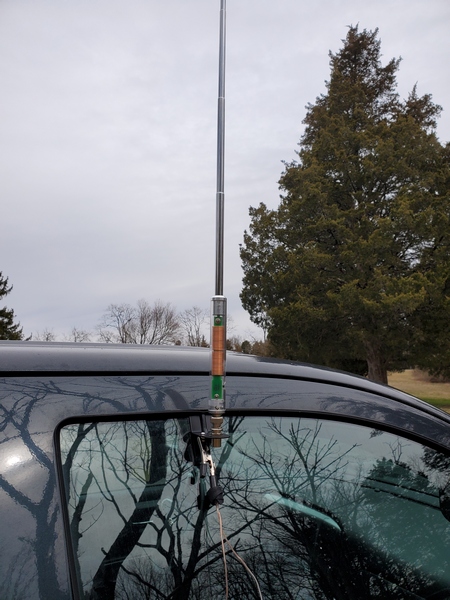
The Sirio M1 stainless steel antenna mounting bracket I found on Amazon
The bracket arrived the next day. It’s really heavy-duty and possibly overkill for my application. My local hardware store had an excellent selection of stainless steel hardware. I bought some #12 x 1-inch sheet metal screws and some star washers.
The next step was figuring out exactly where to mount it. I had to make sure that I could still close the truck bed cover without hitting it. By dumb luck, I chose a spot where I could use one of the screws that fastens the truck’s bed liner. This placed the mount close to where I wanted it. Then, it was a quick task to drill pilot holes for the three additional screws. Mechanically, it felt solid, and an ohmmeter check confirmed continuity to the truck’s body.
The bracket installed in the bed of my truck with the antenna installed. The black screw is an existing screw I took advantage of.
I gave the new mount a trial run at Ridley Creek State Park (K-1414, KFF-1414). It took me about a minute to get the antenna set up on the mount, and it was a perfect fit. I ran an 18-foot length of RG-8x coax (much longer than I really needed) to the Penntek TR-35 inside my truck.
Using an antenna analyzer, I first tuned it up on the 40M band. I couldn’t get the SWR down below 2:1. This also happened when using the antenna on a magnetic mount, too. I’m guessing a different length of coax or a counterpoise wire might help. In any event, I tuned the antenna to resonance and used a tuner to keep the rig happy. The first QSO was a station in Georgia who gave me a decent signal report.
The Gabil GRA-7350TC antenna in use
The SWR on 30M was a bit lower but still above 2:1. Again, I had no problems making contacts with the antenna. On 20M and 17M, the SWR was down to about 1.2:1 or thereabouts.
Despite the time spent fiddling with the antenna, I logged 13 contacts, with three park-to-park QSOs. I also worked W1HNJ on 40M and 30M. As part of Museum Ship Weekend, they were operating the radio console from the hospital ship, SS Hope. The radio console is now part of the Chatham Marconi-RCA Wireless Museum on Cape Cod, Massachusetts.
I still have some tinkering to do, but I think the mounting bracket will work just fine. I won’t be retiring my homebrew vertical anytime soon, but the GRA-7350TC gives me another option when the need arises.
During a POTA activation a few days ago, I was in the middle of a QSO when my Palm Mini paddles started behaving erratically. I knew right where to look for the cause of the problem.
The Palm Mini paddles have been my go-to paddles in the field for many years. Although the German manufacturer, Palm Radio, is no longer in business, they are still the only paddles I take along for portable work. They are compact, have a great feel, and work perfectly with the clipboard arrangement I use in the field. I loved the first set I bought and later acquired a second set.
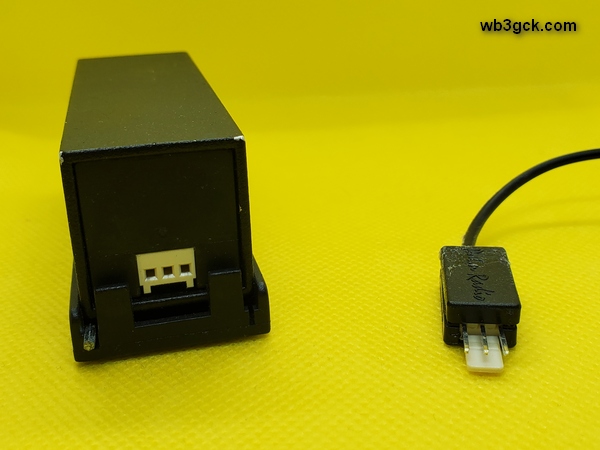
These great little paddles have one weakness: the cable connection. The three-pin connector is similar to standard header pins with a two-piece plastic backshell held together with a tiny screw. Once inserted into the paddles, there’s no locking mechanism to hold it in place. It’s definitely not the most rugged arrangement. After my first encounter with cable issues, I ordered a couple of replacement cables. Sadly, that’s no longer an option.
During my most recent episode of cable problems, the connector backshell had fallen apart, leaving the tiny wires exposed. I grabbed a spare cable and was back in business in short order.
Fortunately, after some searching, I found the two backshell pieces on the floor of my truck. The screw that holds the backshell together goes into a threaded boss, which had broken. I encountered an identical failure on another cable a couple of years ago, so I knew how to deal with it.
After I got home, I carefully checked the wire connections and confirmed that they were still intact. So this time, the fix was just to reassemble the backshell. Since I could no longer screw the two halves back together, I had to resort to drastic measures. I call this the “final fix.” Once implemented, it can’t be undone.
This photo shows the rear of the Palm Mini Paddles (left). On the right is the connector I repaired by gluing it back together. In my haste to repair the cable, I neglected to take pictures of the inside of the connector.
I positioned the connector in the bottom half of the backshell and re-checked the connections. Then, I applied a dollop of Goop™ adhesive inside the backshell and put the top half on. The Goop™ filled the inside of the backshell, holding it all together and providing some additional strain relief for the tiny wires. After cleaning off the adhesive that squeezed out during assembly, I clamped the backshell overnight. The next morning, I gave it a test and confirmed that everything was still working.
I’ve seen webpages describing ways of replacing the fragile connector with something more robust. I’m not quite ready to perform major surgery on my beloved Palm Mini paddles. Someday, I suppose, I’ll have no choice.
I looked at my log the other day and saw that I had only made a measly two HF contacts this month. Between the grandkids’ school functions, soccer games, horseback riding competitions, and my knee issues; I haven’t had much time for my QRP-portable activities. I set out to change that this morning with a drive to Valley Forge National Historical Park (K-0761, KFF-0761).
A few weeks ago, while nursing my injured knee, I made an impulse purchase. After watching some YouTube videos, I went on Amazon and bought a Gabil GRA-7350TC antenna. The last thing I needed was another antenna—I blame YouTube and Amazon. Actually, it wasn’t a totally frivolous purchase; I have plans to use it during a trip later this summer.
I also bought the matching GRA-ULT01 MK3 tripod for the antenna, which I planned to try out today. I put together some radials to use with the tripod setup.
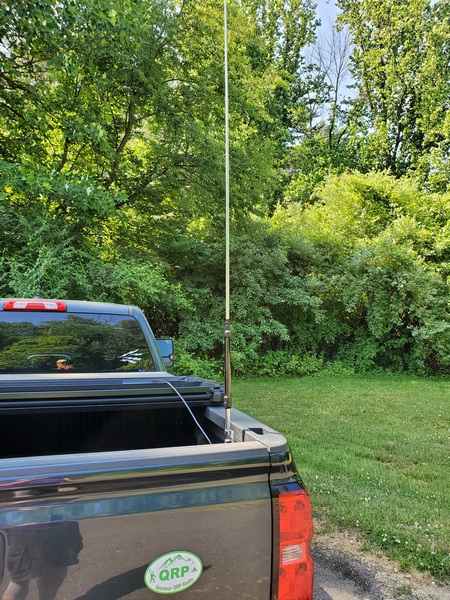
As I headed out the door this morning, I grabbed an old magnetic mount base I had from an 2M/440 antenna. Since I bought the GRA-7350TC with the ⅜-24 stud mount, the antenna was a perfect fit for the mag mount. I figured I’d give that a try, while I was trying out the antenna.
It was raining when I got to the park this morning, so I kept things simple and tried out the mag mount. In doing so, I learned something about my six-year-old truck: The hood isn’t made of steel. The rest of the truck is, but not the hood. Who knew? (Probably every Chevy Silverado owner but me, I guess.) I ended up putting the antenna on the roof where I could easily reach it. Inside the truck, I used my Penntek TR-35 (5 watts).
The Gabil GRA-7350TC on a magnetic mount from an old 2M/440 antenna.
The sliding coil adjustment made tuning up a snap. Using my old MFJ-226 antenna analyzer, it only took a minute or two to get the antenna tuned up on 40M. I’m not a big fan of having to take an antenna analyzer out in the field, but this was relatively painless. Band changes only took about a minute. Most of that time was setting up the antenna analyzer for the band of interest.
I used the new antenna on 40M, 30M, and 20M with decent results. In the end, I had 16 contacts, including five park-to-park QSOs. I’m sure my little magnetic mount wasn’t providing the best ground in the world, but at least I know it’s usable in a pinch.
Hopefully, June will provide more opportunities to get out portable. Since my old knee has been feeling a little better recently, I’m hoping to get back on the bike again at some point. I already have some ideas for a bike mount for the GRA-7350TC.
I made a quick run down to Ridley Creek State Park (K-1414) for an early morning POTA activation. For a few minutes, though, I thought I might fall short of the 10 contacts needed to complete the activation.
I dusted off my old MFJ-1820T 20M whip antenna and thought I’d try it out on my window mount. Inside the truck, my Elecraft T1 tuner loaded it right up. After calling CQ a few times, I checked the Reverse Beacon Network (RBN). The first spot I received was from Costa Rica. So, the antenna seemed to get out OK. I was running about five watts from my TR-35.
The MFJ-1820T 20M whip on my old window mount
Things got off to a good start on 20M. I had a steady stream of callers for the first several minutes, and I was getting strong RBN spots to the west of me. Then, things slowed down. It was five minutes before the next QSO. Then another six minutes after that. I was beginning to consider the prospect of a busted activation when activity picked up again. I suspect it was just a bit too early on a Sunday morning.
After I had 11 contacts in the log, I switched to the Elecraft AX1 to give 17M a try. I didn’t hear much activity there, and the RBN wasn’t seeing me at all. I stayed with the AX1 and went back to 20M.
The activity on 20M started picking up this time around. When I wrapped things up, I had 20 contacts in the log, with two park-to-park QSOs. I didn’t have any DX contacts today, but I did work two Idaho stations.
I continue to be amazed at what you can do with five watts and one of these little whip antennas.
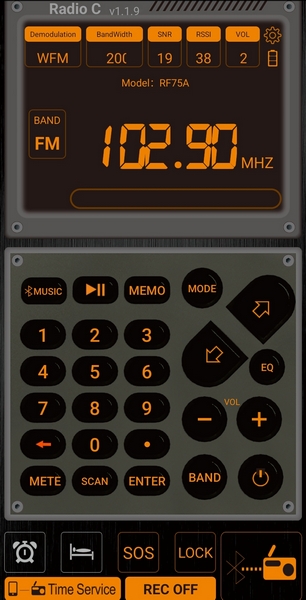
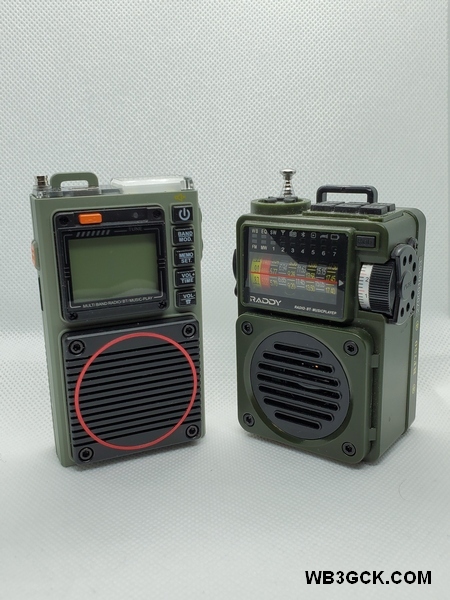
Since I purchased the Raddy RF750 Portable Multimedia Player a year ago, it has become my favorite portable receiver. So, when the folks at Radioddity asked me if I’d like to have a look at a new upgraded version, I jumped on it. The new radio is the Radioddity RF75A Shortwave Radio, and it includes some interesting new features.
[Disclaimer: In the interest of full disclosure, Radioddity sent this radio to me free of charge to evaluate and review. However, the opinions expressed here are entirely my own and were not influenced by the vendor.]
What It’s All About?
Like its predecessor, the RF75A is a multimedia device. It covers the AM, FM, Shortwave, Weather, and VHF bands. In addition, you can play audio files from a micro SD card. In Bluetooth mode, it’ll play audio from an external source. You can also connect a computer to the USB connector and use the RF75A as a speaker.
FM: 64-108MHZ (Step Value: US: 10KHZ, EU: 9KHZ) AM: 520 -1710 KHz SW: 4.75 – 21.85 MHz WB: 162.400 – 162.550 MHz VHF: 30 – 199.975 MHz TF Card Max Capacity: Max 256GB Audio Format: MP3, WAV, WMA Size/Weight: 3.6’’ x 2’’ x 1” / 3.7 oz Components & Accessories: 1 x RF75A, 1 x Storage bag, 1 x Lanyard, 1 x Wire antenna, 1 x Type-C cable, 1 x Earphone
The internal 1000mAh battery is charged via a USB-C connector, which is handy for a portable radio. The RF75A also has a built-in flashlight and an “SOS” mode. In the SOS mode, the flashlight flashes and the radio emits an ear-piercing siren.
At the time this post was written, the RF75A was selling on the Radioddity website for $52.99 (USD).
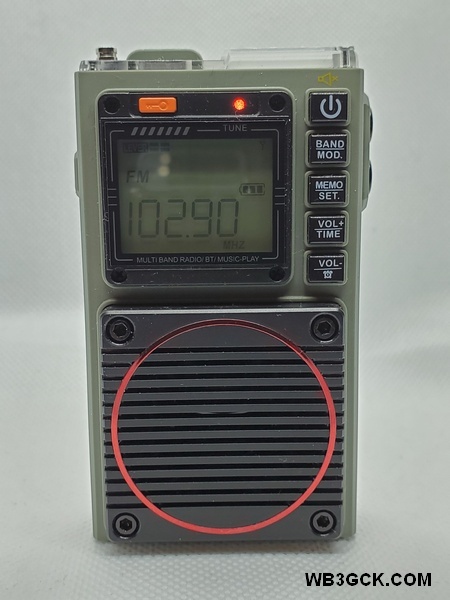
The Raddy RF75A from Radioddity
Major Improvements in the RF75A
While the basic functions of the RF75A and RF750 are similar, there are some big changes in the RF75A. The first thing you’ll notice is the digital display and digital tuning. I found the analog tuning on the RF750 a little touchy and the frequencies hard to read. The RF75A’s digital tuning makes tuning much easier.
One interesting improvement in the RF75A is an app that lets you control the radio from your smartphone over a Bluetooth connection. While the RF75A is pretty simple to operate as it is, the app makes it even easier.
Screenshot of the RF75A Android app, which allows you to control the radio from your smartphone.
My Impressions
The first thing that struck me is the RF75A’s small size. It’s smaller than an Altoids tin and thinner than the RF750, so it’ll easily fit in your pocket.
The Raddy RF75A (left) compared to the RF750. Besides the digital display and controls, the RF75A has a slimmer profile making it more “pocket friendly.”
Like the earlier radio, the sound quality is impressive. Listening to the FM band, the sound through the speaker has a rich sound you wouldn’t expect from such a small radio. The supplied earbuds are comfortable and also sound great to these old ears. The RF75A seems to have a little less bass than the RF750, but the sound is still very good.
I found the reception on the AM broadcast band to be very good, easily pulling in local stations. Because of high noise levels, my home location isn’t the best place for testing the shortwave bands. However, using the scan function, I was able to find several shortwave stations. I should note that the RF75A only receives in AM on the shortwave bands. So, if you want to listen to SSB or CW signals, you’ll have to look elsewhere. It comes with an antenna wire (approximately 10 feet long) that you can clip onto the built-in antenna to improve reception.
On the VHF band, I programmed in some local 2M repeaters and a few public service frequencies to test it out. Using the buttons on the radio, I found the tuning steps too coarse to zero in on some frequencies. Using the app, however, it was a simple task to enter the frequencies and save them as presets. Reception was good, but there’s no squelch setting. So, you’ll hear some background noise between transmissions.
The memory card function works great and gives you a choice of four different play modes. I set it to play my MP3 files in random order. You can also choose from six different EQ settings. Using the RF75A’s Bluetooth mode, I was able to pair it to my cell phone and play audio files that way.
I also tested the alarm function. I like having the option to have the radio turn on instead of sounding an alarm. The alarm sound is a loud series of beeps, so I’d rather wake up to music.
The smartphone app is easy to install and makes it easy to operate the radio (especially for my old eyes). The Android version of the app, however, requires the manual download and installation of a .apk file. I would feel safer getting the app through the Google Play store, instead of downloading it from an unfamiliar website. Apple iPhone users, however, can get the app from the Apple app store.
Once installed, the app requires access to your phone’s location in order to pair with the RF75A. I’m not sure why the Bluetooth pairing depends on location. In any event, I only allow access to the phone’s location when I’m actually using the app, and I close the app when I’m not using it.
While the Operational Guidelines booklet provided with the radio is sufficient to get you up and running, it’s not without some issues. The wording is confusing in some places, and I came across a few errors and formatting issues. Despite these editorial shortcomings, I had no problems figuring out how to use the radio.
The Radioddity website claims 7-8 hours of use from the 1000mAh battery. I haven’t actually measured it, but that seems about right. The USB-C charging port is handy, too. I can charge it using my cellphone charger or a portable power bank when I’m camping.
The last function I evaluated was one of the more important features for me: the weather alert function. To test it out, I set up the RF75A in the “Alert” mode in time for the weekly NOAA Weather Radio test. The alarm went off as expected, and boy, did it ever go off! Like the RF750, the weather alert triggers an extremely loud siren. Along with the siren, the light on top of the RF75A flashes, just like the SOS mode. I really wish there was the option to just activate the weather radio in response to an alert. Or, at the very least, be able to adjust the volume of the siren. As it is, I can’t imagine using it in a campground at night.
The Bottom Line (for me, at least)
All in all, I really like this little radio. It’s small in size, weighs next to nothing, and sounds great. I like that it’s simple to operate without having to navigate through a bunch of menu options. The smartphone app is a terrific improvement that further simplifies things.
Since I received it, the RF75A has seen a lot of use around the house, and I plan to take it along on camping trips and travel. Now, if there was only a way to tone down that weather alert, I’d be a very happy camper.
Inspired by some blogs I follow, I’ve recently dusted off my Elecraft AX1 antenna and started putting it to use. Until now, I’ve kept it stashed away in my backpack as a backup antenna that I’ve never needed.
So far, I’ve used this versatile little antenna a couple of ways. Most recently, I’ve used it with an old window mount, while operating “stationary-mobile” in my truck. I’ve also used it while “picnic table portable,” using an Elecraft AXT1 tripod mount and my little Ultrapod tripod. If I’m using my KX3, I can use the AXB1 BiPod Mount to support the antenna.
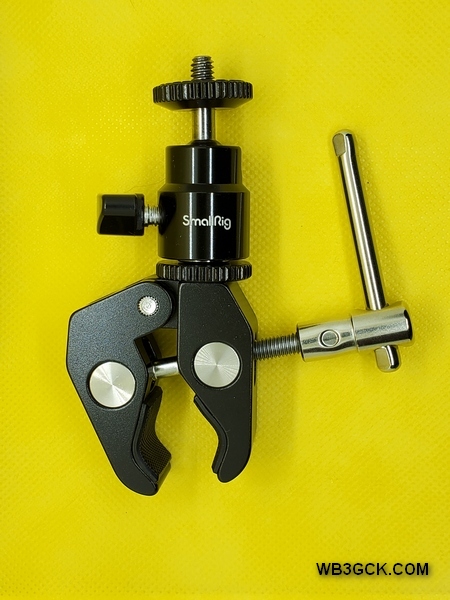
One other use case I wanted to address is operating “bicycle portable.” If I’m out on a bike ride and stop for some radio, it would be handy to use the bike to support the AX1. Browsing around on eBay, I came across an interesting camera mount clamp that looked like it might work well with the AXT1.
I found this gizmo listed as a “clamp mount ball head” from a company called, SmallRig. It’s a clamp with a standard ¼-20 camera mount, and it works perfectly with the AXT1 tripod adapter. I can fasten the clamp to the handlebars, to give the AX1 some elevation. I would post a link for the clamp, but eBay listings come and go too fast. However, if you search for “clamp mount ball head,” you should find lots of them from a variety of sellers.
This is the camera clamp I used. When coupled with the Elecraft AXT1 tripod mount, it made for a very versatile mount for my AX1 antenna.
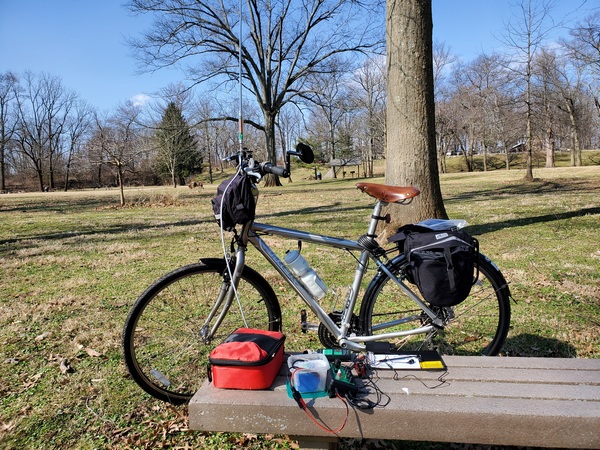
To test it out, I packed my radio gear and headed out for my first bike ride of the year. I rode a few miles on the Schuylkill River and Perkiomen trails to a local park.
The AX1 mounted on the handlebars of my bike.
I set up my TR-35 on a bench in the picnic area and mounted the AX1 on the handlebars of my bike. Even with the bike leaning, the clamp’s adjustable swivel allowed me to keep the antenna vertical. I used two radials clipped to the AXT1 tripod adapter with an alligator clip. A six-foot length of RG-8x coax was more than enough to reach the rig. I was on the air in about 3 minutes.
My setup in the park with my AX1 bike mount. I used two 12.5-foot radials attached to the AXT1 tripod mount with an alligator clip.
The T1 tuner easily tuned up on the 20M band. During my brief stop in the park, I worked POTA stations in Virginia, Illinois, and Georgia. Pleased with my new bike mount, I packed up and continued on my ride.
I have a feeling I’ll be taking this handy antenna setup along on more bike rides in the future.
Sometimes, you just have to be flexible. Originally, I had planned to do some bike riding today and experiment with a bike mount I cobbled together for my Elecraft AX1 antenna. However, Mother Nature decided to throw some freezing temperatures at me today. Instead of a cold bike ride, I opted for a more comfortable “stationary-mobile” POTA activation.
I loaded up my gear and made the quick trip to nearby Evansburg State Park (K-1351). My setup today was similar to the one I used a couple weeks ago. I used my AX1 antenna on a window mount. The rig today was my PennTek TR-35 (5 watts), coupled with an Elecraft T1 tuner. The TR-35 limited my operation to the 20M and 17M bands. With this simple setup, I was on the air within a couple of minutes of arriving.
My window-mounted AX1 antenna
Contacts on 20M came as easily today as my last activation with the window mounted AX1. I had my first 10 contacts in about 15 minutes. I was pleased to get a call from K4SWL down in North Carolina. Thomas has a bunch of recent posts on the AX1 over at qrper.com. Of course, I had to let him know I was using an AX1 today.
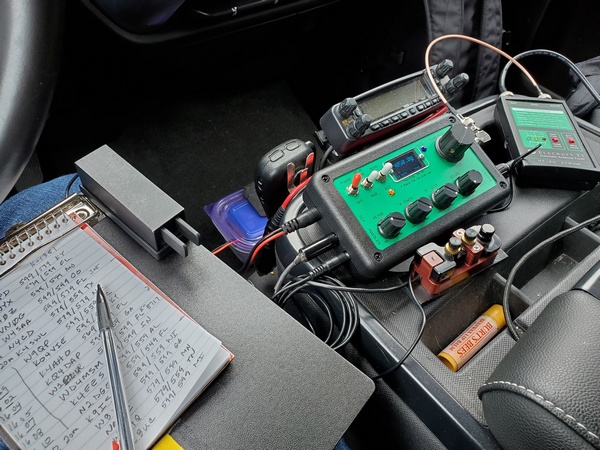
The organized chaos in the cab of my truck, which includes my PennTek TR-35 and Elecraft T1 ATU.
After logging 20 contacts on 20M, I changed over to 17M. I didn’t have as much luck, but I made four contacts there. After that, I went back to 20M to make a couple of park-to-park contacts. My last contact was with WA3GM. Greg is a local ham who is spending some time in Florida and was activating a park down there.
I shut down after an hour of operating with 26 contacts in the log including 3 park-to-park contacts.That exactly matched the results from my last activation with the AX1. This little antenna never ceases to amaze me.
Hopefully, we’ll get some more moderate temperatures this week, so I can finally get that bike ride in.
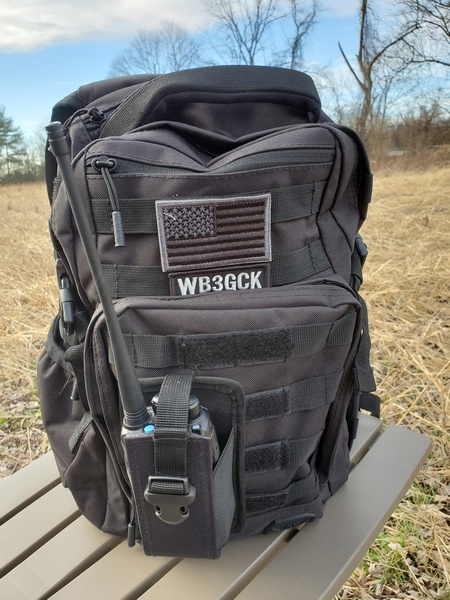
Over the past couple of years, some knee issues have slowed me down. My new knee joint resolved those issues, and life is getting back to normal—as normal as my life gets, I suppose. Anyway, I’m planning to get back to doing some light hiking this year as the weather improves. With that in mind, I bought a new backpack to use on day hikes.
For the past four years, I have been using the Rambler sling pack from Red Rock. It has been—and still is—a great backpack. It has plenty of storage for hauling a radio and accessories out to the field, and it is one sturdy, well-built pack. My only issue with it is that it is a sling pack. For short trips, it’s fine. But, for longer trips, having all the weight on one shoulder feels a bit “lopsided” to me. If I could have the same pack with two shoulder straps, I would be a happy camper (hiker).
A while back, I came across the Wakizashi backpack from Samurai Tactical and saved it to my Amazon wishlist. The Wakizashi is similar in size to my Rambler sling pack. While it has fewer storage pockets than my sling pack, it has more than enough storage for my needs. (I tend to carry too much stuff with me anyway.)
When I purchased it, the Wakizashi backpack in black was selling for a mere $24 (USD). (Other colors are available at slightly higher prices.) For that price, if I didn’t like it, I could always give it to one of the grand-kids. The average ratings were 4.6 out of 5, so I took a chance and placed an order.
I should also note that I have no financial interest here; I paid for the backpack with my own funds. Also, the Amazon link above is not an affiliate link.
Amazon delivered the pack to a neighbor’s porch a few days later. I had to wander the neighborhood in the rain to find it. Not cool, Amazon.
I wasn’t expecting much for a $24 backpack, but I was pleasantly surprised. For a cheap backpack, it seems well built. A few of the many reviews complained of poor stitching and general issues with quality. I saw none of that in the item I received. Mine was well-built, and the material appears to be durable enough.
Samurai Tactical Wakizashi backpack. The patches and HT pouch were added by me.
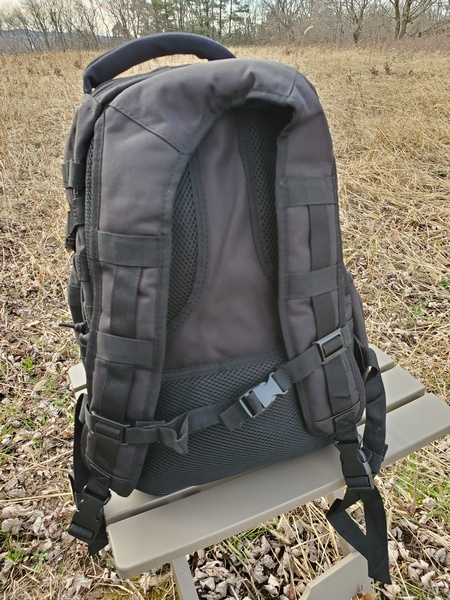
The pack measures 17.1 x 11.1 x 6.1 inches with a capacity of 24 liters. There’s a large main compartment and a smaller admin compartment. There are also two smaller compartments near the top of the pack. A side pouch is large enough for a water bottle, and there is plenty of MOLLE webbing on the sides and back. If you’re so inclined, it accommodates a hydration bladder and has a hydration port at the top of the bag.
Samurai Wakizashi backpack shoulder and sternum straps.
Although the Wakizashi backpack has fewer compartments than my sling pack, there is enough storage to accommodate everything I normally carry in the field. Besides the radio gear, I always carry a small first aid kit, emergency poncho, headlamp, and a few other emergency items. The main compartment is a bit larger, so things that present a tight squeeze in the sling pack fit easily in the Wakizashi.
I’ve been using this pack for the past couple of months now with no issues. How well it holds up in the long term remains to be seen. For now, anyway, I’m happy with this budget backpack.
Recently, Thomas K4SWL over at QRPer.com featured an excellent guest post from W2AEW describing a car window mount Alan built for his Elecraft AX1 antenna. Inspired by Alan’s post, William KR8L, did some experimenting and came up with his own window mount. These folks got me thinking—a dangerous thing, sometimes.
I remembered a commercially made window mount I bought 25+ years ago. (I think it came from RadioShack, but I’m uncertain of that.) Back then, I was traveling for work a lot, and I usually took my old RadioShack HTX-202 HT along with me. When I was using a rental car, I used the window mount with a rubber duck antenna. When parked, I used a 2M half wave telescopic antenna on it. I hadn’t used it—or seen it—in years. It was somewhere amongst the miscellaneous stuff acquired over my 48 years in ham radio.
It took a little searching, but after rummaging through some old parts, I found the old window mount. The mount is made of steel with a female BNC connector on it. It also has six feet of RG-58 coax attached. The coax is more than enough to reach the center console of my truck from the passenger side window.
The old window mount I resurrected from the junk box. The bolt next to the BNC connector is something I added.
The next task at hand was to figure out a way to connect a counterpoise wire to the mount. The steel mount has a black coating on it, which electrically isolated the BNC connector from the mount. To resolve that, I removed the BNC connector and used a rotary tool to remove some of the coating around the mounting hole. Then, I drilled a hole for a small bolt that I could use as a place to attach an alligator clip for the radials.
I already had an Elecraft AX1 antenna that I bought years ago when they first came out. I usually carry it in my backpack as a backup antenna, but I really haven’t used it very much. So, I guess it’s time to put it to use.
To see how this setup worked, I drove over to nearby Valley Forge National Historical Park (POTA K-0761) for a brief activation. Along with the AX1 on the window mount, I used two 12.5-foot radials. I have to admit it was nice being able to deploy an antenna in less than a minute.
My AX1 deployed on the window mount with two radial wires clipped on.
Back in the truck, I fired up my KX3 running five watts. I was prepared to crank the power up to 10 watts, if need be, but that proved unnecessary. Within a minute of spotting myself, the calls started coming in. The signal reports were decent, and I was seeing some strong hits on the Reverse Beacon Network. It took all of 12 minutes to make my prerequisite ten contacts.
In less than an hour, I had 14 contacts on 20M, nine on 17M, and three on 15M. Among those 26 QSOs, I had one park-to-park contact with a station in Quebec. At one point on 17M, I had a DX station calling. I believe it might have been Italy, but I just couldn’t pull out the entire callsign. My apologies to that station, wherever they were.
The AX1’s performance was a pleasant surprise. Although it has been in my antenna arsenal for a few years now, I really haven’t given it a serious test. Well, that changed today. It has proven itself to be a worthy antenna choice, when a larger antenna is impractical.
Thanks to W2AEW and KR8L for inspiring me to dust off my old window mount and put it to good use.
During my last POTA activation, the eyelet at the top of my trusty 20-foot Black Widow telescopic pole snapped off. This pole has served me well for over 25 years, so I can’t blame the pole. The Black Widow poles are still available from the manufacturer, so I could have just bought a new one. But hey, what fun would that be?
After staring blankly at the broken pole for a while, I rummaged through my stash of parts and came up with an easy fix. I found a small ring terminal that fit snugly over the top of the pole, so I just glued it on using some Loctite outdoor adhesive. In keeping with my usual practice, I added a small key ring (split ring) to the eyelet replacement. (For more on the rationale for the split ring, check out this post.)
My quick and dirty replacement for the broken eyelet on my Black Widow telescopic pole. I simply glued a ring terminal to the top section of the pole.
Well, that was easy enough. Hopefully, this silly little hack will squeeze 25 more years of use left in this old pole. It probably won’t, but a guy can dream, right?