Among the Christmas gifts my XYL gave me was one that sums me up perfectly. She understands my love of coffee, and she is very supportive of my ham radio hobby. With this sweatshirt, I can proudly display both of my addictions.
One of the Christmas gifts I received from my XYL. It suits me perfectly!
I don’t have a link to the source, but my XYL says she found it on Amazon.
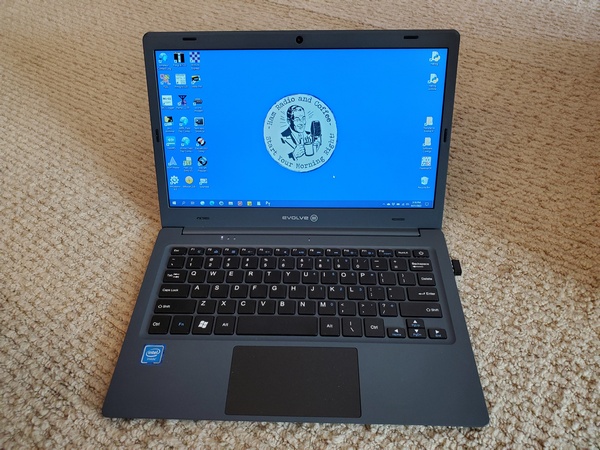
You’ve most likely heard hams talking about the Evolve III laptop over the past few months. I had been hearing about these little laptops being snapped up at prices as low as $60. Several ARES-RACES colleagues have been happy with them, and there’s even one running 24 x 7 as a VARA FM digipeater in our Emergency Operations Center. So, I had to buy one and judge for myself.
So, what is attracting hams to this laptop? Of course the low price is attractive to frugal hams. It’s also small (11.6-inch display) and light, making it useful for portable operation. Speaking of portable operations, you can charge the Evolve III from a 12-volt DC source. Out in the field, you can charge this laptop from the same type of 12-volt battery used to power your rig.
Evolve III Maestro E-Book
Despite its low cost and small size, it’s a capable little machine. It runs the Windows 10 Pro Education operating system, and has two USB ports and a micro SD memory card slot. A 1.1 GHz Celeron processor runs the laptop, and it has 4 GB of RAM and 64 GB of data storage.
Micro Center stores have been selling them for $59.99 with a limit of five per customer. When I checked my local store, they were out of stock, so I bought one on Amazon for about $89. (Still a bargain, I think.) These laptops are obviously clearance items, since the Evolve website shows newer models running Window 11.
My plan for this little laptop is to use it for logging during QRP-portable operations, especially Field Day and Winter Field Day. I also want to use it for digital communications during ARES-RACES exercises and deployments.
Getting started with the Evolve III was the same as any other Windows 10 device I’ve owned. The initial Windows setup didn’t take long, and I was ready to install some software. I started by installing the software I use for logging, e.g., N3FJP ACLog, SKCC logger, HamRS, N3FJP Field Day Logger, etc. Everything ran without issues.
Next I installed the software I need for ARES-RACES. First up was Winlink Express, along with VaraFM and SoundModem. Then, I installed the Narrowband Emergency Messaging System (NBEMS) software, i.e., fldigi, flmsg, and flamp. Over the past two weeks, I’ve been making solid connections to a local Winlink node on 2M using VARA FM. The NBEMS software has also been working great during our local ARES-RACES digital nets.
After using the Evolve III daily for the past few weeks, I really like it. The keyboard has a good feel to it, and the display looks good. I used it outdoors in the shade and the display was still readable. You might need to crank up the brightness, though.
Is it the fastest laptop? No way. Is it fast enough? Absolutely. I’ve heard of hams running FT8 on these things with no issues. You would think the 64GB of storage would be a limitation. However, after installing the ham radio applications I use, I still had about 24GB left. Just in case, I took advantage of the Micro SD card slot and added an extra 128 GB of storage.
I’m really impressed with the battery life. Depending on what I’m doing, I get more than eight hours of operation on a charge.
Lately, it seems like my house is where computers go to die. I’ve had a laptop and a desktop go belly-up in recent months. Given what I paid for the Evolve III, if it dies, I won’t feel a tremendous loss.
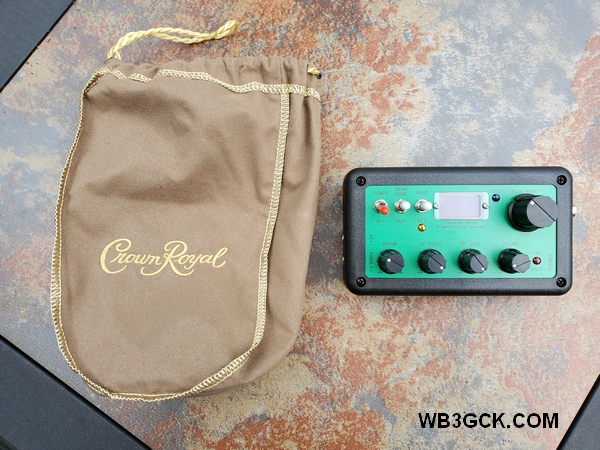
Over the years I have accumulated a stash of the bags that Crown Royal whiskey comes in. I don’t drink much hard liquor myself, but I have a relative who enjoys a nip now and then. She knows I have a thing for bags and containers, so she passes them along to me. I graciously accept them, figuring someday I’ll find a good use for them.
When I take my Penntek TR-35 on the road, I use a repurposed insulated lunch box to carry the radio, an Elecraft T1 tuner, along with a variety of accessories. Pending a better solution to protect the TR-35 from bouncing around, I wrap some bubble wrap around it before placing it in the box. Decidedly low-tech, but effective.
The Crown Royal bag, along with my TR-35 transceiver
The lunch box works great, but it’s a little bulky for my sling pack. So, for hiking, I usually pack the TR-35 loose in the pack, with a rubber band around the bubble wrap.
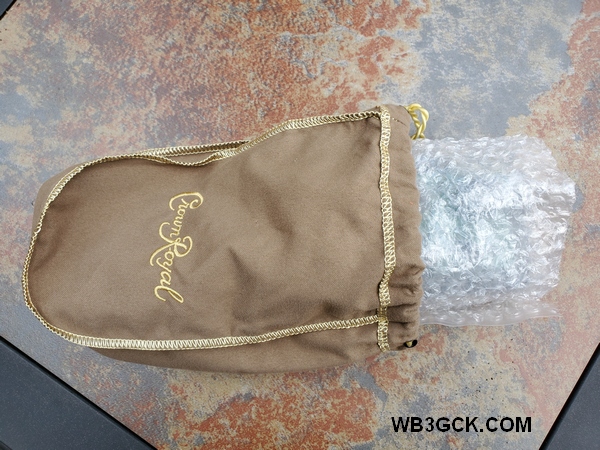
The bubble-wrapped TR-35 going in the bag
I found that a Crown Royal bag provides a more elegant solution for packing the TR-35 (or other small QRP rig). I just wrap the bubble wrap around the radio and place it in the bag. There’s no longer a need for the rubber band. Plus, there’s enough room in the bag to accommodate the T1 tuner.
The Crown Royal bag with my TR-35 tucked away inside
These bags don’t offer any real protection from the weather, but they look cool. My collection of bags includes a variety of colors, so I can change them to match my mood (just kidding—let’s not get carried away here).
So, there’s a crazy little hack for you to ponder. If you’re a Crown Royal drinker, save the bags. Your radio just might fit in there.
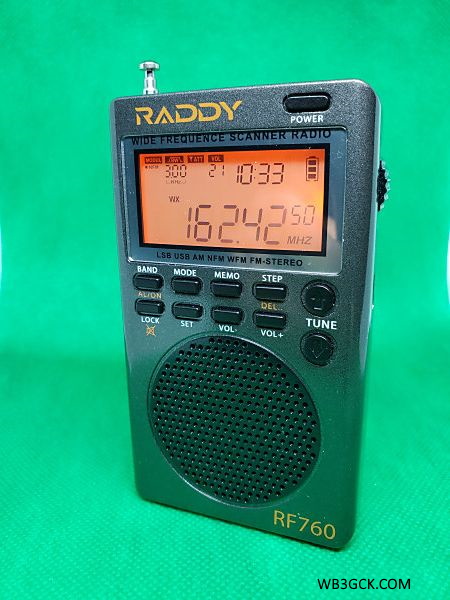
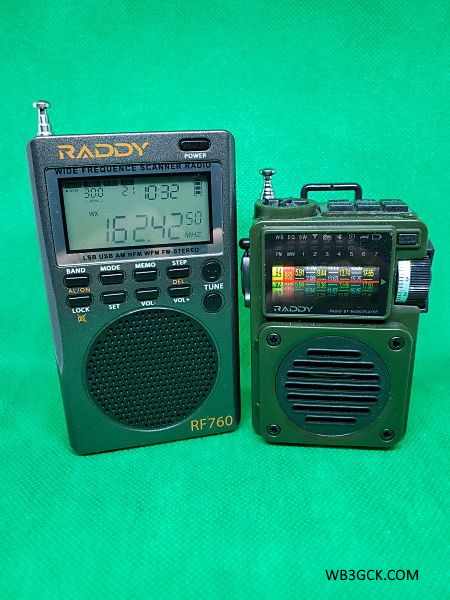
A while back, I purchased the Raddy RF750 Multimedia Music Player and did a blog post reviewing that remarkable little radio. The folks at Radioddity reached out to me recently to see if I would be interested in taking a look at their latest offering. A week or so later, I received the Raddy RF760.
[Disclaimer: In the interest of full disclosure, this radio was sent to me free of charge to evaluate and review. This was with the understanding that I would write an honest and unbiased review.]
What It Is
The seller refers to the RF760 as a “full-band radio”. That’s an apt description, since it covers everything from the AM broadcast band up through the UHF range.
With the battery installed, the RF760 weighed in at a mere 3.8 ounces (108 grams) on my kitchen scale.
The box includes:
RF760 radio
1000MAH 3.7V Lithium battery
Earbuds
USB-C cable for charging
External antenna wire (approx. 10 feet)
Wrist strap
Storage pouch
User manual
RF760 vs RF750
It’s clear from the specifications that the RF760 is not an upgraded RF750. The RF750, with its Bluetooth and ability to play MP3 files, is more of a multimedia player. The RF760 does not have those capabilities, but, rather, provides expanded frequency coverage.
The Raddy RF760 (left) and the Raddy RF750
In my view, the RF760 is aimed more towards shortwave listeners and scanning enthusiasts. It includes features like selectable bandwidths, selectable demodulation modes on certain bands (AM/USB/LSB/NFM), and adjustable squelch.
The RF760 also includes a headphone jack (earbuds included) and a connection for an external wire antenna. These features are lacking on the RF750. The RF760 also has a digital display, which the RF750 does not. Both radios are charged via a USB-C connector.
The RF760’s additional features come with a higher price tag. As of this writing, it was selling for $99.99 USD
My Impressions
The RF760 is one small radio. It’s roughly about the size of an Altoids tin and weighs next to nothing. (It weighs about 0.65 ounces less than the RF750.) You can fit the RF760 in a shirt pocket, and you might even forget that it’s in there.
There’s a lot going on with the RF760. Even with the power off, a press of any button will light up the display showing time and temperature. Oh yeah, did I mention this thing even has a built-in thermometer? It even includes an alarm clock and a sleep timer. If you can think of a function, the RF760 probably has it.
The user manual does a decent job of covering the myriad of features in this radio. The small size of the printed manual, however, is a little tough on my old eyes. Fortunately, the Raddy website has a PDF version of the manual for downloading. The softcopy manual allows me to search for specific functions, which is handy. I also stored a copy on my cell phone, so I always have it available. As is typical of manuals for Chinese products, some of the wording is not always clear. For example, a section covering how to delete a station that has been saved to memory is titled “Delete the radio.”
The various configuration options (e.g., bandwidth, demodulation mode, tuning increments) vary according to the band you are on. Once you get the hang of it, navigating through the options and selecting specific values becomes an easy task.
In the FM mode, the sound quality is reasonably good, considering the RF760’s diminutive size. In all honesty though, I think the RF760’s audio lacks the richness and fullness of the RF750. When using the included earbuds, however, the RF760’s audio is greatly improved. On FM, make sure you have the radio set for the proper de-emphasis (75 microseconds here in the U.S.).
The weather alert function is one of the more important features for me, and I had the opportunity to give it a “real world” test. My area was under a tornado watch, and we had multiple severe thunderstorm warnings. While tuned to the weather band, a long press of the “SET” button places the radio in the “SCAN” mode. When NOAA issues an alert, the radio comes on with a brief tone followed by the weather station’s audio. There’s no loud siren like the RF750 has, but that’s fine with me. After an alert, you need to long-press the “SET” button to go back into the “SCAN” mode. During the storms, the RF760’s weather alert function worked flawlessly, going off three or four times.
Tuning is interesting in that it uses a combination of two methods: up/down tuning buttons on the front panel and a rotary “shuttle tuning” knob on the right side of the radio. You can select the tuning increments for the buttons, which is helpful. You can also select the digit of the displayed frequency that is adjusted by the rotary knob. Now, I’m an old “knob spinner” from way back, so I’m generally not a big fan of using buttons for tuning. However, once you get the hang of using the shuttle tuning knob, you can tune to a specific frequency quickly. You can also scan the selected band by long-pressing the “up” or “down” tuning buttons.
There’s a lot of information shown on the display panel. On such a small radio, though, I find a few of the smaller items hard to read with my old eyes. Fortunately, these are items that I don’t have to deal with often. You folks with better eyes probably won’t have a problem.
I haven’t done any formal measurements on battery life, but you should be able to go for days before recharging. The USB-C charging port is handy; I can charge the radio with the same chargers I use for my phone.
Bottom Line
The RF760 is a small, lightweight, and feature-packed radio. For camping or in my emergency go-kit, I’d go with the versatility of the RF760. It’s like the Swiss Army knife of radios. I especially like how the NOAA weather alert feature is implemented on this radio. However, If I want to listen to music while working around the house, I’d go with the RF750 and it’s superior audio.
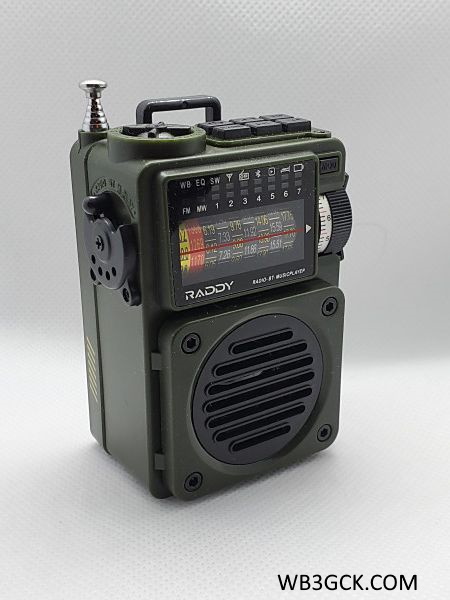
My (far) better half and I like to keep a radio in our little travel trailer. When we’re camping, we often listen to baseball games in the evening (go Phillies!) while sitting around the campfire. It’s also handy to have a weather radio on hand, when the cell service is unreliable or non-existent. I bought this little radio to see how it compares to the old radio we’ve been using for years.
The Raddy RF750 is sold by the folks at Radioddity. When I went out to their website to buy one, it was showing “sold out.” They had some in stock, however, on Amazon, so I placed my order there. The same radio is also available at a lower price from Chinese sellers branded as the HanRongDa HRD-700. Being the impatient sort, I went with Amazon Prime at a slightly higher price than the $34.99 price tag on the Radioddity website. (When I checked a few days after receiving my radio, Amazon was showing it as “currently unavailable,” and Radioddity was still “sold out” in the U.S. These things must be selling like hotcakes.)
The Raddy RF750 from Radioddity
What It Is
The Raddy RF750 is a compact multimedia player with a radio that covers the AM, FM, shortwave, and the NOAA weather bands. It has a Bluetooth mode, so it will play audio from your smartphone. The RF750 will also play MP3 files from a micro SD memory card (up to 256GB) you can insert into the unit. It’s powered by a 1000mah Li-ion battery, which you can recharge via a USB-C port on the radio.
When playing audio via Bluetooth or SD card, the RF750 has an audio equalizer with six preset configurations to choose from. You can also set the radio to scan a band automatically and store the stations it finds (up to 20 stations each on FM and AM, 10 stations on each of 7 shortwave bands). This can be useful when you’re traveling. There is also a sleep timer that will shut off the radio after a user-selected time (10 to 70 minutes).
Here are the specifications from the Radioddity website:
FM: 87.5-108MHz AM: 520-1720KHz SW: 5.7-17.9MHz WB: 162.400-162.550MHz Memory: Support TF card, Max 256GB Audio format: AV, WMA Power supply: replaceable 3.7V 1000mAh BL-5C lithium battery included Charging: DC 5V, Micro USB-C interface Size: 3.5″ x 2.4″ x 1.5″ Weight: 0.22lbs
My Impressions
When I first unboxed this thing, the first thing that struck me was the small size. The descriptor, “compact,” is an understatement. It’s smaller than an Altoids tin and just a bit thicker. Weighing in at less than 4 ounces, it won’t add much weight to your go-kit or backpack.
Along with the radio, the box included the Li-ion battery, USB charging cable, wrist strap, a rubberized drawstring storage pouch, and a user manual. The battery was easy to install and charge up.
I powered it up and tuned to a local FM station. Frankly, I was blown away by the sound coming out of this little radio. Apparently, it uses DSP filtering to provide that sound clarity. Given the radio’s small size, tuning can be a little touchy for an old guy with clumsy fingers. Fortunately, there’s a tuning indicator that makes it easy for me to lock in on a station.
I was particularly interested in the weather band capabilities. In addition to covering the 7 NOAA weather channels, the RF750 also includes a weather alert function. In this mode, the audio is silenced, and the radio appears to be scanning the 7 weather channels. I haven’t been able to test this out yet, but I plan to see what happens during NOAA’s next weekly test.
[Update: I set up the RF750 in the “Alert” mode for the NOAA weekly weather radio test, and the RF75o’s alert went off as expected. The only issue is that the siren sound it makes is excruciatingly loud. On a positive note, when a weather emergency happens, you will definitey know about it!]
When I tested the Bluetooth mode, it paired easily with my smartphone. Although my phone’s audio played through the RF750 was nice and clear, I don’t see myself using this function much.
To test the “Music Player” mode, I copied a few MP3 files to a 2GB micro SD card, which I inserted into the RF750. The sound quality coming out of the tiny speaker really impressed me. I plan to load more of my music collection onto a larger memory card, which I’ll leave installed in the RF750.
I was a little surprised that the RF750 doesn’t include an earphone jack. I would have expected one on a portable radio like this.
The user manual provided is typical of low-cost Chinese products. The English isn’t always clear, but it was enough for me to figure out how to use the various functions.
I have to say, I’m impressed with this little unit and all the features packed into it. It will be a handy item to have around, especially while camping or during emergencies. In fact, during a recent snowstorm, we lost power for a while. The RF750 allowed us to check the local NOAA weather forecast, listen to local news on the AM band, and enjoy some music on FM.
Disclaimer: I have no financial interest in this product. I purchased it with my own funds, and I’m merely a satisfied customer.
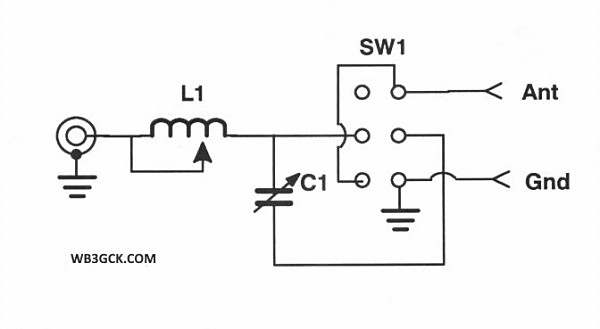
In a recent post, I wrote about an old antenna tuner I built about 25 years ago. Although a description of it has been online for decades, I never posted pictures of it. So, here it is.
I originally posted an article about this tuner on my QSL.net website under the title: A Simple and Flexible Tuner for QRP. Once my go-to transmatch for portable use, it had been on the shelf for quite a while. I hadn’t opened the case in 20 years, so it was a nostalgic walk down Memory Lane for me.
Schematic of the “Simple and Flexible Tuner for QRP.”
All of the parts used for this project came from my junk box or were re-purposed from other projects. This is the second tuner to inhabit this enclosure, so the variable capacitor and rotary switch were already in place.
The coil is consists of 40 turns of enameled copper wire on a plastic 35mm canister. The wire appears to be 22 AWG. I wasn’t shooting for any particular inductance value; I just started winding turns. Based on the dimensions of the coil, the total inductance appears to be approximately 31 uH. I tapped it in 8 places and wired it to a rotary switch. I used two-sided foam tape to secure it to the bottom of the enclosure. I left the cap on the film canister so that the lid would press down slightly on it. This helps to securely hold the coil in place.
Inside view of the tuner
The variable capacitor was salvaged from an old radio by a friend of mine. It’s a two-section capacitor, totaling about 365 pf, according to my notes. I added a switch to select between one or both of the sections. Because the capacitor is sometimes in series with the coil, I used some thin fiberglass material to insulate it from the chassis.
Front panel of my old antenna tuner. The switch selects one or both sections of the variable capacitor.
To the best of my recollection, I purchased the aluminum box at Radio Shack back in the day. I finished off the project with some embossed labels made on an old Dymo label maker. They look tacky, but they’re still holding up after all these years.
Rear view of my old tuner. The slide switch on the left selects the configuration. In the “LO” position, the coil and capacitor are in series. In the “HI” position, the tuner is configured as an L-match tuner.
After spending 15 or more years on the shelf, this funky-looking tuner has been seeing a lot more use lately. I mostly use it as an L-Match for end-fed wires. (I’ve only used the low impedance, series connection a few times over the years.) It’s a great portable tuner for QRP when weight isn’t a consideration.
I have the parts on hand to build a lighter L-match when I need to carry a tuner in my backpack. Until I find the time to put it together, I’ll keep using this funky old tuner.
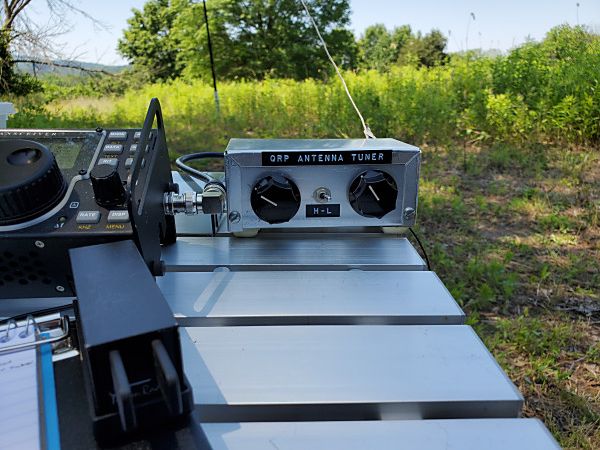
According to the weather prognosticators, today is the start of a 4- or 5-day heatwave here in southeastern Pennsylvania. So, I wanted to get out early for some antenna testing before things heated up too much.
I planned to play around with the speaker wire end-fed halfwave antenna I built recently. To do this, I went back to my favorite antenna test range—my daughter and son-in-law’s property.
I set up the formerly 66-foot wire (now about 63 feet) in an inverted-V configuration. Since the last time I used this antenna, I trimmed off a couple of feet to see if I could get my little Hendricks SOTA tuner to load it on 20M.
I started with the SOTA tuner on the 40M band and worked a POTA activator in Indiana. I moved up to 20M, but the SOTA tuner wouldn’t tune below a 2.2:1 SWR.
Before I left the house today, I had the forethought to pack an old antenna tuner I built about 25 years ago. I used it extensively years ago, but I relegated it to the shelf when fancier equipment came along. I switched to the old tuner, which I configured as an L-match. It loaded up nicely on 40, 20, and 15 meters. As a bonus, the old-school tuner gave a good match on 30 and 17 meters.
My 25-year-old homebrew antenna tuner. It doesn’t look like much, but it did a nice job with my end-fed halfwave antenna cut for 40M.
After I finished experimenting with the antenna, I set out to make a few contacts. It was a busy day for Parks-on-the-Air (POTA) activators. I worked 10 of them in 8 states plus Puerto Rico. Three of the QSOs were on 17 meters. It was nice to hear POTA activity up there.
All in all, I was pleased with how my old homebrew antenna tuner performed. I don’t think it will be spending as much time on the shelf in the future.
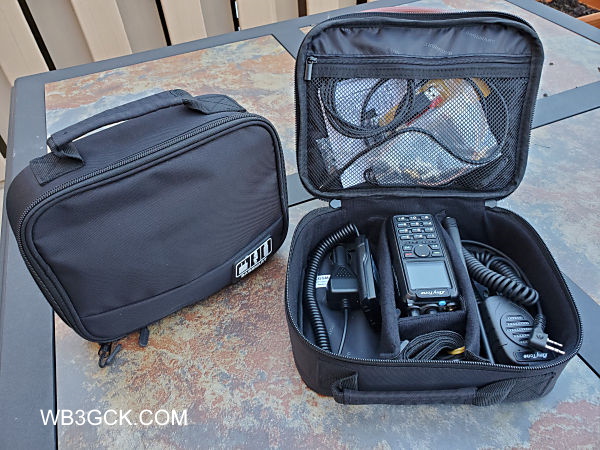
I mentioned in a previous post my obsession with bags and cases for equipment. Well, this post is further evidence of that.
Over the past year or so, I purchased a couple of new HTs. It was a long-overdue upgrade. I first acquired a Kenwood TH-D74. About six months later, I came across a deal on an AnyTone AT-D878UV I couldn’t resist. Accessory-wise (batteries, chargers, antennas, etc.), these radios are very different. So, I wanted a way to organize these accessories and pack everything for travel and ARES-RACES events.
After looking at available options, I settled on an electronics travel organizer from a company called Bagsmart. They weren’t very expensive, so I bought one for each HT. I purchased my bags on Amazon for well below the list price shown on the manufacturer’s website. The specific models available on Amazon, however, seem to come and go.
The bag measures 9.4″L x 7.5″W x 2.8″H and is constructed of water-resistant—not waterproof—nylon. It weighs a mere 0.25kg/ 0.55 pounds. There three padded partitions that attach with Velcro that can be repositioned or removed. The bag also has a zippered mesh compartment under the lid that is great for storing cables, adapters, etc. There’s also a small compartment intended for memory cards or thumb drives. Despite its small size, it has sufficient room for everything I use for each radio.
My HT “go bags.” Several items were left out of the open bag, for the sake of clarity. I often pack a desktop charge, roll-up J-Pole, a couple of spare batteries, and a hotspot for digital voice modes.
These bags have been perfect for my needs, but they do have their limitations. While they offer some protection for your radios, we aren’t talking Pelican cases here. If you need something water-tight that you can bang around on a rock, these bags aren’t for you. These are light-duty bags, to be sure.
My only complaint with these bags is that the partitions are somewhat flimsy. Something a bit more rigid would be more to my liking. They do, however, keep things separated inside the bag.
There’s nothing earth-shattering here, but if you need an inexpensive way to organize your gear, this bag (or something similar) might do the trick. The usual disclaimer applies: I have no financial interest in this company or their products. I’m just a satisfied customer.
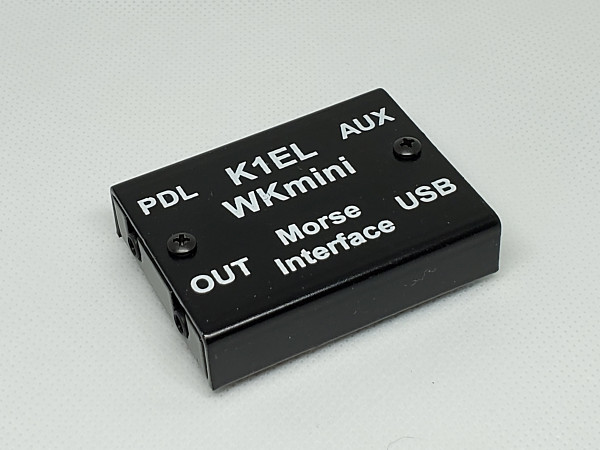
I haven’t bought any new ham radio toys lately, so I decided to upgrade the homebrew passive CW interface I use for contesting. I had been looking at the K1EL WKmini USB keyer for a while. I recently bought one, and it fit my needs exactly.
I’m not a big contester, but for Field Day, Winter Field Day, and some POTA activations, I key the radio using macros in the logging software. For years, I used a passive interface built into a DB-9 connector, along with a USB-to-RS-232 adapter. The interface consists of a resistor and a 2N2222 transistor. It served me well, but occasionally, there were some hiccups. With this simple interface, the logging software on the laptop is doing all the CW work. Once in a while, I noticed some timing issues in the code sent.
The WKmini is based on the WinKeyer 3 chip and designed for use with contesting logging software. The WKmini takes on the work of generating the CW, so it eliminates those timing issues. The logging software sends commands and data to the keyer, and the keyer does the rest.
The other nice feature is the paddle input. This feature allows me to instantly send CW manually when needed. I was able to do this in my previous setup, but it was a bit more complicated. The WKmini keyer is a more simple, elegant approach. Its small form factor makes it ideal for portable operating.
The WKmini Morse Interface from K1EL Systems. This compact device measures 2.25″ W by 1.75″ D by .5″ H.
The WKmini was incredibly easy to set up. I connected the keyer to my laptop, and Windows immediately recognized it. I used the free K1EL WKscan utility to determine which COM port the keyer was using. I connected the keyer to my KX3 using a stereo patch cable with 1/8-inch connectors. Using the K1EL WK3demo utility, I was successful in keying up the radio and sending some code.
The last thing I needed to do was to configure my N3FJP logging programs to use the WKmini instead of the old passive interface. The WKmini doesn’t have any external controls; the logging software provides the necessary settings. There is a long list of software that supports WinKey keyers, including the N3FJP suite of software. The User Manual covers the N3FJP software, which was helpful. So, with a few mouse clicks, I was in business. All of this testing and setup took less than 15 minutes.
Like other K1EL keyer products I own, the WKmini is a solid performer. I’m hoping to give this little gem a workout during Winter Field Day later this month.
My XYL says I’m obsessed with bags, cases, and containers. She might be right.
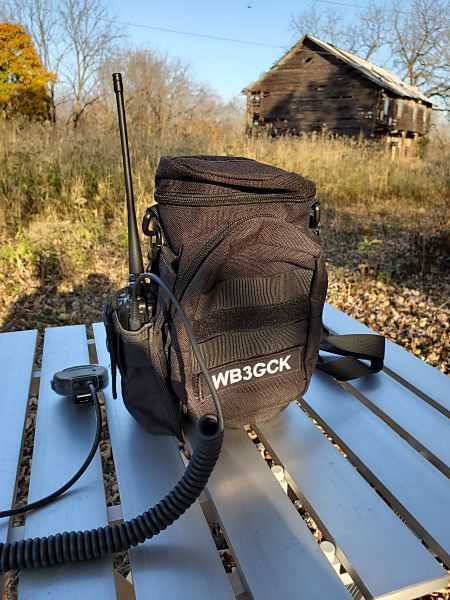
During normal years, I participate in several public service events with my local ARES-RACES group. For a couple of those events, I’m often out on foot away from my truck with an HT. I wanted a convenient way to carry a few essentials for those situations.
I put together this little kit last Winter, but it hasn’t seen much use. Sadly, the pandemic forced the cancellation of our public service events this year. This year has been anything but normal.
My water bottle carrier with HT pouch attached on the side
I wanted something to carry the following items:
Water bottle
HT
Spare battery for the HT
Small notepad and pencil
Minimal first aid kit (a few antiseptic wipes and bandages)
A few snacks
To carry everything, I bought a no-name water bottle carrier on eBay for about $13. I looked at lots of bottle carriers, but this inexpensive one was best suited to my needs. I’d provide a specific link, but these eBay offerings tend to quickly come and go. A search for “tactical military molle system water bottle bag” should should yield lots of options. I found some for less than $10. Of course, there are name brands out there that cost much more.
Here are the particulars of the one I bought:
The bag is constructed of 600D nylon. The specs say it’s waterproof, but I haven’t verified that.
The main compartment is 10.6″ tall and 4.3″ in diameter. It’s large enough to hold a 2-liter bottle. If I use a smaller water bottle, there’s room in this compartment for some other gear, too. It also has a zippered lid that will keep your gear from falling out.
There’s a 5.9″ x 4.3″ x 2″ gadget pouch on the front. This pouch is large enough for a couple of HT batteries, notepad, pencil, first aid kit, etc.
It has plenty of MOLLE webbing. A couple of them have Velcro for attaching patches. You could use the straps on the rear of the bag to attach it to another larger bag or your belt.
This bag certainly has room enough to carry everything I plan to carry in it. Heck, I’m sure I could carry a complete HF QRP station in it.
To hold my HT, I tried out several MOLLE-compatible pouches. The one I plan to use is a no-name item I bought from a Chinese seller on eBay. It only cost me about $4.00 (shipping included), but it works well with my current collection of HTs. I attached it to the side of the bottle carrier using the MOLLE webbing. An Internet search for “radio pouch” will bring you a dizzying assortment from which to choose.
As a final touch, I added a patch with my callsign on it. I ordered the 4″ x 1″ custom embroidered Velcro patch from a shop on Etsy. This little bit of vanity cost almost as much as the bag, but it looks good.
So far, I’ve only used this bag for a few short hikes. I haven’t used this bag for its intended purpose yet, but I’m hoping that will change next year. (Fingers crossed)