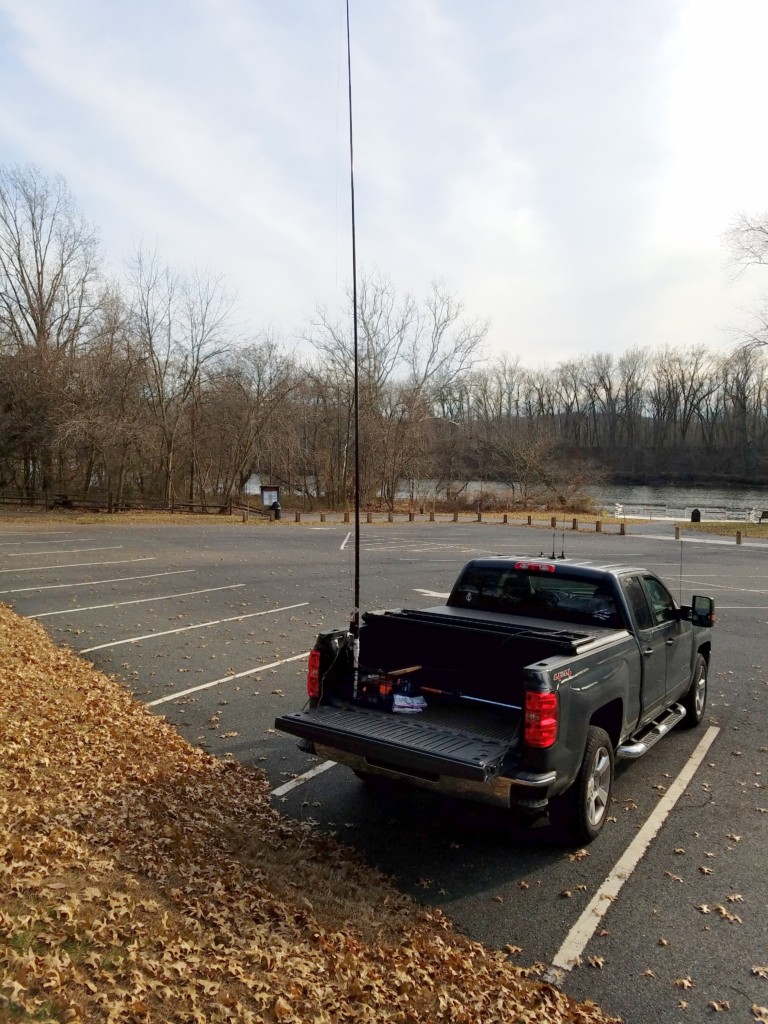
For several years my homebrew 19-foot vertical was my go-to portable antenna. Over the past two years, I’ve been using a variety of other antennas, relegating my trusty vertical to backup status under the backseat of my truck. I dusted it off recently to see how well the Elecraft KH1 would work with it.
I designed the antenna to be resonant on the 40 and 30 meter bands. On the 20M band and higher, it functions as a random wire, so a tuner is required. I was sure the KH1 would easily find a match on 40M and 30M, but I was curious to see how well it would fare on 20M through 15M.
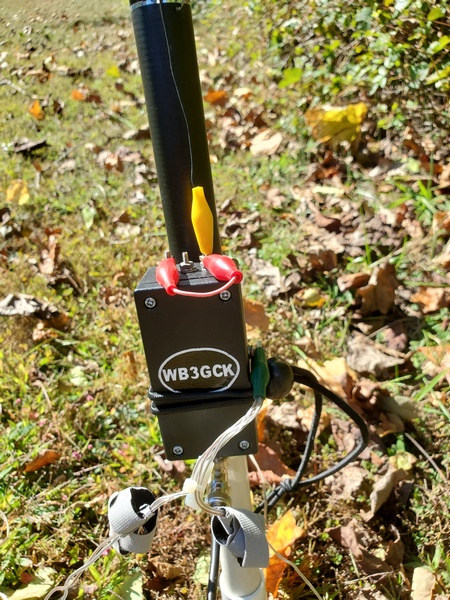
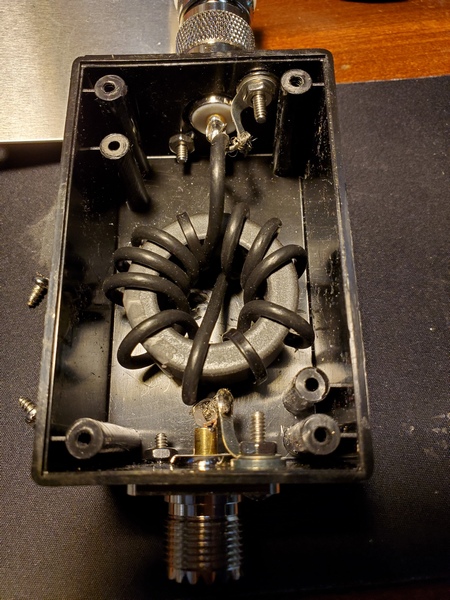
The matching unit for my 19-foot vertical. The red jumper is used for changing bands.
To test this out, I drove to Ridley Creek State Park (US-1414, KFF-1414). I had been to an ARES-RACES get-together that morning, so I swung into the park for a quick activation on my way home.
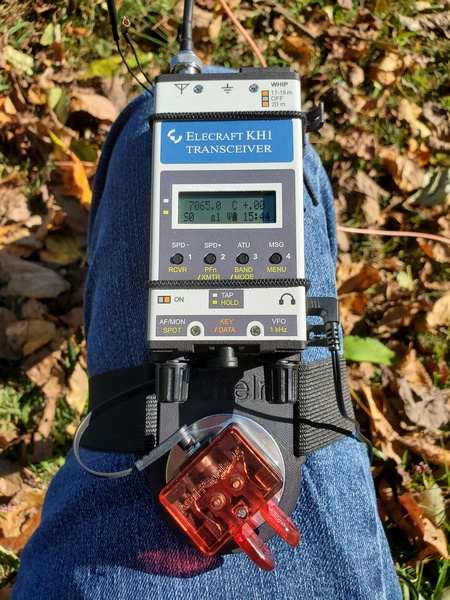
I set up at the edge of a field away from other park visitors. Since it was a weekday, the park wasn’t very busy, anyway. I supported the antenna on a cheap telescopic pole using my homebrew ground mount and spread out four 12.5-foot radials. From there, I ran 20-feet of RG-213 over to my camping chair, where I used the KH1 on a Tufteln KH1 knee board.
KH1 and Ashi Paddle 45 on a Tufteln KH1 kneeboard
Before I got started, I tried the KH1’s internal tuner from 40M through 15M. It easily found a decent match on each of the five bands. The SWR on 15M was 2:1, which is certainly usable for the KH1.
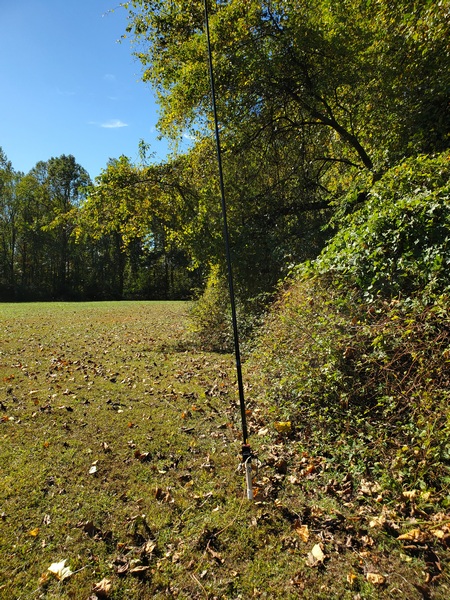
The 19-foot vertical on a slightly-leaning pole
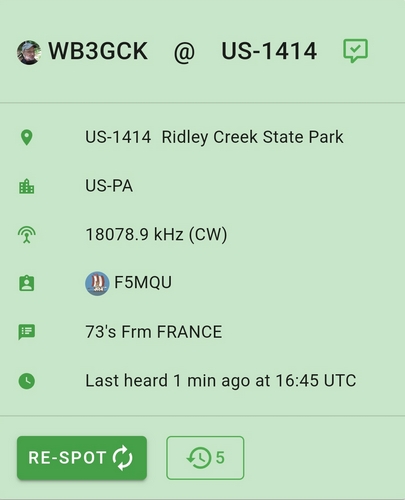
Despite some unsettled geomagnetic conditions, I made contacts on each band except 15M. (I didn’t hear any activity there this morning.) The antenna really worked well on 17M, where I had back-to-back contacts with F4ILH and F5MQU. Even with the geomagnetic wackiness afoot, I managed to log 16 QSOs. Five of those were park-to-park contacts.
Spotted by F5MQU
It was good to get the old vertical out in the field again. I’ve been thinking about re-packaging it to reduce the size of the matching unit and eliminate the jumper used for band changes. That might be a good project for over the winter.
Back in 2017 I built my 19-foot wire vertical, which was my go-to portable antenna for about 4 or 5 years. The concept was simple: It functions as a base-loaded resonant vertical on 40M & 30M and as a random wire on 20M and up. The matching unit contains a tapped toroid for 40M & 30M and is fed through a built-in 1:1 choke. It occurred to me I could do something similar with the 12-foot telescopic whip and homebrew loading coil I’ve been using on my truck of late.
My 12-foot whip setup is resonant on 40M through 17M. You’re probably thinking: “Why not just bypass the loading coil and adjust the length of the whip for 15M through 10M?” Well, being as lazy as I am, that would make band changes a little more involved than I want to deal with. I like having some “frequency agility,” and I’m not above using an ATU to achieve that.
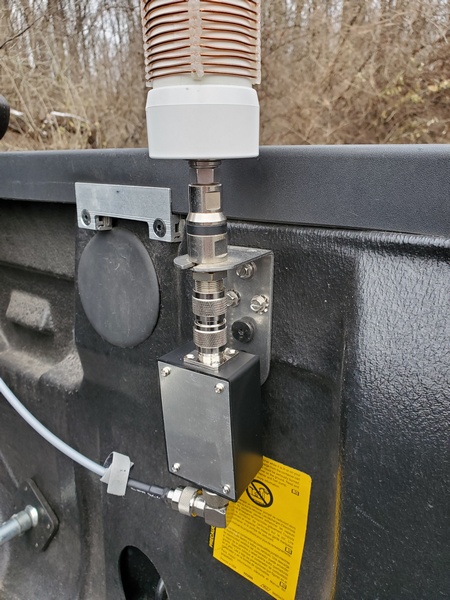
To emulate the scheme I used for the 19-foot vertical, I just needed a choke at the input to my homebrew loading coil. (I could probably go without the choke, but I wanted to keep the coax from becoming part of the antenna.) So, I use the 12-foot whip as a base-loaded resonant vertical on 40M through 17M. For 15M through 10M, I would bypass the coil and use an ATU.
To test this out, I threw together a choke using parts I had on hand. I wound 10 turns of RG-174 on an FT-140-43 toroid. A Radio Shack project box I had in my stash of parts was the perfect size to house the toroid. (I bought it a decade or two ago, and it was still unopened in the original Radio Shack packaging.) Since I installed SO-239 connectors on each end, I had to use an adapter to connect the choke to the SO-239 on the antenna. To hold the coil in place, I wedged a piece of foam packing material between the lid and the core. The completed choke is functional, albeit a little cheesy-looking.
The choke is 10 turns of RG-174 coax on an FT140-43 toroid.
My first test using the 12-ft whip on the higher bands was a success. While activating Ridley Creek State Park (US-1414, KFF-1414), I used my KX3 (5 watts, CW) and installed the choke at the antenna feedpoint. On 40M through 17M, the loading coil functioned as it normally does. On 15M, 12M, and 10M, I bypassed the coil entirely and relied on the KX3’s internal ATU to load up the whip.
The choke installed at the antenna’s feedpoint
The KX3 easily found matches on all three bands, and my results on the air were encouraging. On 15M, I worked stations in Poland, Belgium, France, Ukraine, Germany (3), and the Slovak Republic. I made two stateside contacts on 12M. Up on 10M, I worked some more DX: Germany (2), Italy, and Czech Republic. One of the German contacts was park-to-park.
I’ve used this arrangement on a few more activations since then, including Winter Field Day. My results have been consistently good.
I haven’t done any modeling, but the 12-foot whip seems to be a pretty good length for operating like this. It’s just a little longer than a ¼-wave on 15M and a little shy of ⅜-wave on 10M. On 12M, it’s somewhere between ¼ and ½-wave; so it isn’t resonant on any of the bands of interest.
Although I was pleased with these initial results, I might do a little more tinkering with this setup. I’m toying with repackaging the choke to make it a little more weather resistant. I encountered some rain during the first activation using it. There was no damage to the choke at all, but I always have a tendency to over-engineer things—it keeps me occupied and out of trouble, I suppose.
No scientific breakthrough here. Just a lazy guy “force feeding” a fixed length whip to squeeze a few more bands out of it.
With rainy weekends and other competing activities, I was way overdue for a bike ride. Of course, my ride today included a stop to make a few contacts.
This year, I’m making it a point to explore some new trails, instead of just sticking with my usual haunts. Today I chose to ride a section of the Perkiomen Trail near Graterford, Pennsylvania. I started off from the Graterford trailhead and rode north towards Central Perkiomen Park.
One of the paved sections on the Perkiomen Trail. Other parts of the trail were gravel-covered.
Although I enjoyed the scenic ride, it was a little shorter than I anticipated. As it turns out, the park was only a little over two miles from the trailhead. No worries; that just gave me more time for radio!
One of the bridges on the Perkiomen Trail
Central Perkiomen Park is a beautiful park and I appreciated the modern restrooms (an important consideration for us old guys). After cruising around the park, I set up on a picnic table under a shady tree. I clamped my 19-foot vertical to one of the benches and fired up my KX3.
My antenna mount. This is a mount that I normally use with my AlexLoop. It’s just a PVC elbow and about 4 inches of 1/2-inch PVC pipe.
I started out on 20M and found general bedlam from the WPX CW contest. That type of contest operating has never really appealed to me, so I made a couple of quick contacts (2 Canadian stations) and headed for the more peaceful waters of the 30M band.
I called CQ a few times and heard K4AHO calling from Florida. Jim was running 5 watts from an HB1B. We had a lot of fading but managed to complete the contact. I also a nice chat with Mark K4NC from North Carolina.
WB3GCK operating from Central Perkiomen Park
By this time, the weather was really starting to heat up, so I dropped down to 40M for one more contact. This time, I got a call from KC3RN who was running 5 watts from Pittsburgh. Kevin and I chatted for a bit before I packed up and loaded up the bike for the ride back.
I had used a straight key for most of the year, so far, so I really needed to get my paddle fist in shape before Field Day. I was definitely starting to get a bit rusty. Since most of my contacts this year have been short SKCC exchanges, it was also nice to have some casual rag chew contacts. Of course, a little exercise on the bike didn’t hurt, either.
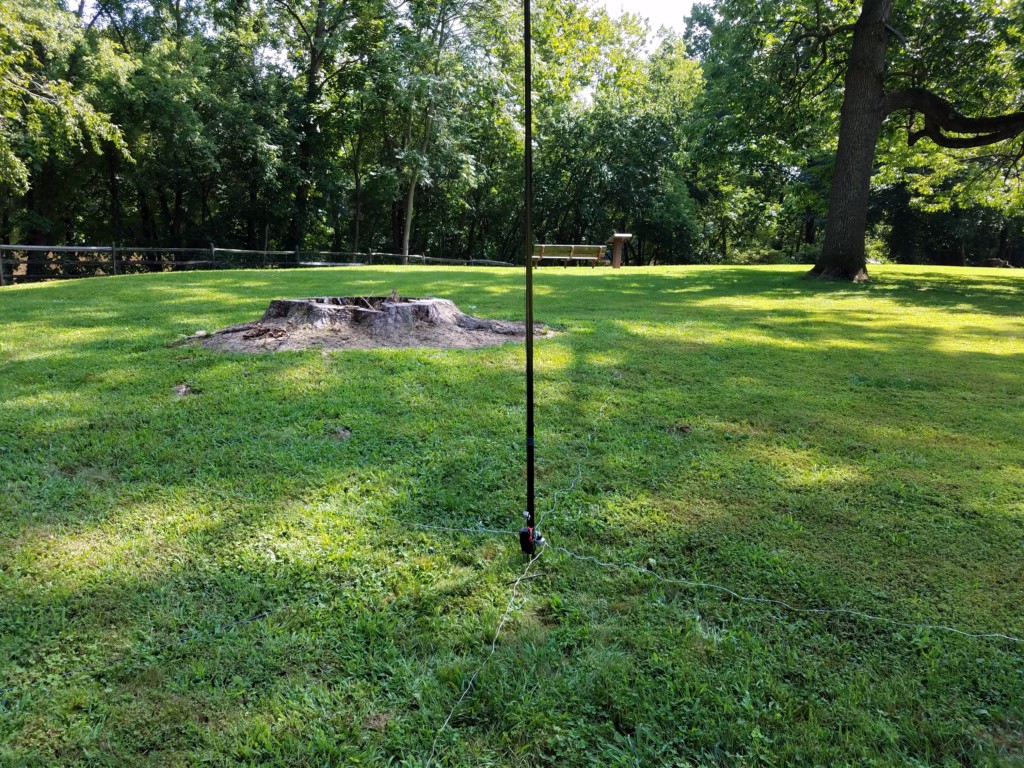
I wanted to get out and do a little QRP-portable before all the holiday festivities get started. I hadn’t operated from Black Rock Sanctuary in a while, so I headed over there. It was dreary and drizzly today, so it was a good day to operate from the truck and give my homebrew 19-foot vertical another workout.
The vertical antenna in use at Black Rock Sanctuary
Since the last time I used the 19-foot vertical in the truck, I found a way to ground the antenna to the body of the truck. It was a simple matter of backing out one of the screws that hold the bed liner in place and using it to attach a small L bracket. This now provides a convenient spot to attach my ground lead.
Ground connection for the vertical antenna.
I was using my little MS2 straight key with the KX3 today. The bands were in pretty decent shape and the antenna seemed to be working great. I made a half-dozen SKCC contacts on 40 and 20 meters with some respectable signal reports. One SKCC’er in California called me on 20 meters but the frequency was taken over by other stations. I wasn’t able to complete the QSO but at least I was being heard on the West Coast.
Operating position in the truck
I also had some nice two-way QRP QSOs. W4UV in North Carolina had a great signal on 40M with his Ten Tec QRP rig. Jim N0UR was really pounding in from Minnesota on 20 meters. My favorite QSO of the day was with Dirk W8IQX. Dirk was running 2 watts from his FT-817 to an AlexLoop on 20 meters. If I copied correctly, he was in Florida. QRP never ceases to amaze me!
Earlier this year, I built a lightweight, 19-foot vertical. Intended for tripod or ground mounting, I did the initial tuning and pruning of the vertical in that configuration. Today, I thought I’d see if it would work mounted on my pickup truck.
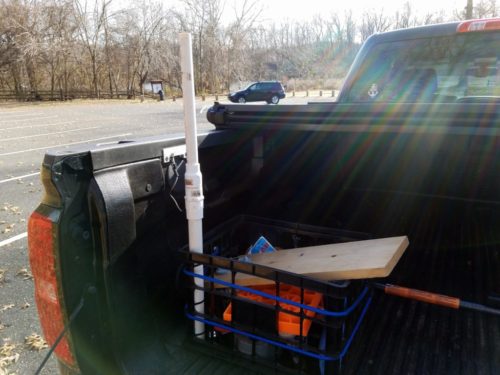
I have this plastic crate that I keep in the bed of the pickup truck. I use it to hold parts for my drive-on antenna mount, along with some tools and miscellaneous “stuff.” I hold the crate in place using bungee cords attached to a cargo bar that spans the width of the bed. I decided to make use of the crate as a quick and dirty antenna mount.
I took some 1-inch PVC pipe with a female threaded coupler from a previous antenna project and attached it to an inside corner of the crate with heavy-duty zip ties. I kept this part short enough to fit underneath the tonneau cover when traveling. To mount my 20-foot Black Widow pole, I used a 1-inch PVC male coupler and a reducer to go down to a 3/4-inch PVC pipe. The 3/4-inch PVC pipe fits nicely up inside the Black Widow pole. I went with the Black Widow pole rather than the lighter weight pole I normally use with this antenna since I already had all the PVC parts I needed to mount it.
My makeshift mount. The PVC mount is attached to the plastic crate, while the crate is attached to a cargo bar using bungee cords. The random junk I store in the crate keeps things stable.
I headed out to a local park today to give it a try. It only took a few minutes to get it set up. From the antenna, I ran some RG-8x coax through a window and into the cab of the truck. I connected the antenna ground to the body of the truck using a short piece of braid to a metal plate used to latch the tonneau cover closed.
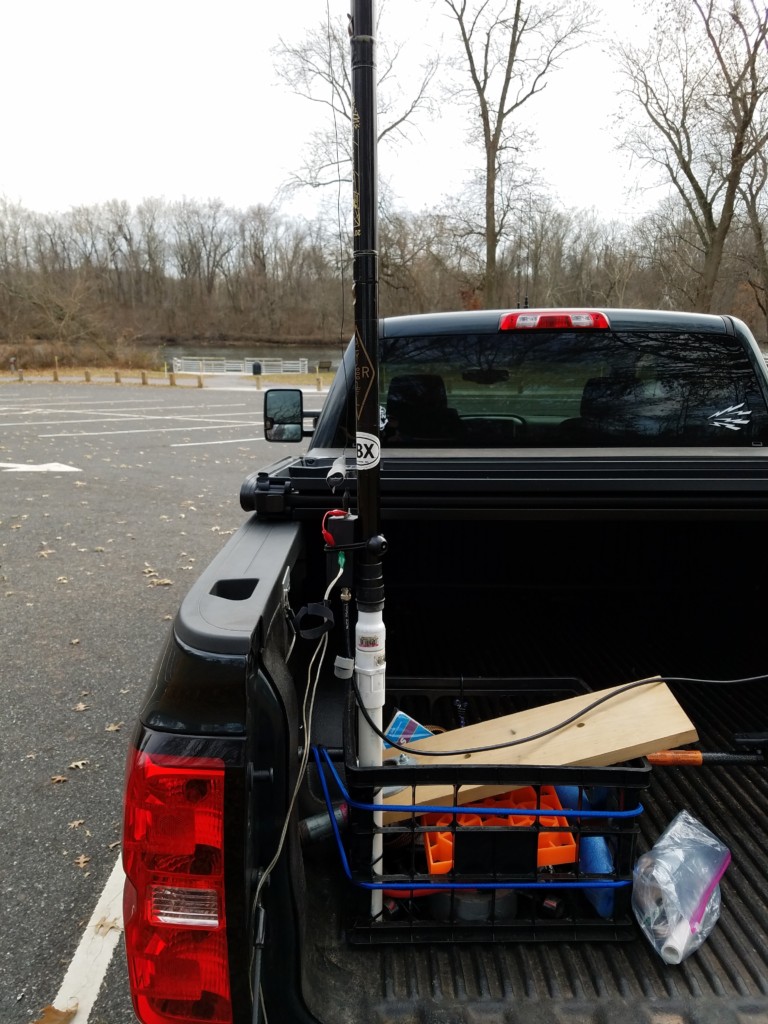
The Black Widow pole installed on my makeshift mount.
I fired up my antenna analyzer and the SWR was off the charts. On closer inspection, I found the plate I was using for my ground wasn’t actually attached to the body of the truck. Instead, I connected two radials and ran them off the back of the truck. This time the SWR on 40 and 30 was much better. The resonant frequencies in this configuration were higher than when ground-mounted but my KX3’s internal tuner easily handled the minor mismatches.
I started out on 20 meters where this antenna operates as a random wire. I heard N5PHT doing a Parks on the Air (POTA) activation (KFF-3023) down in Texas. I gave him a call and exchanged reports. Moving down the band, I worked XE1XR in Mexico. So, the antenna seemed to be working fine. I checked 30 meters but it was devoid of activity.
The 19-ft vertical in operation.
Down on 40 meters, I had a nice ragchew with Bernard VE9BEL. Bernard was operating a club station (VE9CRM) in New Brunswick, Canada. He gave me a 599 and said I was “booming” into New Brunswick. Not bad for 5 watts into a 19-foot loaded vertical. I last worked Bernard a few years ago from Mt. Misery in Valley Forge National Park. We had strong signals both ways on that day, too.
So, it looks like this antenna is usable from the truck. I still need to find a way to connect the ground to the body of the truck. If possible, I’d like to avoid drilling holes in my new truck. This antenna is a little easier to deploy than my usual “Bike Rack Vertical.” The downside is I have to exit the truck to change bands. Life is a series of trade-offs, I guess.
I bought a lightweight telescoping pole on eBay a while back. It collapses down to 26 inches and weighs less than 12 ounces. Best of all, I only paid around $10 for it. While it was advertised as a 7.2-meter pole (approximately 23.6-feet), it actually measures about 19.5-feet when extended. This pole was just begging for some sort of antenna to support.
After trying different types of non-resonant wires with it, I decided to build some sort of resonant antenna. For quick excursions to the field, I often take the AlexLoop. However, sometimes it’s nice to have something a bit more frequency-agile. I wanted something that is easy to deploy and could cover the 40, 30, and 20-meter bands.
I started off planning to build a vertical with a 16.5-ft radiator to make it resonant on 20 meters. I could then build some loading coils to make it resonant on 40 and 30 meters. In the end, I went a slightly different way with this antenna.
With the lousy band conditions lately, I spend most of my time on 40 meters. I decided to take advantage of the full length of the pole. So, my concept was to use a 19-foot radiator with loading coils for 40 and 30. On 20M and higher, I would use the radiator as a random wire and use a tuner.
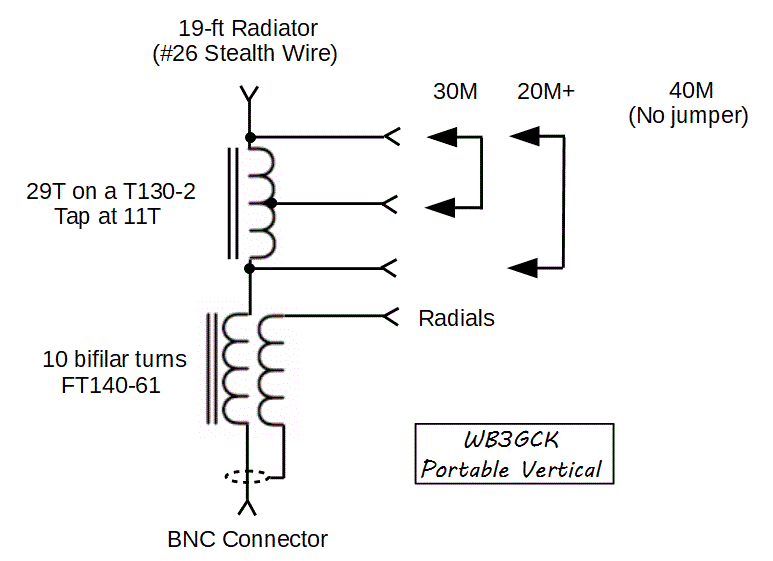
Schematic diagram of the matching network for the 19-ft vertical
As you can see in the schematic, I feed the antenna through a 1:1 choke, consisting of 10 bifilar turns of #22 hookup wire on an FT140-61 toroid. I calculated the values for the loading coil using some online calculators (see notes below). From there, I went through several iterations of testing and adjusting to arrive at the final values. For the 40M loading coil, I ended up with 29 turns of #22 enameled wire on a T130-2 toroid. I made a tap at 11 turns for the 30M band.
Interior of the matching unit
I mounted both coils in a small box and used some small bolts to make the tap points accessible for band changing. I also made a little jumper with alligator clips to short out various portions of the loading coil for the different bands.
The matching network is attached to the pole with a small bungee cord. In this picture, the red jumpers are configured for the 30M band.
The pole won’t support much weight, so I built the 19-foot radiator from #26 Stealth wire (Part #534) from the Wireman. Because the pole is made from carbon fiber, I try to let the top of the pole bend over slightly, to keep the wire away from the pole. I don’t know how much influence the carbon fiber pole would have on tuning but I figure I’d avoid introducing another variable.
For radials, I used a 25-foot roll of cheap speaker wire and used it to throw together four 12.5-foot radials. Again, I grabbed what I had on hand and went with it. While the four radials seem to be working out OK, I plan to add a couple more for good measure.
I should note that all the materials here were selected based on availability in my junk box. So, there’s certainly plenty of wiggle room here for experimenting.
I made up a little tripod adapter out of some PVC pipe. One end slides over the post on my tripod, while the other end slides up inside the bottom of the collapsible pole. I also found a screw driver with a handle that fits nicely inside the bottom of the pole. So, for ground-mounting, I can just shove the screwdriver in the ground and place the pole on top of it. This works surprisingly well and allows me to leave the tripod at home.
Vertical mounted on a tripod. My backpack is attached to the bottom of the tripod to help stabilize it in the wind.
After considerable tweaking I ended up with SWRs of less than 2:1 across the entire 40M band and less than 1.5:1 across the 30M band. On 20M and higher, the tuner in my KX3 loads it up with no problems.
The vertical ground-mounted. The pole is light enough to be supported by a screwdriver shoved into the ground.
I’ve been very pleased with the results on 40M so far. It seems to radiate pretty well. I’ve also made contacts on 30M and 20M but, honestly, I need to use it more on those bands to get a better feel for the performance. It’s hard to evaluate antennas when the band conditions are as poor as they have been lately.
Although the antenna works, there are a few things I would do differently, if I were to build another one:
My physical packaging could be better. While the enclosure I used is nice and compact, it’s a little cramped for experimentation. During development, coil adjustments were tough.
Separate coils for 40M and 30M would make the tuning much easier. The tapped coil was a challenge to adjust.
I like the form factor and easy setup of this antenna. I can set it up in a few minutes and it is very easy to transport by backpack or bike. Now to give it some more air time in the field.
Time will tell if it’s a keeper.
72, Craig WB3GCK
Notes:
Loading coil calculator: http://www.k7mem.com/Ant_Short_Dipole.html (Note: The calculator I originally used for this project is no longer online. This calculator should work. Just use one leg of the dipole.)