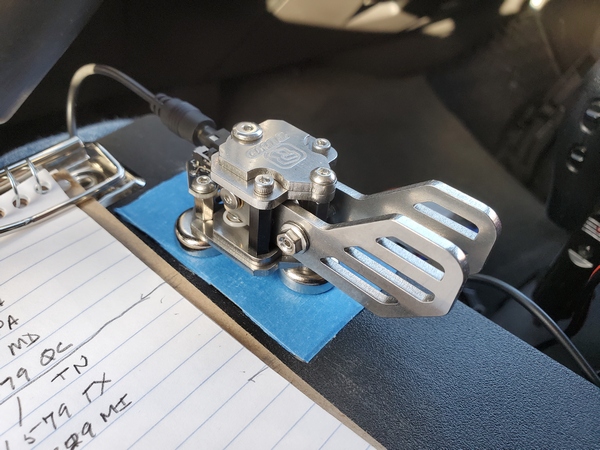
I bought the Ashi Paddle 45 from N6ARA Electronics last year. While I like the paddles a lot, the magnetic mount wasn’t strong enough for the way I operate. I did a quick and dirty mod to address that issue.
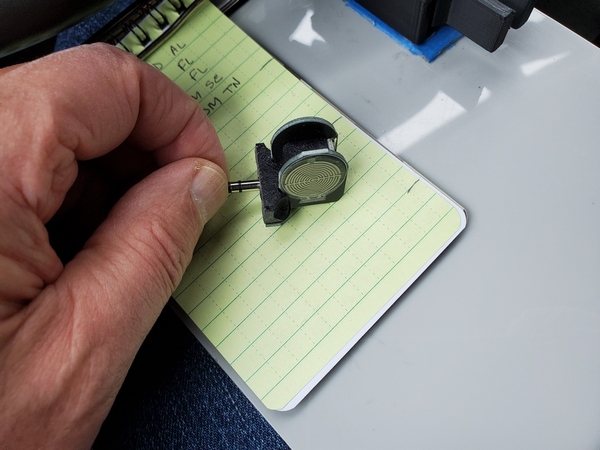
I’m not a huge fan of holding paddles in one hand while keying with the other. I have operated like that and probably will again, but that’s not my preferred technique. My preference is to use a small clipboard with steel strips glued on and a magnetic base on the paddles. Of course, this arrangement only works if the paddles have magnets strong to keep them from moving. This is a problem with some portable paddles.
As with many portable paddles, the Ashi paddles are small and lightweight. As a result, the magnets on the included attachment are small and confined to the bottom of the base (out of necessity). This gives the paddle levers some mechanical advantage, allowing the base to slide side-to-side with vigorous keying.
With the Ashi paddles, I used a mod similar to what I used for my QU-21 paddles. As luck would have it, I had a scrap piece of fiberglass perfboard that was just about the perfect size. What are the odds of that? Then, it was a simple matter of drilling a few holes, using the original magnetic mount as a template.
The paddles attached to my clipboard
Initially, I used just the two original screws to attach the board, but I could feel a little vertical flexing when I used the paddles. I finally added a couple of strips of two-sided foam mounting tape, and that seemed to do the trick.
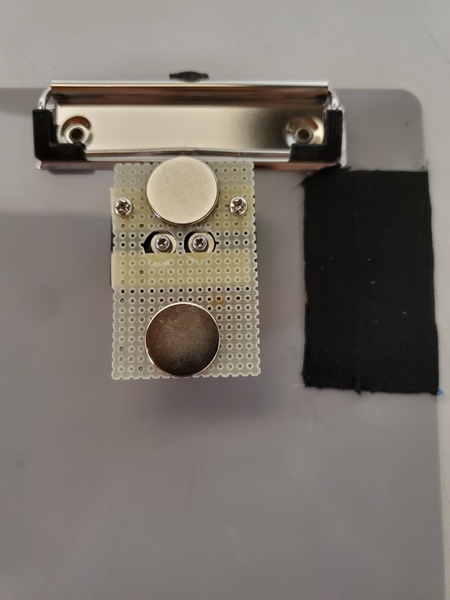
The underside of my quick and dirty mod. The black rectangle to the right are the steel strips covered with hockey grip tape.
The other issue I run into is highly polished magnets. Even though I used some powerful magnets, their slick finish still allowed a little sliding. While searching for something thin that would provide a little friction, I stumbled across hockey grip tape. This is the cloth tape used on hockey sticks, baseball bats, etc., to provide a better grip. I bought a roll on Amazon to try—they had a bunch of options to choose from. My grandson plays hockey, so if the tape didn’t work for me, he could use it. Fortunately, the tape was a definite improvement.
So, this quick little mod made the Ashi paddles better suited to my clipboard use case. Is it ugly? Yes. Is it functional? Also yes. Regardless, these paddles should see a lot more action in the field now.
This is one of those antenna projects that started with: “I wonder if…” Designed with my Elecraft KH1 in mind, it covers the 20M, 17M, and 15M with the use of an tuner—similar to how the KH1’s whip antenna operates. It wasn’t something I had a burning need for, but it turned out to be pretty effective.
Concept
For many of my recent activations, I’ve been using my Elecraft KH1 with my base-loaded 12-foot whip. While I built the loading coil for 40M through 17M, I found that the KH1’s internal tuner easily matched the 12-foot whip on 17M and 15M, with the coil bypassed. A 12-foot radiator is resonant somewhere around 19.5 MHz, so it falls in between the 17M and 15M bands. Even though the 12-foot whip is a compromise, I was regularly making DX contacts on those two bands running five watts or less.
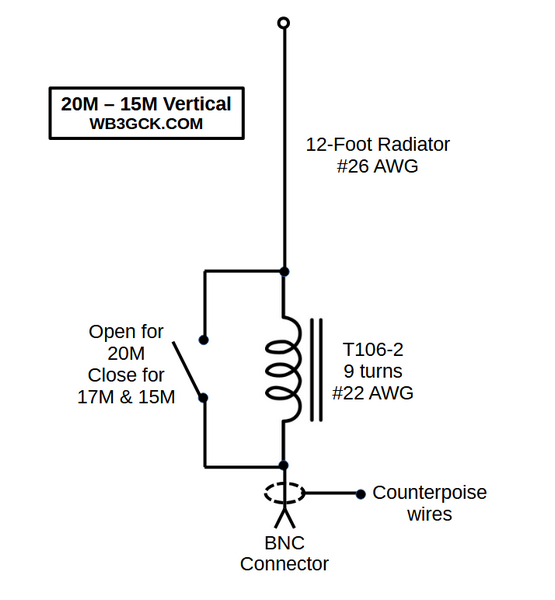
That got me thinking about building a more portable antenna for 20M through 15M using a 12-foot radiator. What I came up with was a simple 12-foot wire antenna that uses a loading coil for 20M and just the 12-foot wire for 17M and 15M.
When I thought about it, what I was building was conceptually similar to the Elecraft AX1 antenna and the KH1’s whip antenna. These antennas are close to resonance on 20M and resonant somewhere in between 17M and 15M. My antenna would operate the same way, except it would be almost 8 feet longer. I’ve always had good luck with the AX1 and the KH1’s whip antenna, so I figured my proposed antenna should work even better.
Along with the electrical properties, I wanted to make the antenna small and lightweight, using a #26 AWG radiator along with two 13-foot counterpoise wires. Also, I wanted to use—as much as possible—parts I already had in my junk box.
Parts List
I selected most of the parts based on availability in my junk box. They might not be the optimal choices, but here’s what I used:
T106-2 iron powder toroid
#22 AWG enameled wire (approx. 35 inches)
SPST slide switch. I actually adapted a DPDT slide switch, since I already had a bag of them.
#26 AWG wire (12 ft for radiator)
#26 AWG wire (2x13ft for counterpoise wires)
2mm banana plugs & jacks (2 sets for connecting the counterpoise wires)
(2) ring terminals
BNC female jack
(2) 4-40 x ¾-inch bolts plus some washers and nuts for the antenna and counterpoise connections. I used a couple of knurled nuts I had on hand.
Plastic box. I had one that measures about 2.5 x 1.75 x 1 inches.
Construction:
When I first thought about building this thing, I originally envisioned a more field-friendly form factor with built-in winders for the antenna and counterpoise wires. Since I constrained myself to using parts I already had (and I don’t own a 3-D printer), I used a plastic box I bought years ago but never used.
The construction was pretty simple; it’s just a toroid, a switch, and some connectors in a box. They say a picture is worth a thousand words, so have a look at the accompanying pictures to see how I built it.
Inside the matchbox
I used some online calculators to determine the loading inductance needed for 20M. Assuming I would need to tweak the number of turns, I started with one turn more than I had estimated. It’s easier to remove turns than to add turns—don’t ask me how I know this.
I used some foam mounting tape to hold the toroid in place. For good measure, I also wedged in a piece of Styrofoam between the toroid and the lid. That adds some assurance that the toroid won’t come loose in the field. The trickiest part was cutting a square opening for the slide switch. That took some careful work with a nibbler tool and a file to get it done without destroying the box.
You could use a tree branch to support this antenna, but I like to keep my field setups self-contained. I found a cheap telescopic pole on eBay that measures about 12’ 3” fully extended, so I went with that.
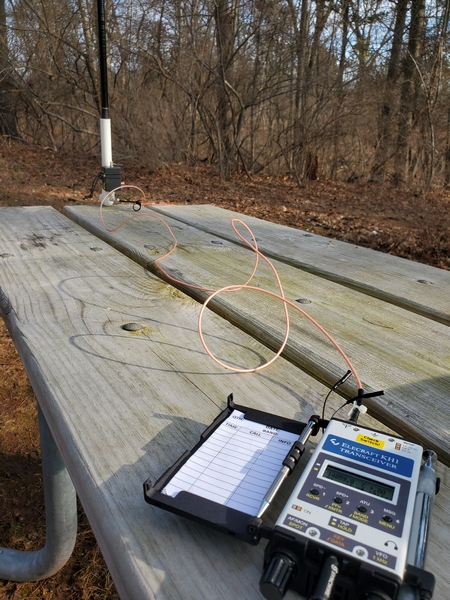
Typical picnic table setup with the 12-ft vertical and Elecraft KH1
I envisioned using this antenna primarily for “picnic table-portable” operation, running a short length of coax to the radio. Using a piece of PVC pipe and a PVC elbow fitting, I built a simple mount for clamping to a table. As luck would have it, the base of the pole fits perfectly inside a ¾-inch PVC pipe. I just use a C-clamp to fasten the elbow to the table and slide the pole into the pipe. When I built the mount, I inserted a small screw partway up the pipe to give the pole a few more inches of height. A six-foot length of RG316 is more than enough to reach the radio at the other end of the table.
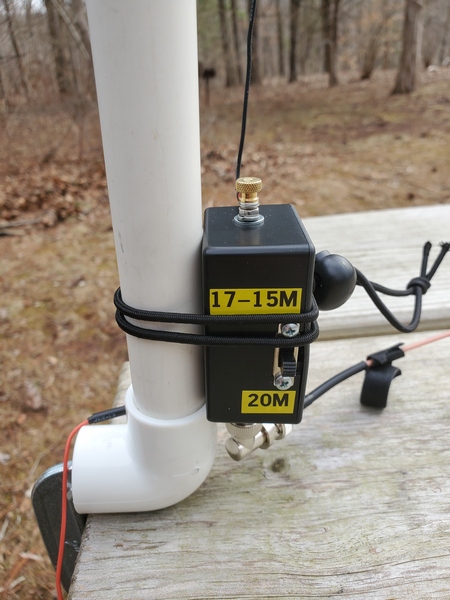
Matchbox attached to the PVC pipe picnic table mount
Testing in the Field
I don’t have a good place for antenna experimentation where I live, so it took several trips to the field to tweak the inductor. On each trip, I took readings with an antenna analyzer, made any necessary adjustments to the loading coil when I got back home, and repeated the process on the next outing. That was a tedious process, which was spread out over a few months because of winter weather.
Once I set the antenna up in the field, I found I needed far fewer turns than I originally estimated. Initially, the antenna was resonating well below the 20M band, so I removed a turn at a time. Since I was going to need to use an ATU for 17M and 15M anyway, I didn’t get too fussy about getting it exactly resonant on 20M. However, I eventually got it resonating in the 20M band, with an SWR under 1.5:1 across the band.
The good news was that, even though I hadn’t finished tweaking the coil, the KH1 easily found a match. I had five successful activations during those testing sessions, typically running 3.5 to 4 watts. I consistently worked stations in Europe on all three bands, along with some U.S. stations on the west coast. On one outing, I worked W6LEN in California on all three bands from a park here in southeastern Pennsylvania. During my final testing session with the antenna, I had a 20-minute two-way QRP QSO with DL4ISX on 15M (CW). I declared the project completed at that point.
Below is a schematic showing the final configuration:
Wrap-up
So, there you have it. No revolutionary technical breakthrough here, just a fun little project that has been even more fun to use. I envision many more picnic-table-portable activations with it.
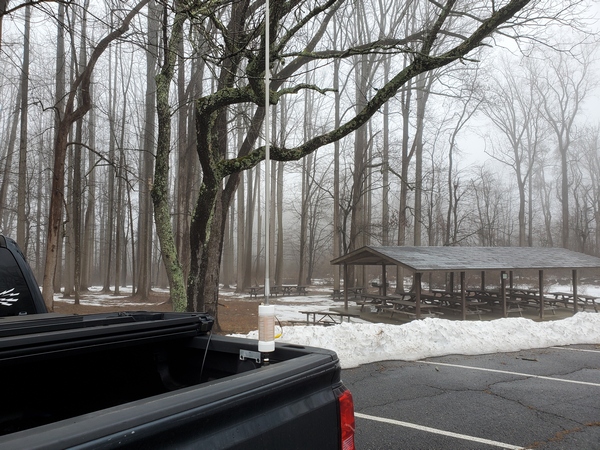
I was out and about on a rainy and foggy Friday morning. Since I was in the vicinity, I made a stop in Ridley Creek State Park (US-1414, KFF-1414) for a quick activation. I completed the activation successfully, despite some self-inflicted problems.
I pulled into a convenient parking spot. Not surprisingly, the picnic area I was in was completely deserted. Since the weather was miserable, I planned to use my Elecraft KH1 in the truck with my trusty 12-foot base-loaded whip on the back.
As I was setting up the antenna, I noticed my first issue. The spot I had hastily chosen was under a tree—a large, rain-drenched one. Rookie error! Fortunately, my 12-foot stainless steel whip went up in between the branches and didn’t appear to be touching any of them. (Note to self: Look up next time!)
Rainy and foggy morning in Ridley Creek State Park (US-1414, KFF-1414)
I finished up with the antenna and got the KH1 set up for 40M. Normally, with this antenna, the KH1 easily finds a good match on the first try. Not this time. It would find a good match (1.5:1 or better), but the SWR would occasionally jump full scale. I had to hit the KH1’s ATU button to re-tune frequently, sometimes mid-QSO. Thinking it was the wind blowing the whip into the wet branches above, I backed the truck up a foot or two to clear the tree. That didn’t help.
After stumbling through seven contacts on 40M, I went out to change the antenna tap for 20M. As I did that, I realized what the problem was. On my last activation, I was using the KH1’s whip antenna, and I neglected to set the switch for using the BNC connector. The BNC jack is always connected, but the “20M” setting puts in some additional inductance for the whip. It appears extra loading was the source of my issues on 40M. Once I corrected my mistake, things continued normally on 20M and 17M.
Despite my struggles, I completed my brief activation with 22 contacts in my log. It was good to put a few DX stations in the log:
20M: CU3DI, F1BLL 17M: OE3KAB
All’s well that ends well, I suppose. My switch error got my activation off to a shakey start, but I got it done. Having already experienced blown finals with this rig, I’m usually mindful of the antenna switch setting. Still, I used my trusty label maker to put a reminder right on the radio.
I’ve been very happy with the soft case that came with my Elecraft KH1 Edgewood Package. It has room enough for the KH1 and most of the accessories I typically use with it. Although I’ve been very careful with the KH1, I somehow damaged the stock Elecraft paddles that came with it. I’m not sure how I managed to do that, but that prompted me to start looking into a hard case for transporting this expensive little radio.
[Note: This post is not sponsored, and there are no affiliate links.]
Fortunately, others have gone before me in this quest, so there are a variety of boxes that others have tried. KR8L wrote a blog post about using a Pelican 1040 case for his KH1. K4SWL had a blog post and an excellent video showing a bunch of hard cases suitable for the KH1. Somewhere online I saw mention of the Apache 550 as a less expensive option from Harbor Freight. Commercially, Tufteln sells a Pelican M40 case modified to fit the KH1 and its whip antenna.
Now that I had a mind-boggling array of options to consider, it was time for the next phase of my project: over-thinking and over-analyzing.
While most KH1 users carry the bare minimum of items to get on the air. I, however, tend to over-pack. With the original soft case, I could carry everything I needed for pedestrian-mobile, picnic-table-portable, and stationary-mobile operations. Being a soft case, it has a little “give” to it when I squeeze in some extra items. So, for my purposes, I wanted a box at least large enough to hold everything I carried in the soft case.
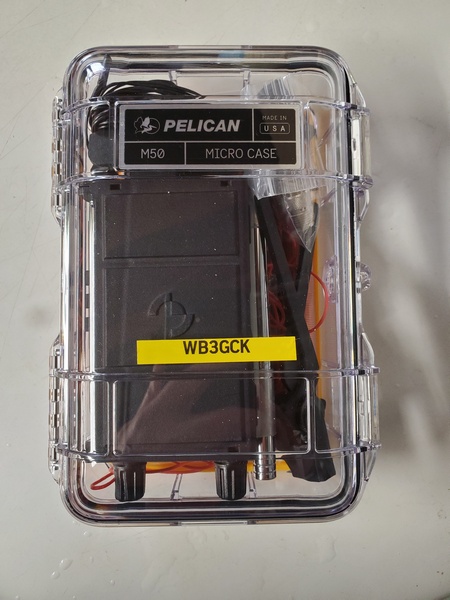
After much agonizing, I settled on the Pelican M50. With exterior dimensions of 8.10 x 5.50 x 2.90 inches, it’s somewhat larger than others use. However, it easily holds everything I carried in the soft case—and then some.
Pelican M50 MicroCase with my KH1 and accessories (see text for contents)
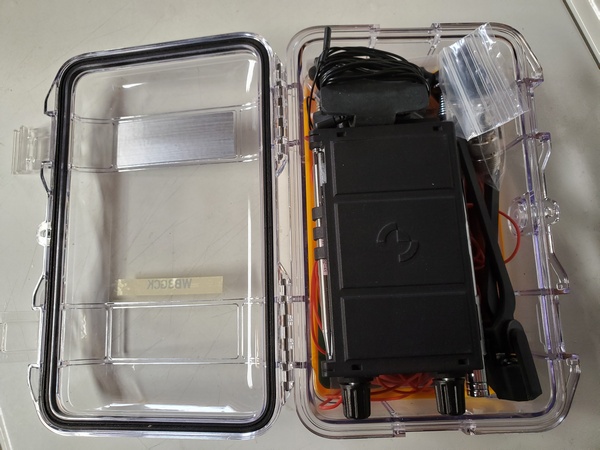
I placed the KH1 on top of the counterpoise wires for some cushioning, but the KH1 still flopped around a bit. I found that placing a 3×5 inch notepad under the KH1 kept it in place with the lid closed. So, the notepad and a full-size mechanical pencil are now part of the kit. No problem, since they will get used for picnic table operations.
Pelican M50 MicroCase. The counterpoise wires and a notepad are under the KH1.
Although I already have a bunch of stuff packed in there, I’m still thinking about adding a random wire antenna and maybe some throw line. I might just keep that stuff in my backpack, though. We’ll see.
So that’s what I wound up with. In typical fashion, I probably packed more than I should have, but the overall weight of my backpack hasn’t increased very much. Plus, I like to think I’m minimizing the possibility of forgetting something in the field.
My old, arthritic fingers aren’t what they used to be, especially when sending CW in colder weather. I’ve tried a variety of gloves over the years, but they have each had their drawbacks. Recently, my (far) better half stumbled across an inexpensive pair of gloves that seem to be just what I’ve been looking for.
[Note: This post is not sponsored, and there are no affiliate links.]
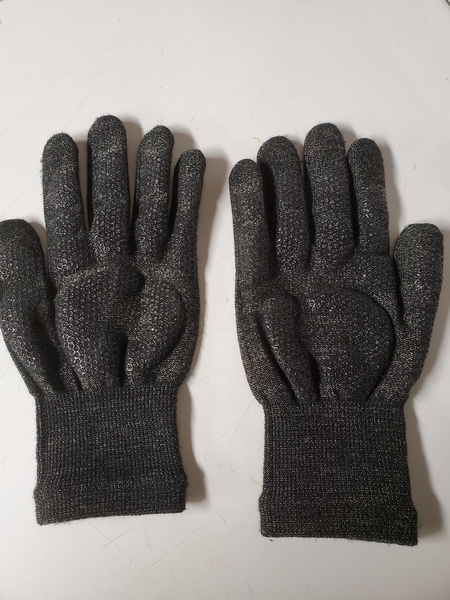
I mentioned my cold weather CW dilemma to my (far) better half in passing, and she found an interesting pair of gloves on Amazon a few minutes later. They are the Glider Touch Screen gloves for $8.99 (USD). At that price, I took a chance and fired off an order to try them. After measuring my hand and using their sizing guide, I went with the large size. Glider Gloves is a Canadian company, and our friends to the north certainly know a thing or two about cold weather.
Some reviewers on Amazon complained about these gloves having a snug fit, but that’s exactly what I’ve been looking for. I use iambic (squeeze) keying and paddles with a light touch, so bulky gloves can make accurate sending difficult.
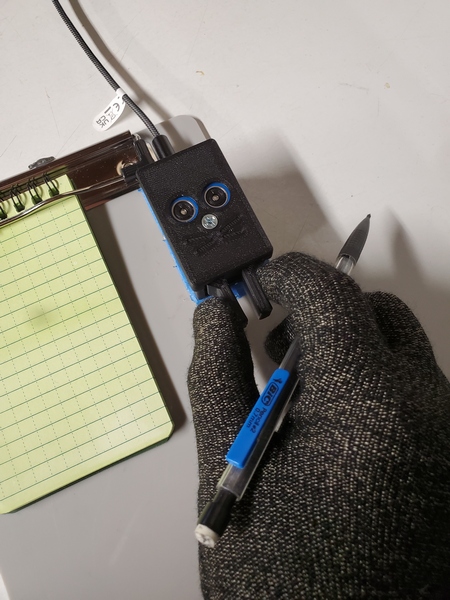
This is how I normally send while holding a pencil. These touchscreen gloves allow me to do that with no problems.
I tried my new gloves during a recent POTA/WWFF activation. They definitely have a snug fit, but they conform nicely to the shape of my fingers. There’s no excess material in the fingertips to interfere with keying. Normally, I use the paddles while holding a pencil, so I can quickly alternate between keying and logging. I found I could still do that with no issues. My log’s legibility was no worse than my normal chicken scratch.
The Glider Gloves. (See the Amazon website for much better pictures.)
They also worked great when I entered my spotting information using my cell phone. To facilitate use with touch screens, they have some copper woven right into the material. My typing on the phone was about the same as my normal “fat-fingering.”
Since they are thin and form-fitting and have some non-slip material on the palms, they are good for other tasks requiring manual dexterity. Normally, I have to take my gloves off at some point when installing the antenna on my truck. This time, however, I had the Glider gloves on and had no problems screwing the parts together.
The temperature in the truck during my brief activation was about 45° F (7° C), and my hands stayed reasonably warm. The manufacturer says they’re good for “moderate temperatures,” so I probably wouldn’t wear them on an Artic expedition. Regardless, they are a whole lot better than no gloves at all—which is how I sometimes operated in the cold. I can also put my regular gloves on over them if I need to take a break from sending.
I had hoped to use them during Winter Field Day this year, but some personal obligations and a snowstorm forced me to sit this one out. According to the weather forecasts, we have a lot more winter weather ahead of us here in Pennsylvania, so I’m sure these gloves will still get plenty of use.
There are lots of similar gloves on the market, so there may be better options out there. Since I tend to avoid operating in extremely low temperatures anyway, I think these should do the job for me.
On those occasions when I do an activation with my (far) better half’s car, I have been using my Gabil GRA-7350TC antenna on an old magnetic mount. Because of a recent issue with the mag mount I’ve had for 20+ years, I finally had to replace it. Today was the first opportunity I’ve had to use the new one.
While visiting my daughter and her family over the Christmas holiday, I headed out to activate the Captain John Smith Historic Trail (US-4567). Normally, when using the GRA-7350TC and mag mount on my (far) better half’s car, I can easily get the SWR down less than 1.5:1 on 40M. This time was different; the tuning seemed very finicky. I eventually got it close enough to use with the KH1 and completed my activation. As I was packing up, I noticed some damage to the coax where it enters the mount.
This old mag mount has seen many years of service with a VHF/UHF antenna on my truck before being pressed into service with the Gabil antenna. It’s amazing it lasted as long as it did. I decided that trying to disassemble and repair it was more trouble than it was worth.
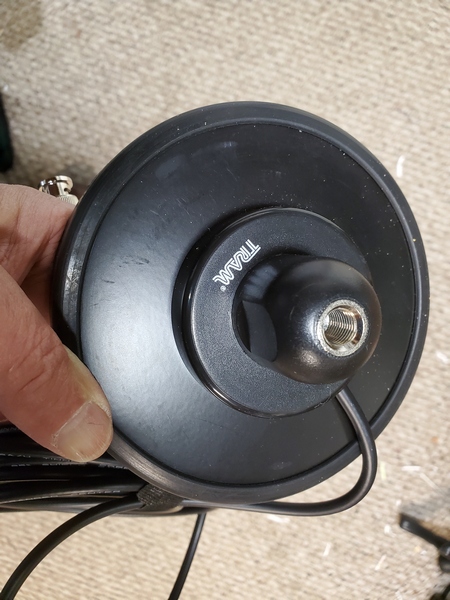
I ended up buying a Tram magnetic mount on Amazon. This one is a real beast. It’s five inches in diameter and weighs a whopping 2.6 pounds. It’s probably overkill for my intended use, but I figured the larger diameter would provide better coupling to the vehicle. (Spoiler Alert: It does.)
Tram magnetic mount
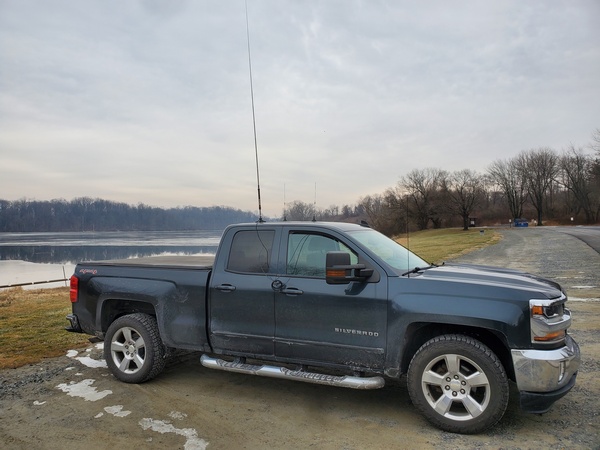
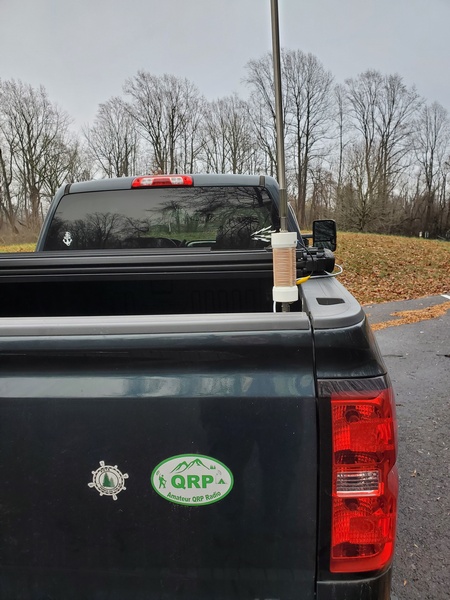
To try it out, I headed out to Marsh Creek State Park (US-1380, KFF-1380) and set it up on my truck. The attached coax is 17 feet long. That’s way more than I need, so after feeding it through the passenger-side window to my Penntek TR-35 (5 watts, CW), I coiled up the excess.
The Gabil GRA-7350TC antenna and magnetic mount on my truck
I started out on 40M and was surprised to see I could tune the Gabil antenna down to 1.3:1 SWR. That’s better than I could ever get using the old mag mount on my truck. It was slow going on 40M this morning with a lot of fading. I could only manage about nine contacts before moving up to 30M.
Marsh Creek Lake partially frozen over
Up on 30M, things picked up dramatically, but the most productive band was 20M. My contacts on 20M included Germany, France, and two from Finland. After logging 42 contacts, I pulled the plug and headed home for lunch.
So, the new mag mount should work great on my (far) better half’s car. Sadly, my old mount is now destined for the trash. I certainly got my money’s worth out of it, though.
I mentioned in a previous posting that I have a fascination (obsession) with unusual CW paddles. These paddles are the last in a series of recent purchases (but I doubt it).
These rather industrial-looking paddles are not new; they have been around for a while. They are often sold under various brand names or no name at all. The eBay listing I purchased mine from didn’t specify a particular brand, but they came branded as “TUMD.” The paddles I ordered were shipped from China and took about a month to arrive.
I’m not providing a specific link, since these things are available all over the place. Just search on “stainless steel paddles” and you’re sure to find them.
The Tumd paddles attached to my clipboard. The three magnets are super strong.
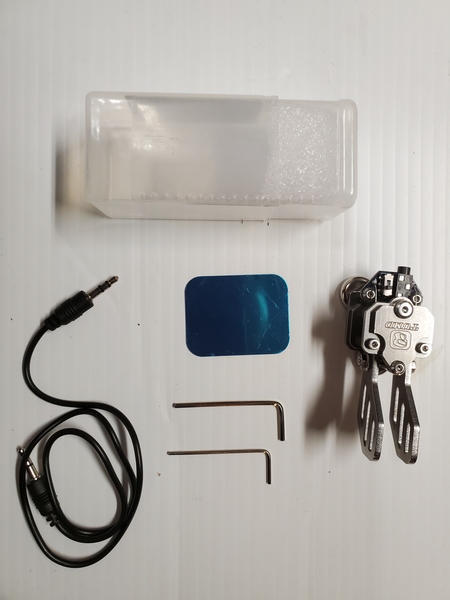
Here’s what was included in the box:
The paddles, of course
A stereo cable with 3.5mm connectors
A two-piece plastic case large enough to hold the paddles and cable
Two Allen wrenches
A small adhesive metal disc for applying to the surface of your choice
The accessories I received with my Tumd stainless steel paddles.
The first thing that struck me was that these paddles are built like a tank. The base has three powerful magnets, which I like. At the rear of the paddles next to the 3.5mm jack, is a small slide switch for reversing the “dit” and “dah” paddles. They look great, but my purchase was not without a couple of minor issues right off the bat.
Based on the picture in the eBay listing, I ordered a version of the paddles with smaller, square paddles. What I received, however, was a version with larger paddles reminiscent of the fins on a 1959 Cadillac. Instead of going through the hassle of returning them to China, I opted to keep them.
The next issue was adjusting the paddle spacing. As received, the paddles had different spacing. The paddles each have a hex bolt within a larger locknut of some sort. There were no instructions provided, and neither of the included Allen wrenches fit. Fortunately, Charlie NJ7V over at the Red Summit RF YouTube channel provided all the answers I needed. He has a video detailing how to adjust them and what size wrenches you need. I had the tools I needed in my toolbox, so I had the paddles adjusted to my liking in short order.
I’ve used these paddles on quite a few outings and have grown to like them a lot. Here are some pros and cons from my viewpoint—your mileage may vary:
Pros:
The three magnets on the bottom are seriously strong. They hold tight to the steel strips on my clipboard. I love that!
Once adjusted, they have a great feel and key reliably. They do, however, require a slightly heavier touch. That’s a matter of personal preference, so others may disagree.
Cons:
Weighing in at 3.8 ounces (106 grams), they are heavier than other paddles I use in the field. This is a minor issue or no issue at all, depending on how you operate.
You need two tools to adjust the paddle spacing. From what I’ve seen online, some sellers include both wrenches; mine did not. Again, this is also a minor issue, since the paddle adjustments hold very well and shouldn’t need further adjusting in the field.
Lately, these paddles have been my first choice for portable operation. For $50 (US) or less, they are a pretty decent value.
I headed down to Ridley Creek State Park (US-1414, KFF-1414) this morning for a pre-Thanksgiving POTA/WWFF activation. While I was there, I wanted to field test a couple of paddles, one new and one I slightly modified.
I mentioned in a previous post (or two) that I somehow damaged the paddles that came with my Elecraft KH1. In searching for an alternative, I came across the KH1 Pressure Paddles from K6ARK. The kits were selling for a mere $22 on Amazon, so I fired off an order.
K6ARK Pressure Paddles
I’m not as good at building kits with small parts as I used to be. My close-up vision hasn’t gotten any better with age. However, with the aid of my lighted magnifying glass, I assembled the kit in less than 30 minutes with no major issues. The only issue I ran into was the 3-D printed cover didn’t fit against the KH1 too well and needed a little sanding. Once I took care of that, the paddles worked great. Using pressure-sensitive paddles feels a little different at first, but I quickly adapted.
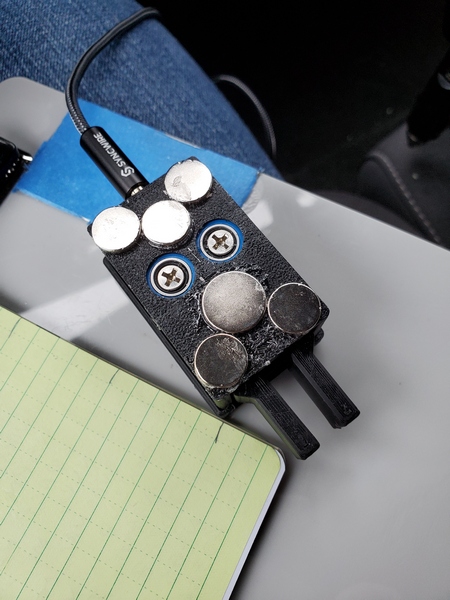
The other thing I did was glue two more magnets onto the bottom of my CWMouse paddles. The four I glued on initially weren’t quite enough to keep the paddles from moving when attached to my clipboard. Two additional magnets seemed to do the trick.
The magnets on my CWMouse paddles. I recently added the two towards the middle.
When I rolled into my usual spot in the park, the place was deserted. I wasn’t too surprised, since it was a weekday and drizzling to boot. My original plan was to operate the KH1 handheld to give the K6ARK paddles a good workout. Given the lousy weather, I abandoned that plan and set up in the truck. I used my trusty 12-foot loaded vertical on the back of the truck.
KH1with the K6ARK Pressure Paddles attached
I started off trying to use the K6ARK paddles with the KH1 on the center console. After two contacts, I decided that wasn’t the most comfortable way to operate. The pressure paddles worked fine, though. I switched over to the CWMouse paddles attached to my clipboard, and the magnets held nicely. It helps that the CWMouse paddles have a light touch, so I’m not slamming them side to side.
On the air, the bands were as mediocre as the weather this morning. According to my band conditions app, we were experiencing an unsettled geomagnetic field. Starting out on 40M, it took longer than usual to make my first ten contacts. After I had 15 in the log, I switched to 20M and picked up a few more. I spent the rest of my time on 17M and 15M. As predicted, the band conditions up there were fair at best. I worked two domestic stations on 17M, and stations in Germany and Texas on 15M.
My loaded whip at Ridley Creek State Park (US-1414, KFF-1414)
I was getting ready to call it quits, but I wanted to adjust the KH1’s real-time clock before shutting down. It had gained a minute or two over the past couple of months, so it just needed a tweak. As I navigated through the menus to set the clock, I heard a very loud IK1LBL calling me. I quickly exited out of the menu and completed the contact. After that, I set the KH1’s clock and packed everything up.
As activations go, this one was nothing special. However, my new KH1 paddles and my modified CWMouse paddles were a rousing success.
And finally, I’ll leave you to ponder this curious AI-generated image of a turkey operating a radio. It appears the turkey might be keying with his left foot (QLF?).
After my inexpensive QU-21C paddles started acting up again during a recent activation, I went on a paddle binge, ordering some new, reasonably-priced paddles to try out. First up was the CWMouse paddles, which I really like. Next was the Ashi Paddle 45 purchased from N6ARA Electronics.
The paddles are designed and built by 7L4WVU in Japan and imported by N6ARA. I’ve had my eye on these paddles for a while, so I thought I’d buy them and give them a go.
After using the Ashi paddles on a few POTA/WWFF activations, I thought I’d document my impressions.
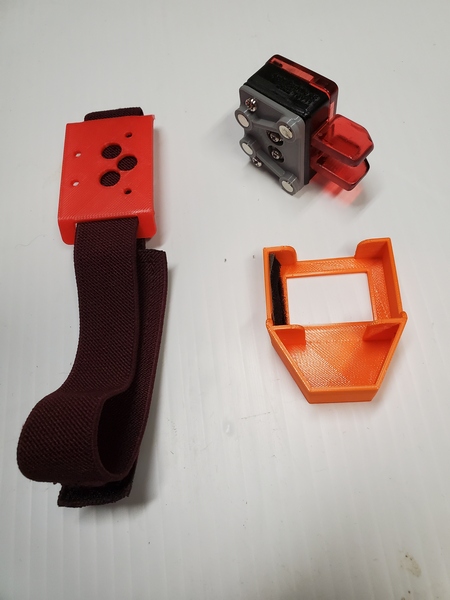
General: I was looking for small paddles to keep in my Elecraft KH1 kit, and the Ashi Paddle 45 fits the bill. They measure approximately 1-1/16″ x 2-1/8″ x 1″ (27mm x 54mm x 25.4mm) and weigh just 1.1 ounce (32g) with the magnetic mount attached. They are constructed from high quality 3D printing, and come with two mounting options: a magnetic mount and a leg strap. Two screws are provided for attaching the paddles to the mount you choose.
The Ashi Paddle 45 leg mount (left), the paddles with the magnetic mount attached (upper right), and the protective case for the paddles.
Overall Feel: Like the CWMouse paddles, the Ashi Paddle 45 uses microswitches for the contacts. Thus, the tension and throw are not adjustable. Of course, paddle spacing and tension are matters of personal preference. Being an Iambic Mode B user, timing is critical, so I prefer narrow spacing and light tension. The Ashi paddles’ spacing seems slightly wider than the CWMouse paddles, and the tension feels just a bit heavier.
When I first started using the Ashi paddles, I would occasionally get an extraneous “dit” when forming characters with a single squeeze, like the letter K. My guess is the microswitches are a little slow breaking contact after releasing the paddles. I have to send more deliberately and remove my fingers completely from the paddles after each character. Fortunately, it didn’t take long to get used to the feel, and I had no issues sending with the paddles. Of course, this is all based on my personal preferences, so your mileage may—and probably will—vary.
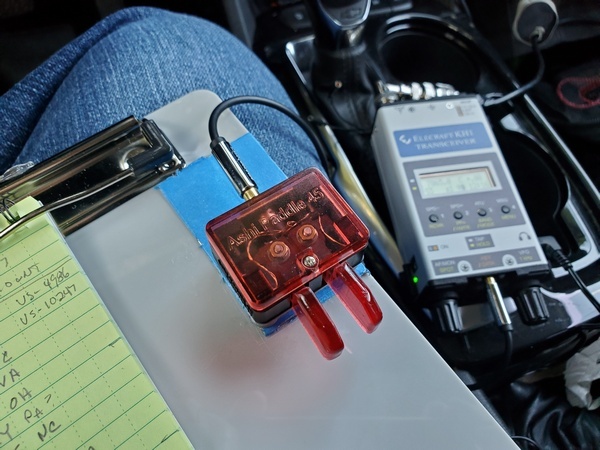
The Ashi paddles attached magnetically to my clipboard
Mounting: My preferred method of sending is with the paddles attached magnetically to my little clipboard or a kneeboard for my KH1. So, naturally, I tried the magnetic mount first. Like my QU-21C paddles, the body of the key is small relative to the paddles. This makes magnetic mounting problematic. When I attach the paddles to a steel surface (like on my clipboard), they have a tendency to move side to side when keying. I have to use my hand to keep them steady. Not a huge thing, but I’d prefer they didn’t move at all. I have an idea in mind for an improved magnetic mount. If that works out, I’ll do a separate post on it.
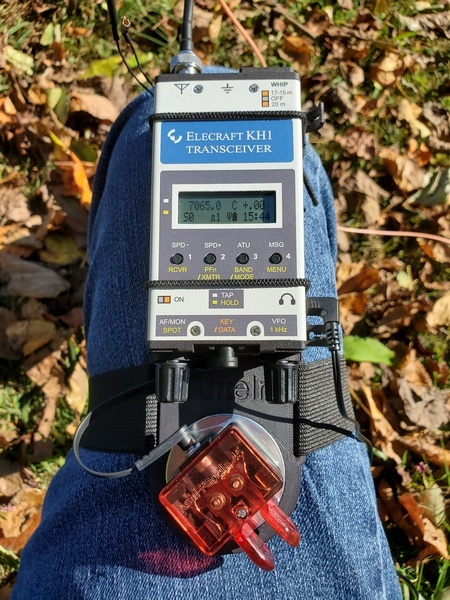
Using the Ashi paddles on a KH1 kneeboard
I haven’t used the leg mount in the field, but it worked great in the shack. That would probably be a great mounting option in some situations. The leg mount is cleverly designed so that you can angle the paddles to the left or right, if you like.
Overall, I like these paddles. Once I adapted to the feel, they worked reliably in the field. So, the Ashi paddles definitely replaced my quirky QU-21C paddles in my backpack.
For several years my homebrew 19-foot vertical was my go-to portable antenna. Over the past two years, I’ve been using a variety of other antennas, relegating my trusty vertical to backup status under the backseat of my truck. I dusted it off recently to see how well the Elecraft KH1 would work with it.
I designed the antenna to be resonant on the 40 and 30 meter bands. On the 20M band and higher, it functions as a random wire, so a tuner is required. I was sure the KH1 would easily find a match on 40M and 30M, but I was curious to see how well it would fare on 20M through 15M.
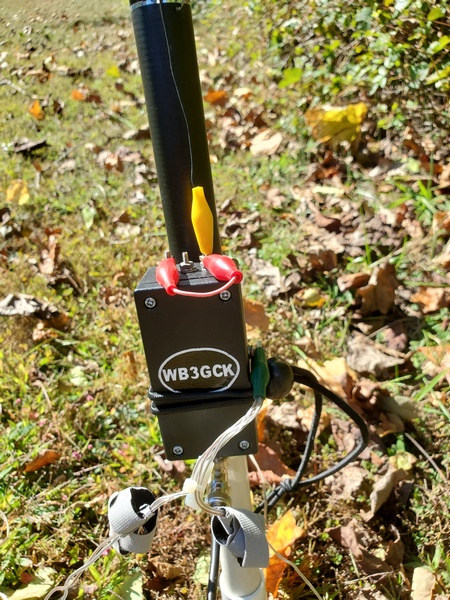
The matching unit for my 19-foot vertical. The red jumper is used for changing bands.
To test this out, I drove to Ridley Creek State Park (US-1414, KFF-1414). I had been to an ARES-RACES get-together that morning, so I swung into the park for a quick activation on my way home.
I set up at the edge of a field away from other park visitors. Since it was a weekday, the park wasn’t very busy, anyway. I supported the antenna on a cheap telescopic pole using my homebrew ground mount and spread out four 12.5-foot radials. From there, I ran 20-feet of RG-213 over to my camping chair, where I used the KH1 on a Tufteln KH1 knee board.
KH1 and Ashi Paddle 45 on a Tufteln KH1 kneeboard
Before I got started, I tried the KH1’s internal tuner from 40M through 15M. It easily found a decent match on each of the five bands. The SWR on 15M was 2:1, which is certainly usable for the KH1.
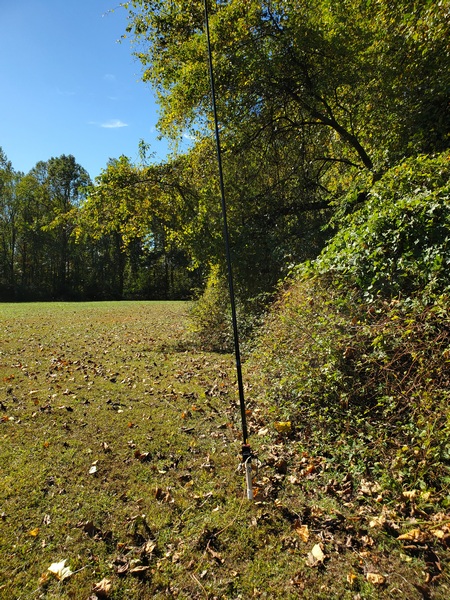
The 19-foot vertical on a slightly-leaning pole
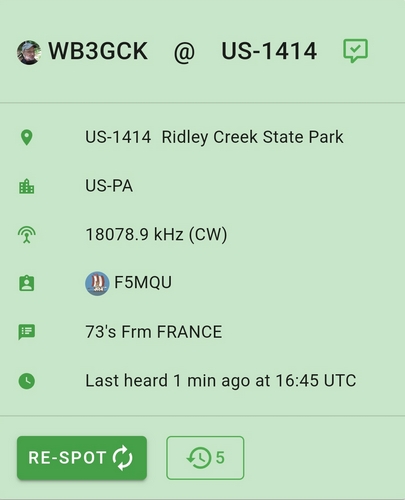
Despite some unsettled geomagnetic conditions, I made contacts on each band except 15M. (I didn’t hear any activity there this morning.) The antenna really worked well on 17M, where I had back-to-back contacts with F4ILH and F5MQU. Even with the geomagnetic wackiness afoot, I managed to log 16 QSOs. Five of those were park-to-park contacts.
Spotted by F5MQU
It was good to get the old vertical out in the field again. I’ve been thinking about re-packaging it to reduce the size of the matching unit and eliminate the jumper used for band changes. That might be a good project for over the winter.