First Ride of the Year

It has been quite a while since I’ve done any bike-portable operating. Over the past couple of years, I’ve dealt with medical issues of one sort or another. This year, I’ve avoided any serious issues, so I dusted off the bike and went out for a ride. While I was out, I tested some new gear for the bike. (I purchased all of the products mentioned with my own money.)

Antenna Mount

I make no claims of originality for this setup. I first saw this antenna mount in a YouTube video by VA7BIX. So, I found one on eBay and fired off an order to give it a try.

The antenna mount in question is a Nagoya RB-46. I had been looking for a way to mount my Gabil GRA-7350TC antenna (or any antenna with a ⅜-24 mount) on my bike. Originally intended for mounting on a car’s roof rack, the RB-46 can be clamped to the handlebars on bikes. With the kickstand down, my bike leans a bit. Fortunately, I can the adjust the RB-46 in two directions, so the antenna stays vertical. It accommodates a standard SO-239 to ⅜-24 antenna stud mount, which I had on hand. 

Installing the RB-46 is quick and easy—for normal people. My installation, however, required extra time for searching the garage floor for dropped nuts and washers. Hardware mishandling aside, I installed the mount on my handlebars and adjusted it so the antenna would be vertical with the bike’s kickstand down. 

Nagoya RB-46 antenna mount attached to my handlebars with my Gabil GRA-7350TC installed.

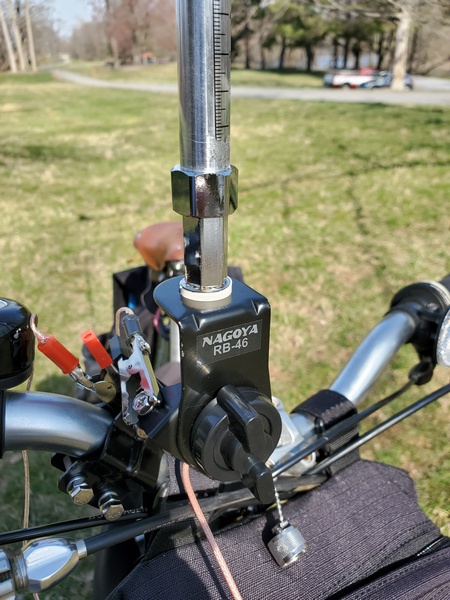
I also had a protective cap for the SO-239 in my junk box, so I put it to use here. Just in case it rains while I’m riding, I carry a ⅜-24 bolt in my handlebar bag. I figure I could put that in the antenna mount to keep the rain out. That’s probably overkill, but that’s how I roll. (No pun intended.)

New Panniers

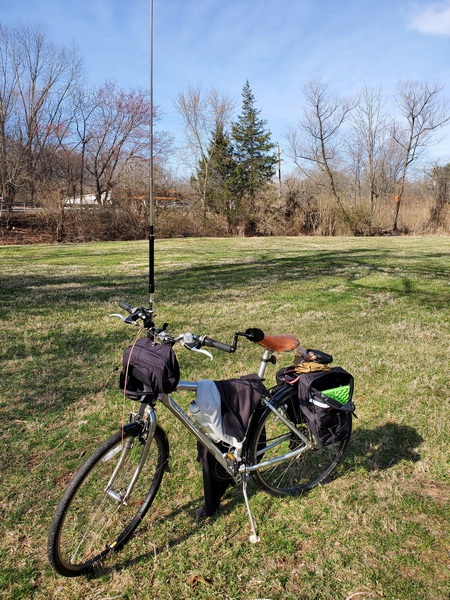
I really like the cheap set of pannier bags I have been using for more than a decade. Sadly, they were really showing their age and were being held together with liberal applications of duct tape. Figuring I had gotten my money’s worth out of the old bags, I ordered a set of Bushwhacker Moab pannier bags.

The new bags are slightly larger than my old ones, so there’s more than enough room to carry my radio gear. My Bushwhacker handlebar bag has been going strong for about 12 years, so I’m hoping my new panniers also have a long life. 

Schuylkill River Trail

I’m fortunate to live near the Schuylkill River Trail, a beautiful multi-use trail that runs along—you guessed it—the Schuylkill River. Since I haven’t been on the bike in a while, I chose a section of the trail for a three-mile ride that leads to a quiet local park. 

Before loading up my bike, I always check the tire pressure. This morning, the front tire had gone flat, despite having fully inflating it a couple days earlier. After installing a new tube, I was finally on my way. Then, as I was driving to the trailhead, it started raining. Geez, what else!? Thankfully, the rain stopped by the time I reached the trailhead.

Bike loaded up and ready to roll

I rode about three miles to Towpath park, a ride I’ve done many times in recent years. The ride was uneventful, and I was soon setting up the GRA-7350TC on my new antenna mount. I used two 17-foot radials laid out on the ground and 25 feet of RG-316 coax. It was easy to get a 1.3:1 SWR on 20M.

Set up and on the air in the park

To see how it works, I set up my Penntek TR-35 on a nearby park bench. Tuning around I found some POTA activators to call. I ended up working three of them. It was fitting that one of my contacts was with Jim N4JAW. Jim is a bicycle/ham radio enthusiast I wrote about in a recent post. (Jim told me later that he was also bike-portable. You can read about his POTA activation operation and our QSO on his Ham on a Bike blog.)

My Penntek TR-35 set up on a park bench

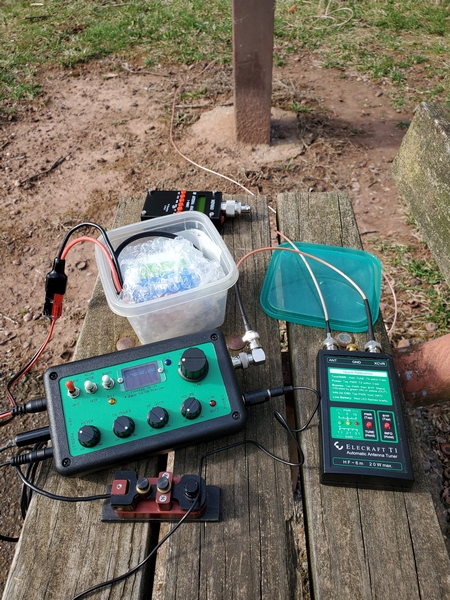
Before tearing down, I checked the other bands with an antenna analyzer. I was able to get good matches on 30M through 12M. The 10M band was a little finicky. I didn’t use my longer radials, so I knew 40M would be tough. 

Happy with the results, I loaded up the bike for the ride back to my truck.

Wrapping Up

I have a few takeaways from today’s ride:

  • The antenna mount worked great. However, using a PL-259 to BNC-F adapter on the antenna mount caused some clearance issues. It was a little tricky connecting the coax. I need to try using a right angle adapter next time.
  • The new panniers were easy to put on and take off the bike. Having a little extra room is a plus.  
  • My short ride today was no Tour de France, but it reminded me how much I enjoy riding my bike. Yep. I definitely need to do more bike-portable outings this year.

72, Craig WB3GCK

Grills on the Air

I have been off the air for the past couple of weeks, so I set out to do something about that this morning. Taking advantage of some milder weather, I did some picnic-table-portable operating from Evansburg State Park (US-1351, KFF-1351). 

I set up at a picnic table along one of the park’s trails. Using a jaw clamp antenna mount, I mounted my Gabil GRA-7350TC antenna to a picnic grill. I started with two radials, but I had some trouble getting an acceptable match on 20M. After I added two more, I got the SWR down to 1.3:1. Since I was next to a trail, I had to keep the radials on one side of the antenna to avoid being a trip hazard. I set up my Penntek TR-35 (5 watts, CW) and started calling CQ.

My Gabil GRA-7350TC antenna clamped to a grill

The band conditions were a little wonky, with an A Index of about 25 and an unsettled geomagnetic field. As a result, the contacts were coming in at a slower pace than usual. It took about 30 minutes to make my first 10 contacts. 

Operating in Evansburg State Park (US-1351, KFF-1351)

I called it quits after about 40 minutes. Band conditions notwithstanding, I logged 12 contacts, including two DX contacts (F1BLL, IW2BNA) and three park-to-park contacts. 

As I was packing up, I ran into a bit of an issue with the Gabil antenna. Despite my best efforts, I couldn’t unscrew the whip from the loading coil. As if that wasn’t enough, the sliding coil seemed to be stuck, too. I just put the whole antenna in the truck, so I could deal with it later. 

When I got home, I took a closer look at the antenna. Using a pair of pliers I managed to remove the whip. I probably got carried away and over-tightened it when I put it together. I also got the sliding coil unstuck. My antenna is one of the early models where the adjustment scale is just a label that was stuck on. (On newer models, the scale is engraved.) The bottom of the label started peeling up and jammed the slider. A little surgery with a razor blade fixed that. 

Even with my antenna issues, it was nice to get out for a little radio in the park. 

72, Craig WB3GCK

Of Hams and Bikes

I received an email from Jim N4JAW last week, letting me know he was planning to mention me in an upcoming blog post. Jim is an avid cyclist and is the owner of the Ham on a Bike blog. He’s doing a series of posts highlighting other hams who incorporate cycling into ham radio activities (or vice versa), titled “I Am Not Alone. There Are Many Of Us.” 

Jim gave me a shout-out in Part 2 of his series. I’m honored to have my meager cycling activities included among such a distinguished group of hams on bikes. There is a really impressive collection of videos and pictures in Jim’s posts.

My park bench setup in Towpath Park
Operating bike-portable a couple of years back

All of this reminds me I’m long-overdue for some bike-portable operation. Now that the weather is warming up a bit, I need to get the bike out on the trails. 

Be sure to check out Jim’s blog. He has some great stuff over there. 

72, Craig WB3GCK

My Bulging Battery

Last week I was using one of my Evolve III Maestro E-Books during our local ARES-RACES NBEMS digital net. I noticed the keyboard had developed a hump in the middle. Having seen this once before in another laptop, I immediately knew what was causing it: a bulging battery. As a precaution, I disabled the battery in the Windows Device Manager and continued running solely on AC power.

The next day I opened up the laptop to remove the battery. That was fairly simple to do. I just needed to remove nine tiny Phillips screws to open the case. Then I removed five more tiny screws holding the battery and unplugged the battery cable. It was a painless process. 

Searching the Internet, I found some sources for replacement batteries. I ended up buying one on eBay from a seller that ships from New Jersey. Of course, that convenience came at a price. I ended up paying $40 for a battery to put in a $90 laptop. Yikes!

It's not a great a picture, but you can see how bloated the old battery was. In comparison, the new battery is perfectly flat.
This isn’t a great a picture, but you can see how bloated the old battery was. It’s hard to tell with the lousy lighting, but the new battery is perfectly flat.

A week after I first noticed the problem, I had a brand new battery in my mailbox. It took about 15 minutes to open the laptop, install the new battery, and put it all back together again. Happily, it survived the “smoke test” and charged up normally. Back in business!

Yeah, $40 is steep investment for such a cheap laptop, but I really like this little thing. Hopefully, it’s got a couple more years left in it. 

73, Craig WB3GCK

Testing a Backup Rig

Whenever I go operate portable, I usually take my old YouKits HB-1B transceiver along as a backup. One thing I learned from back in my working days, is you need to test your backup equipment periodically to make sure it will actually work when you need it. It had been quite a while since I last used the HB-1B, so I put it to use today.

My destination today was Ridley Creek State Park (US-1414, KFF-1414). I rolled into one of my favorite spots and set up my homebrew loading coil paired with a 17-foot telescopic whip. This combination covers the 40M, 30M, and 20M bands, perfect for the HB-1B. Along with the HB-1B, I used my Elecraft T1 tuner and my old NorCal keyer. 

My YouKits HB-1B transceiver during an activation at Ridley Creek State Park (US-1414, KFF-1414)
My YouKits HB-1B in use at Ridley Creek State Park (US-1414, KFF-1414)

The A Index was 32 when I started out on 40M. Despite the active geomagnetic field, my four-watt HB-1B still managed 10 contacts in about 16 minutes. The 30M band was a little better, but I made most of my contacts on 20M. The HB-1B only puts out a little over 3 watts on 20M, so I was pleased with that. 

The (far) better half and I are puppy sitting one of our grand-dogs this weekend, and I received a text message that he was at the house waiting for me. He knows I’m the designated dog walker at our house, so I packed up to go spend some quality time with a furry buddy.

After operating for an hour, I logged 34 contacts. I didn’t have any DX contacts today, but four of my contacts were park-to-park. 

I bought the HB-1B from Ten-Tec almost twelve years ago, and it has seen a lot of use in the field. Although it doesn’t see as much action as it used to, it proved once again it’s a capable little rig. 

72, Craig WB3GCK