Dollar Store Special

[NOTE: This is an updated version of an old article from my QSL.NET website. In the interest of full disclosure: My local dollar store no longer sells the speaker wire I used. While it’ll probably cost you a few more bucks to build one, it’ll still be a cheap antenna. Although the original article has been on my website for 15 years, I still get the occasional email from folks who have built one.]

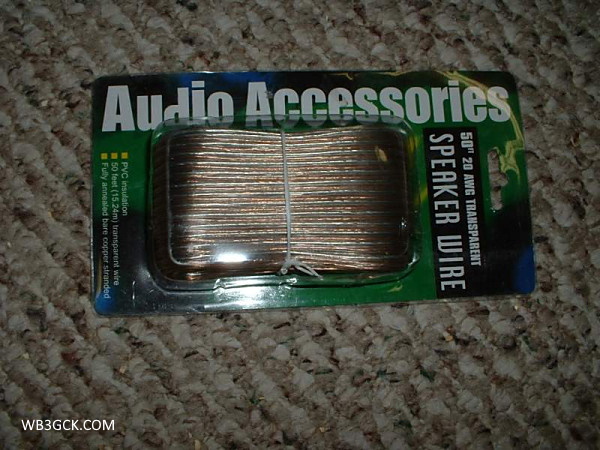
I love rummaging through our local dollar store. One of the biggest bargains in our local dollar store is speaker wire. You can get 50 feet of two-conductor speaker wire for a buck. Not too shabby. I always keep a bunch of the stuff on hand for antenna experimentation. 

Diagram of the Dollar Store Special. See the text for other counterpoise options.
Diagram of the Dollar Store Special. See the text for other counterpoise/radial options.

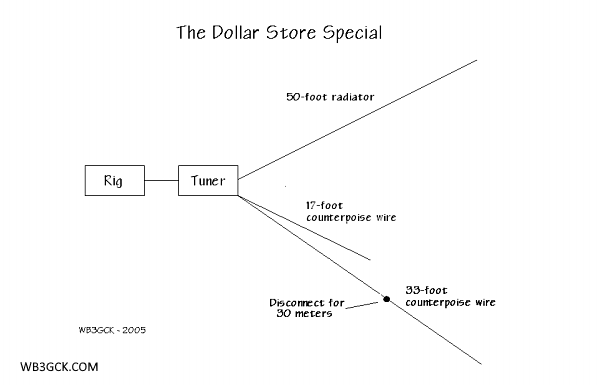
Using a single 50-foot roll of dollar store speaker wire, I made a simple 50-foot random wire antenna with counterpoise wires to cover the 40, 30 and 20-meter bands. I stashed the whole kit in a zip-lock sandwich bag and always keep it on hand as a backup antenna system whenever I operate in the field. With a simple antenna tuner of some sort, this will get you on the air in a pinch, should your primary antenna fail. 

This is the 20 AWG speaker wire I used. Sadly, my local dollar store no longer carries it. I wish I had bought a ton of it while it was available.
This is the 20 AWG speaker wire I used. Sadly, my local dollar store no longer carries it. I wish I had stocked up while it was available.

Here’s all you have to do:

  1. Separate the conductors so that you now have two separate 50-foot wires.
  2. For the radiator, take one of the 50-foot wires and crimp a small ring lug to one end—right over the insulation. This gives you someplace to tie a line to hoist it up. On the other end, just strip off a half-inch or so of the insulation. You can leave it bare or add whatever kind of connector you want; whatever works best with your tuner.
  3. For the counterpoise wires, take the remaining 50-foot wire and cut it so that you have a 33-foot wire and a 17-foot wire. If you only want to work 40 and 20 meters, you can stop right here. You now have counterpoise wires for both of these bands.
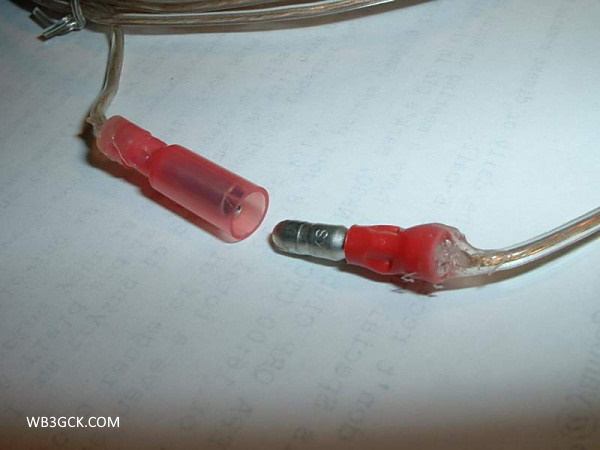
  4. To provide a counterpoise wire for 30 meters, take the 33-foot wire from Step #3 and cut it so that you now have a 23-foot wire and a 10-foot wire. Strip off about 1/2-inch of insulation from one end of the 23-foot wire. Install a quick-disconnect connector of some sort on the other end, so that you can join the 23-foot and 10-foot wire sections together. The idea here is that, with the two wires connected, you have a 33-foot counterpoise wire for 40 meters. With the two sections separated, you now have a 23-foot counterpoise wire for 30 meters.
I used a ring terminal to terminate the 50-foot wire. Note that the terminal is crimped over the wire's insulation. The metal ring terminal is electrically-isolated from the antenna wire.
I used a ring terminal to terminate the 50-foot wire. Note that the terminal is crimped over the wire’s insulation. The metal ring terminal is electrically-isolated from the antenna wire.
This is the quick-disconnect connector I used on the original version of the counterpoise wire.
This is the quick-disconnect connector I used on the original version of the counterpoise wire. I used some Goop® adhesive to provide some strain relief.

[Note: If you only plan to operate with the radials laying on the ground, cutting them to resonance isn’t too important. You can simplify things a bit by going with just the 33 and 16-foot wires. I think two 25-foot wires would be sufficient, as well. Three 16.6-ft radials is another option to consider. Feel free to experiment here and see what works for you.]

In operation, just hoist one end of the 50-foot radiator up in a tree or other suitable support. Connect the other end to the hot side of your tuner. Connect the 33-foot and 17-foot counterpoise wires to the ground connection on your tuner and lay them out on the ground. When you want to work 30 meters, just disconnect the quick-disconnect on the longer counterpoise wire. Pretty simple, eh? Any type of simple L-tuner should work fine for this. 

Please note that I wouldn’t recommend using this wire for a permanent outdoor antenna. It’s not suited for that kind of use. But for temporary outdoor use, it’ll do just fine. Besides, if the wire goes bad, you can always replace the whole thing for a dollar! 

73, Craig WB3GCK

©2005-2020 Craig LaBarge WB3GCK

Checklists for Portable Operations

Nothing can bring a portable radio outing to a screeching halt faster than forgetting to pack a critical item—an adapter, a cable, or heaven forbid, a radio. Been there, done that. My solution is a detailed checklist for such occasions.

At some point in my life, I became an obsessive checklist maker. Back when I was still working for a living, I relied heavily on checklists for my daily to-do list, things I needed to prepare for meetings, and the like. I naturally carried that habit over into my ham radio hobby.

Ham Radio Checklists

I keep a variety of checklists handy for different types of operating. A few of my standard checklists are:

  • Hiking
  • Bike-portable
  • Stationary-mobile operating from my truck
  • Operating from the camper

I also keep some checklists for some special events:

  • Field Day
  • Our annual summer vacation

For those one-off, ad hoc events, I sit down in advance to prepare a special checklist of things I need to take. 

I know all this sounds like a no-brainer, but I wasn’t blessed with the greatest of memories. When I try to take a shortcut around this process, the risk of forgetting an important item goes way up.

Preparing the Checklist

When developing a checklist, I do a mental walk-through of my setup in the field. I simply try to visualize setting up and make a detailed list of the things I’ll need. This method works for simple setups. For more complex set-ups, I sketch it out on paper and make my checklist from that.

An even better approach is to assemble the equipment at home. Then you can do a detailed inventory of your equipment to form your checklist.

When I prepare a checklist, I first list out the containers (backpack, box, bag, etc.) that I’ll be using to carry the equipment. Next, I list out everything that needs to be in those containers. I indent these items on the checklist below the container.

As items are packed in a container, I check them off. Then, as the containers are loaded into my truck, they are checked off. 

I also keep a list of things I need to do before the event. I call this my pre-flight checklist. I use this list to make sure batteries are charged, my truck’s GPS is programmed, and the like. 

The Mechanics

For years, I created my lists using a word processor. When it was time to pack, I just printed them out. That works fine, but I now use a paperless method.

I now use an application called Evernote to keep my checklists. My checklists are stored in the cloud, so I can access them from any of my computers and even my cellphone. I can check off items on my phone as I’m packing. After the event, I just go in and un-check the items, and the checklist is ready to go for the next outing.

A portion of a checklist as it looks in the Evernote app on my cellphone

You can get a basic Evernote account for free. There are paid options for folks (like me) who need additional capabilities and features.

Some “Pro Tips”

Here are a few lessons I’ve learned over the years:

  • Don’t be too quick to check off an item. If you check off an item before it is physically in the container or loaded into your vehicle, you’ll eventually run into problems. Don’t ask me how I know this; just trust me on this one.
  • After an event, take a few minutes to update your checklist, if needed. Was there something you wish you had brought or should have left at home? Some of my frequently-used checklists have been evolving for decades. 

Wrap-up

So there you have it. I know this is a somewhat mundane topic, but checklists have saved my bacon on several occasions. 

73, Craig WB3GCK