MFJ-1979 and the Junk Box Coil

I’ve been toying with buying a 17-foot telescopic whip for some time now. I didn’t really have a pressing need for it, since my 12-foot whip has been doing a great job for me. As a result, I kept talking myself out of buying it—until now. When I heard the news that MFJ was shutting down production, I figured I might as well buy one while they’re still available.

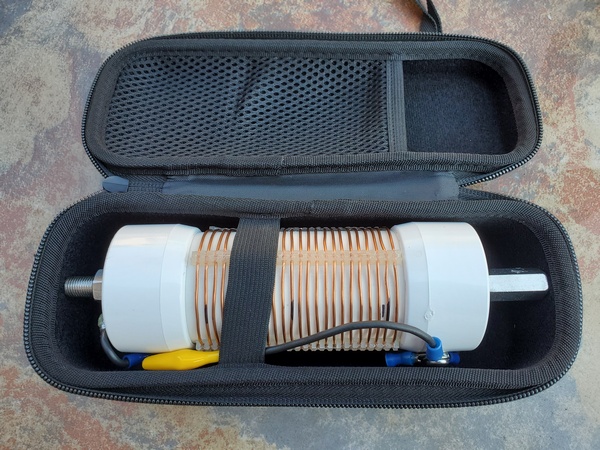
With no additional matching, you can adjust the MFJ-1979 to cover the 20M band and higher. I figured this whip coupled with my “Junk Box Coil” should easily cover 40M through 20M with the antenna fully extended. The four-foot height advantage over my 12-foot whip, should yield some performance improvement. With my older, larger coil, operation on 80M might be possible.

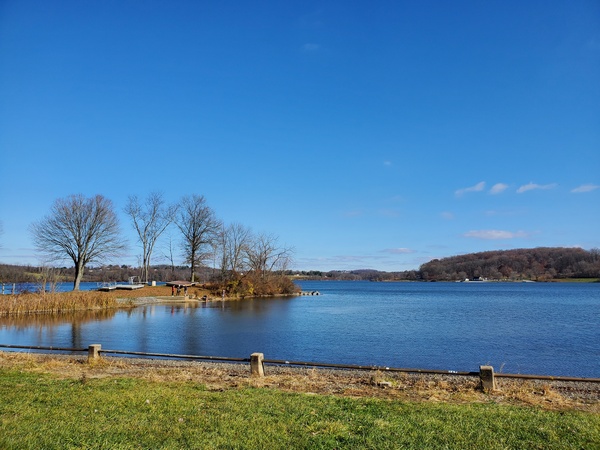
To test my assumptions, I made a trip to Evansburg State Park (US-1351, KFF-1351), where I was one activation away from a POTA “Repeat Offender” award. Like my last visit, it was raining, and I seemed to be the only one in the park. 

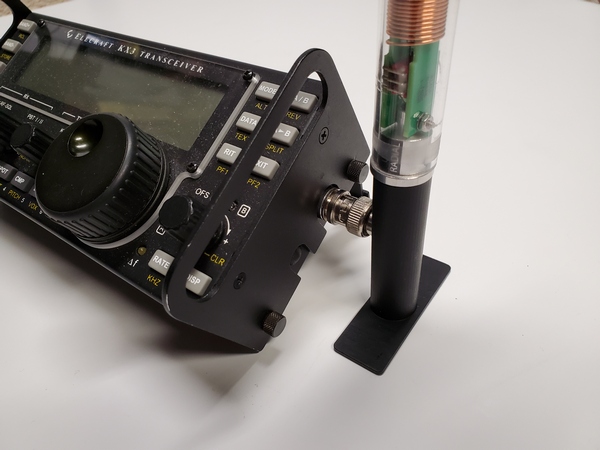
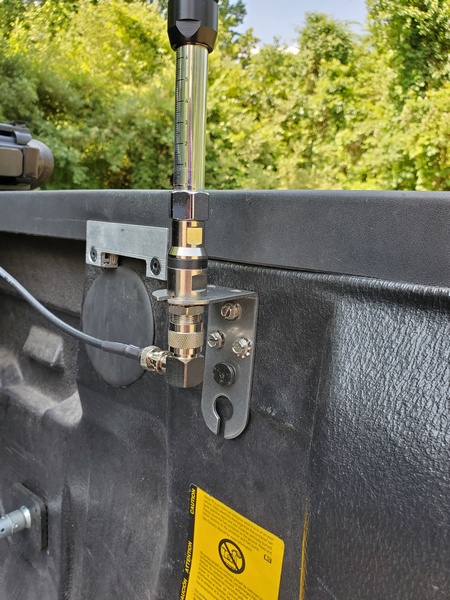
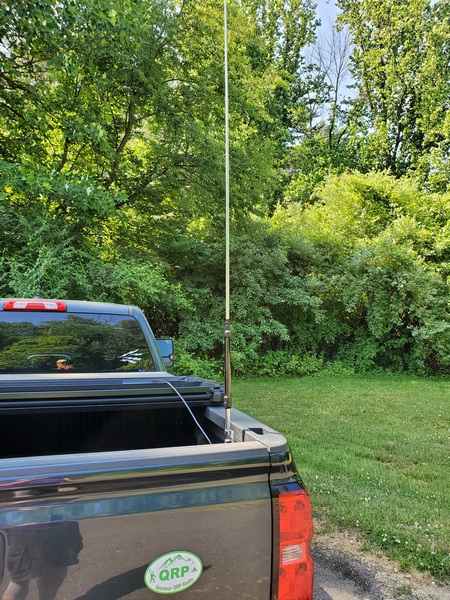
I set up the 17-foot whip and coil on the back of the truck and quickly identified the proper tap for 40M. I used a Sharpie pen to mark the tap location. (The coil now has two sets of marks.) Despite an impending geomagnetic storm, I made my first 10 contacts in about 12 minutes. Not too bad for an early activation on a Friday morning. 

The MFJ-1979 17-foot whip mounted on my "Junk Box Coil."
The MFJ-1979 17-foot whip mounted on my “Junk Box Coil.”

After about 25 minutes, I switched to the 30M band and marked the tap location on the coil. I picked up eight contacts on 30M before giving 20M a try. It was no surprise that the SWR was a flat 1.5:1 with the entire coil bypassed. Although conditions on 20M seemed a little weak, I logged five more contacts before pulling the plug. I ended up with 25 contacts in the log. No DX or park-to-park contacts today, unfortunately. 

For part of the activation, I used a plastic bag to keep the rain off the coil. When I got home, I brought the coil and the whip inside and dried everything off. While I had the whip extended, I measured the actual length. By my measurements, it’s 16 feet 11 inches long. 

Based on this brief test, I made a few observations:

  • Compared to my older 12-foot MFJ whip, I don’t think the quality of the MFJ-1979 is as good. The older whip just seems to telescope more smoothly. Some online reviews mention problems keeping the antenna from collapsing after using it for a while. In an effort to avoid problems like that, I’ll be extremely careful when extending and collapsing the whip. 
  • Performance on 40M, 30M, and 20M should be better than the 12-foot whip, given the additional length. A big difference? Given today’s band conditions, it was hard to tell.
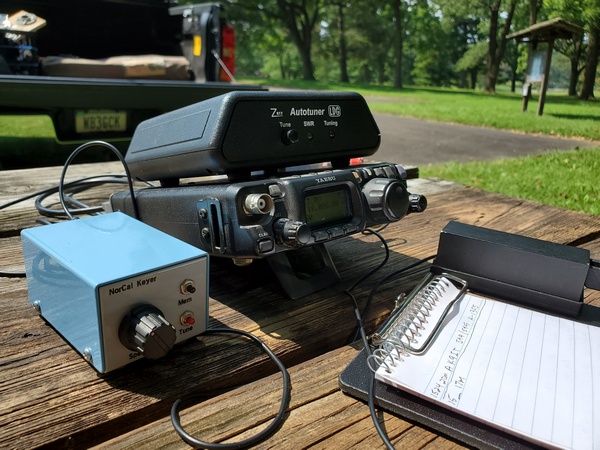
  • With the 17-foot whip and my coil, I can cover 40M. 30M, and 20M without adjusting the length of the whip. However, the 12-foot whip gives me 40M, 30M, 20M, and 17M without adjusting the whip. This lines up perfectly with the bands on my TR-35. 

I won’t be retiring my 12-foot whip anytime soon. I think for most POTA activations, I’ll stick with the 12-foot whip out of convenience. For contesting and activities like Winter Field Day, I will probably go with the 17-foot whip. I have an old 20M mono band QRP rig I want to put back on the air in the near future. The MFJ-1979 should be perfect for that. 

72, Craig WB3GCK

Byonics KX3 AX1 Stand

I mentioned in an earlier post that I bought my Elecraft AX1 antenna not long after they came out. Although I carried in my pack as a backup antenna for a few years, I never used it much. That changed last year, when I started giving it some serious use. It’s now one of my go-to options for casual, impromptu portable operation.

Of course I bought a few accessories for the AX1. I typically use the AXB1 Bipod with the AX1 attached directly to my KX3. While that works fine, I saw mention of an interesting alternative to the bipod, the Byonics KX3 AX1 Stand. My curiosity got the better of me, so I ordered one.

It’s a clever little 3D printed stand that weighs next to nothing. To use it, attach the BNC elbow adapter to the AX1 and set it in the stand. Scoot the stand up to the radio and connect the AX1 to the radio. That’s it!

The Byonics KX3 AX1 Stand

I set it up at home, and it seems pretty stable. The thing I like about it is that there are no adjustments. Since Byonics makes these stands for specific radios, the KX3 version won’t fit a KX2 and vice versa. That’s not a problem for me, since I don’t currently own a KX2. The Elecraft bi-pod, of course, can be adjusted to fit either radio. 

I’m looking forward to trying it out in the field sometime soon.

73, Craig WB3GCK

An Extra Helping of Pi

Back in 2020, I started fooling around with digital voice modes. I don’t really use them a lot, but there are a couple of DMR nets I like to check into each week. I recently started using the WPSD software instead of the Pi-Star software I had been using on my two hotspots. Just for the heck of it, I wanted to try upgrading the old Raspberry Pi Zero board on one of them to something more capable.

According to the documentation, WPSD was never written for single core processors, like the old Pi Zero W board in my hotspot. The developer recommends a Pi Zero 2 W or better. While it will work on a single core Pi, it runs slower—I can attest to that. I also noticed that CPU utilization was well over 100% at times. With its quad core processor, the Raspberry Pi Zero 2 W is supposed to be five times faster than its single core predecessor. So, I was hoping to see some general performance improvements and faster boot-ups after this upgrade.

In the interest of full disclosure, I’m no Raspberry Pi expert—far from it. I had to do some online research before launching into this. It looked simple enough; the Pi Zero 2 W board is a drop-in replacement for the original Pi Zero board, so it seemed simple enough.

I bought a Pi Zero 2 W board on Amazon for about $28 (US). The board didn’t have the header pins installed, so I bought some. I bought a box of 40-pin headers for less than $10 (US). I now have more of them than I’ll use in my lifetime. 

I took advantage of a rainy Sunday to do the upgrade. First, I needed to install headers on each end of the Raspberry Pi’s GPIO area. The two headers had two rows of five pins each. With the help of an Xacto knife, I snapped the pieces I needed from one of the (many) 40-pin headers I now own. With my aging eyes, I needed to use a lighted magnifying glass to do the soldering. To avoid melting the plastic, I allowed some cooling time after I soldered each pin.

  • The new Pi Zero 2 W board installed in the hotspot case. The two headers I soldered in are towards the front.
  • The MMDVM board installed on top of the Raspberry Pi board.
  • The is the fully-assembled hotspot. This pink section to the right is a piece of paper I used to cover some overly-bright LEDs.

From there, it was a simple task to disassemble the hotspot, swap boards, and put it back together. I estimate that the hardware part of the upgrade took all of about 20 minutes. 

I had previously burned the WPSD image on a new Micro SD card, so it was ready to go. When I inserted the card and powered up, the hotspot booted up in a minute or two. After importing a backup WPSD configuration file and doing a couple of tweaks, the hotspot came to life. Success!

The performance improvements were immediately obvious. The dashboard and configuration web pages were much more responsive, and the CPU load typically stays under 20%. It’s been running for a week now, and it’s been rock-solid. Since this upgrade went so smoothly, I went ahead and upgraded my other hotspot. That one was just as easy and is also working great.

For you Raspberry Pi power users out there, this is pretty trivial stuff. Yeah, I guess it is. But it was an easy and fun little project, and I learned a bit about Raspberry Pi boards in the process.

73, Craig WB3GCK

Loading Coil Case

Sometimes I get excited over some of the most trivial things. This is one of those times.

I wrote about my Junk Box Loading Coil in a recent post. I normally keep the loading coil and my 12-foot telescopic whip antenna stashed away under the backseat of my pickup truck, so it’s handy for spur-of-the-moment activations. I also keep a couple of Jackite poles and some other gear under there. While the coil is pretty rugged, I just didn’t feel right about cramming it in there unprotected. By pure dumb luck, however, I stumbled on the perfect storage solution.

While mindlessly browsing the Internet a while back, I stumbled across something on a Chinese seller’s website (Temu.com) that caught my eye. It was a storage case that was probably made for something no longer sold. I’d provide a link, but products quickly come and go on this website. The website listed it as “Simple Portable Storage Zipper Bag, Travel Electronic Tools Organizer, Zipper Container.” Wow. That’s a mouthful. 

I had seen similar cases on eBay, but not in this particular size. Given the listed dimensions, I thought it might be a good fit for my homebrew loading coil. At the time I placed my order, it was selling for $7.98 USD. 

This is the case I bought to use with my Junk Box Loading Coil.

The container, along with a few other things I ordered, arrived on my front porch eight days after I placed my order. Voila! The case was a perfect fit for my loading coil. In fact, it looks like it was custom made for it. It’s semi-rigid, so it affords some degree of protection. It’s definitely not elephant-proof, though. There’s an elastic strap inside that helps hold everything in place. 

My Junk Box Loading Coil tucked away in its new storage container

I’m not exactly sure what this case was intended to house, but it’s perfect for my application. So now, my coil will stay clean and protected, while waiting under the backseat of my truck for my next POTA activation.

73, Craig WB3GCK

Turkey Day Activation

Our family had to postpone our Thanksgiving get-together until the weekend. So that gave my (far) better half and me a quiet day to ourselves. What better way to celebrate a holiday than a POTA activation?

My destination today was Marsh Creek State Park (K-1380, KFF-1380), one of my favorite local parks. As I was walking out the door, my (far) better half told me, “You shouldn’t expect too many contacts because of the holiday.” Ha! After being married to a ham for 46 years, you would think she would know better. A holiday is just an opportunity to get on the radio instead of working!

My rig today was my old YouKits HB-1B. After I bought it through Ten Tec 10 years ago, it was my go-to portable rig. In recent years, I’ve been taking it along on trips as a backup rig, but it hasn’t seen much air time.

The HB-1B has a canned “CQ” CW message, but no programmable memories. I brought my old NorCal keyer along to take care of that. Since the HB-1B also lacks an internal tuner, I used my Elecraft T1. Actually, this was a portable configuration I have used many times years back. Antenna-wise, I went with my 12-foot whip and homebrew loading coil on the back of my truck.

My old YouKits HB-1B transceiver, along with my Elecraft T1 ATU and NorCal keyer

The HB-1B never had the cleanest sounding sidetone; but using a LiFePO4 battery (around 13V), the sidetone had some loud clicks. Over the years, the display also developed some kind of mark or smudge that is very noticeable at some viewing angles. Neither of these issues were a show-stopper for me.

I started out on 40M and seemed to get out well enough. After the first eight contacts, though, the band seemed to dry up. I moved up to 20M, and things picked up. Although it took 20 minutes to get my first 10 contacts, there was lots of activity on the 20M band. The power output is slightly lower on 20M (approximately four watts), but I still collected 32 contacts there. I picked up a few more on 30M before calling it quits.

My view of the lake in Marsh Creek State Park (K-1380, KFF-1380)

In less than 90 minutes on the air, I ended up with 50 contacts (with one dupe). There were no park-to-park or DX contacts today. (I neglected to post a spot for the WWFF folks.)

Despite its shortcomings, the little HB-1B gave a good accounting of itself. It’s still a worthy backup rig, and I need to put it on the air more often. 

Finally, to all those celebrating, have a happy and safe Thanksgiving. 

72, Craig WB3GCK

Taking My FT-817 Back to the Field

Looking through some files recently, I came across the sales invoice for my old Yaesu FT-817. According to the invoice, my FT-817 was 20 years-old back in May. The ‘817 hasn’t seen much use lately, so I set out to change that.

I first saw the FT-817 at an Atlanticon QRP convention back in 2001. The FT-817 had just come out, and I wanted one the moment I saw it. It wasn’t until two years later that I finally pulled the trigger and bought one. The FT-817 became my main rig for many years, both at home and in the field. After I bought my Elecraft KX3, the FT-817 was only saw infrequent use in the shack.

The early FT-817s were plagued with a tendency to blow the finals. Sadly, mine was no exception. Despite being very careful, my finals went belly-up during a camping trip in 2006. I sent my rig back to Yaesu for repairs, and they installed the newer, more robust finals used in the FT-817ND. It’s been fine ever since—knock on wood. 

Initially, I used my homebrew Z-match tuner with the FT-817. In 2009, I bought the LDR Z-817 auto tuner, which was designed specifically for the FT-817. The Z-817 certainly made tuning up a lot faster.

A while back, I tried to program some new repeater frequencies using Chirp on my laptop. Windows informed me that the chip in my old FT-817 CAT cable is no longer supported. I bought a new cable on Amazon, and I was soon back in business. 

To prepare for today’s outing, I put fresh batteries in the Z-817. Since the FT-817 doesn’t have a memory keyer in it, I dug out my old NorCal Keyer. I built the NorCal Keyer from a kit not long after I purchased the FT-817, so it is also 20 years old. I gave the keyer a set of fresh batteries and programmed one of the three memories with a “CQ POTA” message.

With my trusty FT-817 in tow, I drove over the Valley Forge National Historical Park (K-0761, KFF-0761). I parked my truck in a spot that had a picnic table about 10 feet behind it. That allowed me to set up my homebrew 19-foot vertical on the truck and run an 18-ft length of RG-8x over to the rig. 

My 20 year-old Yaesu FT-817 back in the field at Valley Forge National Historical Park (K-0761, KFF-0761). The blue box in the foreground is my NorCal Keyer, which I built from a kit 20 years ago.

Before starting my activation, I did some testing. The FT-817 and Z-817 combo played well with the vertical. I was able to easily get a good match from 40M through 10M. The earbuds I used were more sensitive than the headphones I use at home, so the sidetone was louder than I’m accustomed to. Unfortunately, I couldn’t remember how to adjust the sidetone volume, and I neglected to pack my little FT-817 cheat sheet. So, I just pulled the earbuds out a bit and continued on. 

Since the picnic table was only 10 feet from my truck, I was able to use my homebrew 19-foot vertical.

Once I got going, using the FT-817 brought back a lot of memories of portable outings from years ago. Happily, the old rig still works like a charm. 

Despite some fading on the bands, contacts came easily. In a little more than an hour, I made 21 contacts with four park-to-park QSOs. Most of my contacts were on 40M and 20M, with one contact on 30M (a P2P). I also had a contact with W1AW/0, but the operator didn’t give his location. 

It was a lot of fun getting my trusty FT-817 back out in the field again. The FT-817 isn’t my oldest QRP rig; that honor goes to my 30 year-old MFJ-9030 transceiver. I definitely need to dust off more of my old rigs and give them some QRP-portable love. 

72, Craig WB3GCK

Evolve III E-Book Impressions

I bought the Evolve III Maestro E-Book about nine months ago. Having used it for various ham radio applications during that time, I thought I’d offer some updated thoughts on this inexpensive laptop. 

Spoiler alert! There really isn’t anything I dislike about the Evolve III laptop. Sure, it’s not the speediest machine ever built, but it has stood up to every task I’ve thrown at. I regularly use it at home for Winlink, NBEMS, and VarAC. I’ve also used it for these modes in the field for ARES-RACES exercises.

The Evolve e-book in use during this year's Field Day
The Evolve e-book in use during this year’s Field Day

Power Considerations

Besides its small size and low cost, the thing I like best about the Evolve III is its battery life. Depending on what I’m doing, I can get eight to ten hours of run time. That’s way more than I need for my typical portable outings. 

Since the “wall wart” charger it came with outputs 12VDC, I can charge the laptop from a 12V battery. For charging in the field, I bought a 6-foot cable on Amazon that has a 3.5mm x 1.35mm coaxial power connector on one end. On the other end, I added a 12V accessory plug (cigarette lighter type). I also built a second cable with an Anderson Powerpole connector. 

  • A charging cable I built with a 12V cigarette lighter type plug
  • A 12V charging cable I built with a Powerpole connector

For Field Day, I operated all day without having to charge the laptop. I couldn’t have done that with other laptops I have used in the past. Before turning in for the night, I connected the Evolve to a 17 A-H gel cell battery to charge it overnight. (I had a fused 12V socket installed on the battery.) When I woke up during the night, it was fully charged, so I disconnected it. The Evolve lasted the rest of Field Day without further charging. 

Field Day Configuration

My Field Day configuration made full use of the Evolve’s capabilities. I used it for logging, connecting to our shared log file via Wi-Fi. I also used one of the two USB connectors to drive my WKmini Morse interface to send CW with my KX3. 

Since I only had one more USB connector available, I used a 3-way USB splitter to accommodate the other devices I needed to attach. I had the receiver for my wireless mouse attached to one port on the splitter and the KX3’s rig control cable connector to another port. I used the third port to connect a thumb drive, which I used for exchanging files with another Field Day participant. 

This is a USB splitter I bought at Staples years ago. The extra USB ports came in handy during Field Day.

For backups, I had my N3FJP Field Day logger configured to save backup files to an SD card. Since my backup files included the entire networked log, I had everything I needed to submit our group’s entry on my laptop when I got home. 

With all that going on, the Evolve performed flawlessly. 

Some Additional Thoughts

I recently heard from a couple of hams who received Evolve laptops with a USB-C charging port. This is a recent design change, I suppose. I don’t have any hands-on experience here, but I think this might actually simplify things in the field. A 12V socket connected to the battery and a commercial 12V cell phone car charger should be all you need to charge the Evolve. Most cell phones and devices seem to favor the USB-C connectors these days, so suitable 12V car chargers are easy to come by.

So, if you couldn’t tell, I’m a big fan of the Evolve III Maestro E-Book. So far, I feel the $89 I paid for it was money well spent. I’m hoping I can get several more years of good service from it. 

73, Craig WB3GCK

Bracket for the GRA-7350TC Antenna

Regular readers of this blog know that my homebrew 19-ft vertical is my go-to antenna for “stationary-mobile” operations. I use a low-tech mounting system in the bed of my truck involving a plastic milk crate, a cargo bar, and some bungees. When we go on our annual vacation to North Carolina, unfortunately, I have to remove the crate to free up storage space. I plan to activate a park or two while on vacation this year, so I wanted to come up with an alternate antenna arrangement.

I bought the GRA-7350TC antenna with this specific scenario in mind. Previously, I tested this antenna with a magnetic mount that I had stashed away in the basement. Although a couple of successful POTA activations proved its viability, I wanted something better than my little mag mount. 

Browsing around on Amazon, I found a stainless steel bracket with an SO-239 to ⅜-24 mount. I was reluctant to drill holes in my truck, but I thought a couple of small holes in the truck’s bed wouldn’t be too bad. So, I placed an order.

The Sirio stainless steel antenna mounting bracket I found on Amazon
The Sirio M1 stainless steel antenna mounting bracket I found on Amazon

The bracket arrived the next day. It’s really heavy-duty and possibly overkill for my application. My local hardware store had an excellent selection of stainless steel hardware. I bought some #12 x 1-inch sheet metal screws and some star washers. 

The next step was figuring out exactly where to mount it. I had to make sure that I could still close the truck bed cover without hitting it. By dumb luck, I chose a spot where I could use one of the screws that fastens the truck’s bed liner. This placed the mount close to where I wanted it. Then, it was a quick task to drill pilot holes for the three additional screws. Mechanically, it felt solid, and an ohmmeter check confirmed continuity to the truck’s body. 

The bracket installed in the bed of my truck with the antenna installed. The black screw is an existing screw I took advantage of.

I gave the new mount a trial run at Ridley Creek State Park (K-1414, KFF-1414). It took me about a minute to get the antenna set up on the mount, and it was a perfect fit. I ran an 18-foot length of RG-8x coax (much longer than I really needed) to the Penntek TR-35 inside my truck.

Using an antenna analyzer, I first tuned it up on the 40M band. I couldn’t get the SWR down below 2:1. This also happened when using the antenna on a magnetic mount, too. I’m guessing a different length of coax or a counterpoise wire might help. In any event, I tuned the antenna to resonance and used a tuner to keep the rig happy. The first QSO was a station in Georgia who gave me a decent signal report. 

The Gabil GRA-7350TC antenna in use

The SWR on 30M was a bit lower but still above 2:1. Again, I had no problems making contacts with the antenna. On 20M and 17M, the SWR was down to about 1.2:1 or thereabouts. 

Despite the time spent fiddling with the antenna, I logged 13 contacts, with three park-to-park QSOs. I also worked W1HNJ on 40M and 30M. As part of Museum Ship Weekend, they were operating the radio console from the hospital ship, SS Hope. The radio console is now part of the Chatham Marconi-RCA Wireless Museum on Cape Cod, Massachusetts. 

I still have some tinkering to do, but I think the mounting bracket will work just fine. I won’t be retiring my homebrew vertical anytime soon, but the GRA-7350TC gives me another option when the need arises. 

73, Craig WB3GCK

Palm Paddle Cable Repair

During a POTA activation a few days ago, I was in the middle of a QSO when my Palm Mini paddles started behaving erratically. I knew right where to look for the cause of the problem. 

The Palm Mini paddles have been my go-to paddles in the field for many years. Although the German manufacturer, Palm Radio, is no longer in business, they are still the only paddles I take along for portable work. They are compact, have a great feel, and work perfectly with the clipboard arrangement I use in the field. I loved the first set I bought and later acquired a second set. 

These great little paddles have one weakness: the cable connection. The three-pin connector is similar to standard header pins with a two-piece plastic backshell held together with a tiny screw. Once inserted into the paddles, there’s no locking mechanism to hold it in place. It’s definitely not the most rugged arrangement. After my first encounter with cable issues, I ordered a couple of replacement cables. Sadly, that’s no longer an option. 

During my most recent episode of cable problems, the connector backshell had fallen apart, leaving the tiny wires exposed. I grabbed a spare cable and was back in business in short order.

Fortunately, after some searching, I found the two backshell pieces on the floor of my truck. The screw that holds the backshell together goes into a threaded boss, which had broken. I encountered an identical failure on another cable a couple of years ago, so I knew how to deal with it. 

After I got home, I carefully checked the wire connections and confirmed that they were still intact. So this time, the fix was just to reassemble the backshell. Since I could no longer screw the two halves back together, I had to resort to drastic measures. I call this the “final fix.” Once implemented, it can’t be undone. 

This photo shows the rear of the Palm Mini Paddles (left). On the right is the connector I repaired by gluing back together. In my haste to repair the cable, I neglected to take pictures of the inside of the connector.
This photo shows the rear of the Palm Mini Paddles (left). On the right is the connector I repaired by gluing it back together. In my haste to repair the cable, I neglected to take pictures of the inside of the connector.

I positioned the connector in the bottom half of the backshell and re-checked the connections. Then, I applied a dollop of Goop™ adhesive inside the backshell and put the top half on. The Goop™ filled the inside of the backshell, holding it all together and providing some additional strain relief for the tiny wires. After cleaning off the adhesive that squeezed out during assembly, I clamped the backshell overnight. The next morning, I gave it a test and confirmed that everything was still working. 

I’ve seen webpages describing ways of replacing the fragile connector with something more robust. I’m not quite ready to perform major surgery on my beloved Palm Mini paddles. Someday, I suppose, I’ll have no choice. 

72, Craig WB3GCK

POTA with a New Antenna

I looked at my log the other day and saw that I had only made a measly two HF contacts this month. Between the grandkids’ school functions, soccer games, horseback riding competitions, and my knee issues; I haven’t had much time for my QRP-portable activities. I set out to change that this morning with a drive to Valley Forge National Historical Park (K-0761, KFF-0761).

A few weeks ago, while nursing my injured knee, I made an impulse purchase. After watching some YouTube videos, I went on Amazon and bought a Gabil GRA-7350TC antenna. The last thing I needed was another antenna—I blame YouTube and Amazon. Actually, it wasn’t a totally frivolous purchase; I have plans to use it during a trip later this summer.

I also bought the matching GRA-ULT01 MK3 tripod for the antenna, which I planned to try out today. I put together some radials to use with the tripod setup. 

As I headed out the door this morning, I grabbed an old magnetic mount base I had from an 2M/440 antenna. Since I bought the GRA-7350TC with the ⅜-24 stud mount, the antenna was a perfect fit for the mag mount. I figured I’d give that a try, while I was trying out the antenna.

It was raining when I got to the park this morning, so I kept things simple and tried out the mag mount. In doing so, I learned something about my six-year-old truck: The hood isn’t made of steel. The rest of the truck is, but not the hood. Who knew? (Probably every Chevy Silverado owner but me, I guess.) I ended up putting the antenna on the roof where I could easily reach it. Inside the truck, I used my Penntek TR-35 (5 watts).

The Gabil GRA-7350TC on a magnetic mount from an old 2M/440 antenna.

The sliding coil adjustment made tuning up a snap. Using my old MFJ-226 antenna analyzer, it only took a minute or two to get the antenna tuned up on 40M. I’m not a big fan of having to take an antenna analyzer out in the field, but this was relatively painless. Band changes only took about a minute. Most of that time was setting up the antenna analyzer for the band of interest. 

I used the new antenna on 40M, 30M, and 20M with decent results. In the end, I had 16 contacts, including five park-to-park QSOs. I’m sure my little magnetic mount wasn’t providing the best ground in the world, but at least I know it’s usable in a pinch.

Hopefully, June will provide more opportunities to get out portable. Since my old knee has been feeling a little better recently, I’m hoping to get back on the bike again at some point. I already have some ideas for a bike mount for the GRA-7350TC. 

73, Craig WB3GCK