This was supposed to be a post about how I made a bazillion POTA/WWFF contacts in an hour. Yeah, well, that didn’t happen. However, I had some interesting visitors stop during my (attempted) activation.
I made a trip over to French Creek State Park (US-1355, KFF-1355) for a short activation and a little antenna experimentation. To make sure I wouldn’t be in anyone’s way, I set up at a picnic table well away from the parking lot.
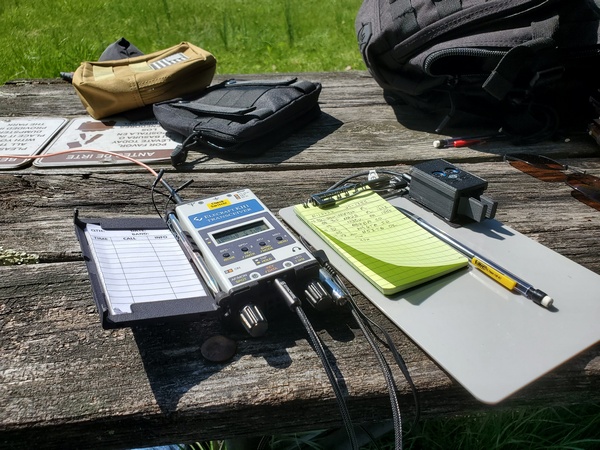
My KH1 and CWMouse paddles
My antenna today was a vertical wire just under 18 feet fed through a homebrew 9:1 unun with a counterpoise wire just under 9 feet. I ran 20 feet of RG-316 coax over to my Elecraft KH1 on the picnic table. I had used this antenna configuration with my Penntek TR-35 and T1 ATU a few times in the past. While it worked well with that rig, I wanted to see how it would work with the KH1’s ATU.
My antenna with Hopewell Lake in the background.
My first visitors showed up just as I was getting started. It was about six Canada geese who wandered over about 20 feet from my antenna. One of them had a bad attitude and hissed at me when I went over to check the antenna. I calmly told him to buzz off; I was here first. They wisely moved on, de-escalating the situation. I’m pleased to report that no humans or geese were harmed during this brief but intense standoff.
Radio-wise, I wasn’t having much luck. QSOs were few and far between. On paper, the band conditions didn’t look too bad, so I’m not sure what my issue was.
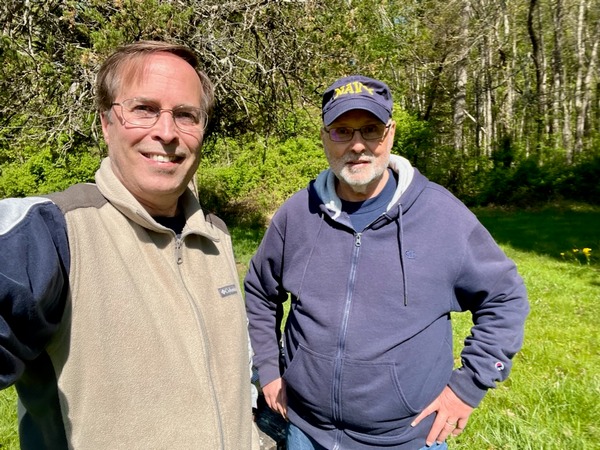
My third contact was an ear-shattering call from my friend N3CU. Ken was also in the park somewhere, so that accounted for his loud signal. I told him where I was, and he came over to visit. I last ran into Ken in French Creek back in January, so it was great catching up with him. Eventually, Ken headed off to continue his activation.
Ken N3CU (left) and me at French Creek State Park (Selfie courtesy of N3CU)
After I got back on the air, I heard a noise in the woods behind me. It was a hiker coming off a trail. He was curious about my antenna, so I gave him my Amateur Radio and Parks on the Air “elevator speech.” After a brief chat, he headed off toward the lake.
After I had six 20M contacts in my log, I moved down to 30M. Just then, another fellow came up to see what I was doing. I was wearing my Navy ball cap, so that prompted five or ten minutes’ worth of “sea stories.”
While we were swapping tall tales, I had the KH1 calling CQ with one of my earbuds in my ear. I heard N3CU calling, so I told my visitor I needed to answer a call. He wished me good luck and headed off towards the parking lot. I needed to get back home, so I shut down and packed up after finishing up with Ken.
So, after an hour and a half, I only had seven contacts in my log. This was my first busted activation in quite some time, but I don’t consider it a failure. I was out in a beautiful park with excellent weather, and I got to catch up with a friend and chat with some other random visitors.
I’m sure I’ll have better luck on the radio next time.
Happy Morse Code Day, a day that honors Samuel F. B. Morse. Born on this day in 1791, Morse is recognized as the inventor of the code which bears his name. So, in honor of Mr. Morse, get on the air today and make some dots and dashes!
I carved some time out of the chaos that is my life lately for some much-needed “radio therapy”. I drove over to Ridley Creek State Park (US-1414, KFF-1414) yesterday morning to take advantage of some great spring-like weather. What I envisioned as an easy in and out POTA/WWFF activation turned out to be one of the more challenging activations I’ve done in a while.
I set up at a picnic table under a large pavilion. Since it was a weekday, I had the pavilion to myself—but not for long. More on that in a bit. To keep things simple, I used my Elecraft KH1 with the whip antenna on a Tufteln right-angle adapter. I ran my counterpoise wire out into the grass. This setup hasn’t failed me yet, so I was feeling confident. For keying, I used my trusty CWMouse paddles.
My setup at Ridley Creek State Park (US-1414, KFF-1414)
It was really slowgoing today. Although I was making some contacts, spots on the Reverse Beacon Network (RBN) were few and far between. That’s not a good sign. Was it band conditions or my location? I don’t know, but I pressed on with dogged determination.
Not long after I got started, a park maintenance worker started mowing the grass in the picnic area. The bands weren’t all that great, and now I had to contend with some loud audio interference. They eventually finished up and moved to another area away from where I was sitting.
After 30 minutes, the 20M band had only produced seven contacts. One of those was 2,400 miles away in California, so my signal was getting out somewhere. Searching and pouncing produced two park-to-park contacts.
Before I knew it, I was sharing the pavilion with a group of about 40 exuberant kids. Apparently, they were on a school trip and taking a break from hiking for lunch. It was nice to see them enjoying the outdoors, but it also meant more audio interference for me. Eventually, some teachers rounded up the kids, and they all headed back down the trail. Once again the surrounding area was quiet, but I still wasn’t making any contacts.
I was stuck at nine contacts for what seemed like an eternity. I checked 17M and 15M a couple of times to no avail. The 20M band was the only one producing any contacts for me, and that wasn’t all that great.
After about an hour and a half, my stubborn persistence was giving way to frustration and resignation. I was about 15 seconds from shutting down and packing up when the elusive tenth contact came in. That contact came in the form of a very loud call from KB5HPM in Mississippi that had me reaching for the KH1’s volume knob. After logging that last contact, I packed up and headed home.
I ended my 40th activation at this park with the bare minimum 10 contacts, but I was okay with that. I’m not sure if this was the hardest I’ve had to work for 10 contacts, but it’s certainly right up there.
It’s been crazy around here in WB3GCK-land lately, so I’ve had very little time for ham radio. However, a mail delivery the other day brought a radio-related item that brightened up my day.
A while back, I was doing an activation in Evansburg State Park (US-1351, KFF-1351), while testing a new antenna I built. I was using my Elecraft KH1 running about five watts. As I was wrapping things up, I tuned around on the 15M band and heard DL4ISX calling CQ. I had worked a few other European stations that day, so I gave him a call. After a few tries, he got my callsign, and we proceeded to have a nice CW chat.
There was some fading on the band, but we carried on for over 15 minutes. During our QSO, Werner told me he was running five watts to a Windom antenna. This wasn’t my first two-way QRP QSO with a DX station over the course of 50+ years in ham radio, but I could probably count them all on one hand with some fingers to spare. Regardless, that was a great finish to a fun activation.
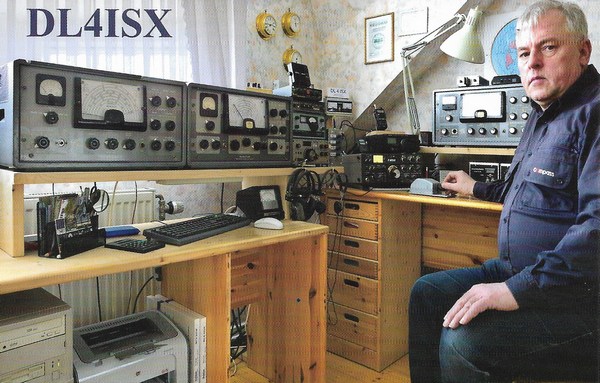
Fast forward about a month later… I went out to get the mail and found an envelope from Germany containing what appeared to be a QSL card. I couldn’t remember the last time I received a DX QSL that didn’t come through the QSL bureau.
Inside the envelope, I found a QSL card from DL4ISX confirming our two-way QRP QSO. That sure brought a smile to my face. The next day, my QSL card was sent on its way to Germany.
I’ve always heard that if you keep your expectations low, you’ll never be disappointed. My activation this morning was a prime example of that. What should have been a difficult activation turned out pretty well.
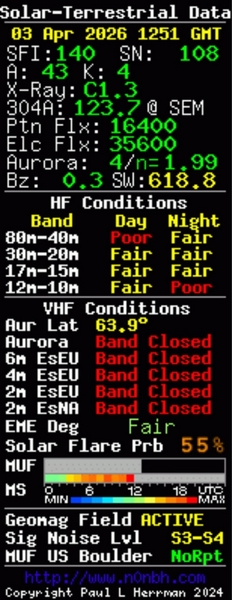
I set out for an early morning activation at Norristown Farm State Park (US-4363, KFF-4363). It was a damp and foggy morning, and the propagation forecast was as dreary as the weather. Before I left the house, I heard some hams on a DMR talkgroup complaining about poor band conditions. Checking the propagation forecasts online, I could see why. The K Index was 4 and the A Index was a whopping 43.
When I got to the park, I wasn’t feeling very optimistic about my chances today. Undeterred, I set up my usual 12-foot whip and homebrew loading coil, along with my trusty little Penntek TR-35 (5 watts, CW). I figured, even in the worst conditions, there would be a hunter or two who could hear me.
Overcast and foggy morning at Norristown Farm State Park
Starting out on 40M, it turned out I was right. A minute or so after spotting myself, I was pounced on by some loud signals. After nine minutes, I had already logged my first 10 contacts, and the hunters kept calling.
After the activity on 40M dried up, I switched to 20M. The activity wasn’t quite as brisk, but it still produced a steady stream of contacts. Among those were three stations in the Dominican Republic. One was HI0A, a special event station for autism awareness. I suspect the other two might have been individual operators at the same station. F1BLL in France was my sole European contact today. I gave 17M a shot, but I only made one contact there.
Even with the lousy propagation numbers, an hour’s worth of operating netted me 37 contacts. It’s a good thing I went out early, as the geomagnetic storm seemed to worsen as the day went on.
Regardless of the propagation, park activators and hunters always seem to find a way to make contacts.
After a tough couple of weeks, I was really looking forward to a park activation today. Although the weatherman predicted storms later in the day, it was supposed to be a decent morning. I had some specific plans in mind. Mother Nature, however, had other plans.
I planned to drive over to nearby Valley Forge National Historical Park (US-0761, KFF-0761) to operate from a picnic table and experiment with an antenna or two. When I was about halfway to the park, it started raining. Figuring it was just a passing shower, I continued on. Hah! It just kept raining.
Not wanting to get my radio gear wet, I gave up on the picnic table idea and stayed in the truck. I quickly set up my usual 12-foot whip and homebrew coil in the rain. I fired up my trusty Penntek TR-35 in the truck and got started.
About three QSOs into my activation, the rain stopped, and the sun came out. That was a cruel prank, Mother Nature! I briefly toyed with moving my gear over to a picnic table and setting up the antenna I wanted to try. Since I didn’t want to spend my limited operating time tearing down and setting up again, so I pressed on.
As activations go, it was nothing special. The bands were so-so, and I could hear some static from the impending storm. Still, I logged 19 contacts in about 50 minutes. Among those were park-to-park contacts with K4NYM in Florida on 30M and 20M. I had other business to attend to, so I started packing up to leave.
As I was out taking my antenna down, the sky clouded over and it started raining again. Well played, Mother Nature! You were quite the prankster this morning.
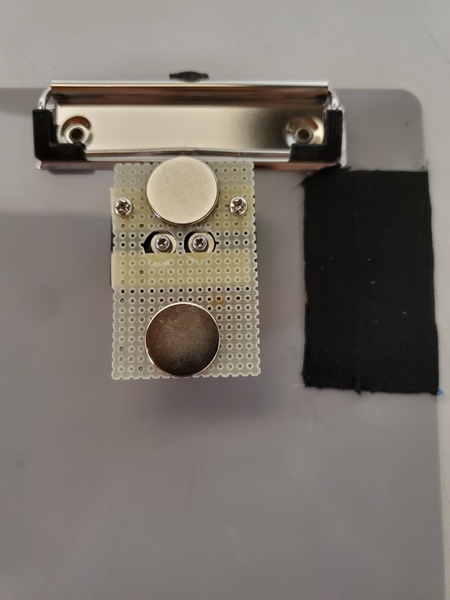
I bought the Ashi Paddle 45 from N6ARA Electronics last year. While I like the paddles a lot, the magnetic mount wasn’t strong enough for the way I operate. I did a quick and dirty mod to address that issue.
I’m not a huge fan of holding paddles in one hand while keying with the other. I have operated like that and probably will again, but that’s not my preferred technique. My preference is to use a small clipboard with steel strips glued on and a magnetic base on the paddles. Of course, this arrangement only works if the paddles have magnets strong to keep them from moving. This is a problem with some portable paddles.
As with many portable paddles, the Ashi paddles are small and lightweight. As a result, the magnets on the included attachment are small and confined to the bottom of the base (out of necessity). This gives the paddle levers some mechanical advantage, allowing the base to slide side-to-side with vigorous keying.
With the Ashi paddles, I used a mod similar to what I used for my QU-21 paddles. As luck would have it, I had a scrap piece of fiberglass perfboard that was just about the perfect size. What are the odds of that? Then, it was a simple matter of drilling a few holes, using the original magnetic mount as a template.
The paddles attached to my clipboard
Initially, I used just the two original screws to attach the board, but I could feel a little vertical flexing when I used the paddles. I finally added a couple of strips of two-sided foam mounting tape, and that seemed to do the trick.
The underside of my quick and dirty mod. The black rectangle to the right are the steel strips covered with hockey grip tape.
The other issue I run into is highly polished magnets. Even though I used some powerful magnets, their slick finish still allowed a little sliding. While searching for something thin that would provide a little friction, I stumbled across hockey grip tape. This is the cloth tape used on hockey sticks, baseball bats, etc., to provide a better grip. I bought a roll on Amazon to try—they had a bunch of options to choose from. My grandson plays hockey, so if the tape didn’t work for me, he could use it. Fortunately, the tape was a definite improvement.
So, this quick little mod made the Ashi paddles better suited to my clipboard use case. Is it ugly? Yes. Is it functional? Also yes. Regardless, these paddles should see a lot more action in the field now.
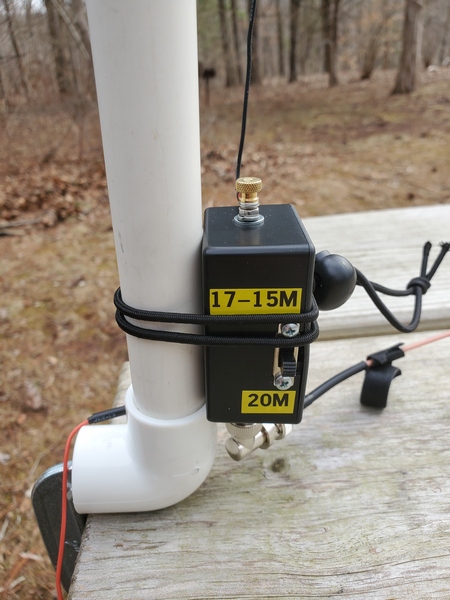
This is one of those antenna projects that started with: “I wonder if…” Designed with my Elecraft KH1 in mind, it covers the 20M, 17M, and 15M with the use of an tuner—similar to how the KH1’s whip antenna operates. It wasn’t something I had a burning need for, but it turned out to be pretty effective.
Concept
For many of my recent activations, I’ve been using my Elecraft KH1 with my base-loaded 12-foot whip. While I built the loading coil for 40M through 17M, I found that the KH1’s internal tuner easily matched the 12-foot whip on 17M and 15M, with the coil bypassed. A 12-foot radiator is resonant somewhere around 19.5 MHz, so it falls in between the 17M and 15M bands. Even though the 12-foot whip is a compromise, I was regularly making DX contacts on those two bands running five watts or less.
That got me thinking about building a more portable antenna for 20M through 15M using a 12-foot radiator. What I came up with was a simple 12-foot wire antenna that uses a loading coil for 20M and just the 12-foot wire for 17M and 15M.
When I thought about it, what I was building was conceptually similar to the Elecraft AX1 antenna and the KH1’s whip antenna. These antennas are close to resonance on 20M and resonant somewhere in between 17M and 15M. My antenna would operate the same way, except it would be almost 8 feet longer. I’ve always had good luck with the AX1 and the KH1’s whip antenna, so I figured my proposed antenna should work even better.
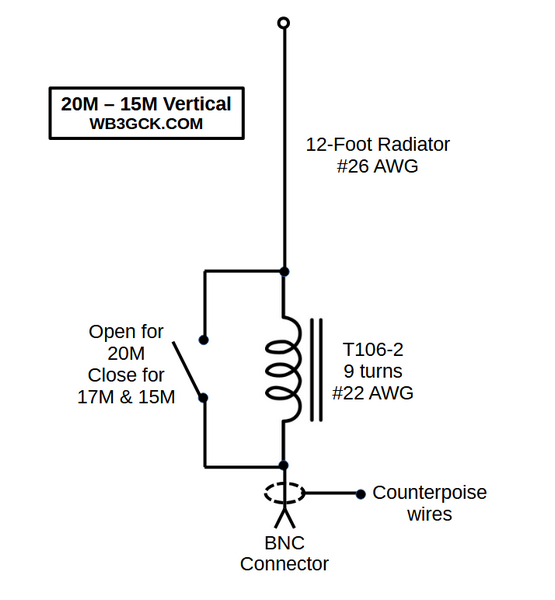
Along with the electrical properties, I wanted to make the antenna small and lightweight, using a #26 AWG radiator along with two 13-foot counterpoise wires. Also, I wanted to use—as much as possible—parts I already had in my junk box.
Parts List
I selected most of the parts based on availability in my junk box. They might not be the optimal choices, but here’s what I used:
T106-2 iron powder toroid
#22 AWG enameled wire (approx. 35 inches)
SPST slide switch. I actually adapted a DPDT slide switch, since I already had a bag of them.
#26 AWG wire (12 ft for radiator)
#26 AWG wire (2x13ft for counterpoise wires)
2mm banana plugs & jacks (2 sets for connecting the counterpoise wires)
(2) ring terminals
BNC female jack
(2) 4-40 x ¾-inch bolts plus some washers and nuts for the antenna and counterpoise connections. I used a couple of knurled nuts I had on hand.
Plastic box. I had one that measures about 2.5 x 1.75 x 1 inches.
Construction:
When I first thought about building this thing, I originally envisioned a more field-friendly form factor with built-in winders for the antenna and counterpoise wires. Since I constrained myself to using parts I already had (and I don’t own a 3-D printer), I used a plastic box I bought years ago but never used.
The construction was pretty simple; it’s just a toroid, a switch, and some connectors in a box. They say a picture is worth a thousand words, so have a look at the accompanying pictures to see how I built it.
Inside the matchbox
I used some online calculators to determine the loading inductance needed for 20M. Assuming I would need to tweak the number of turns, I started with one turn more than I had estimated. It’s easier to remove turns than to add turns—don’t ask me how I know this.
I used some foam mounting tape to hold the toroid in place. For good measure, I also wedged in a piece of Styrofoam between the toroid and the lid. That adds some assurance that the toroid won’t come loose in the field. The trickiest part was cutting a square opening for the slide switch. That took some careful work with a nibbler tool and a file to get it done without destroying the box.
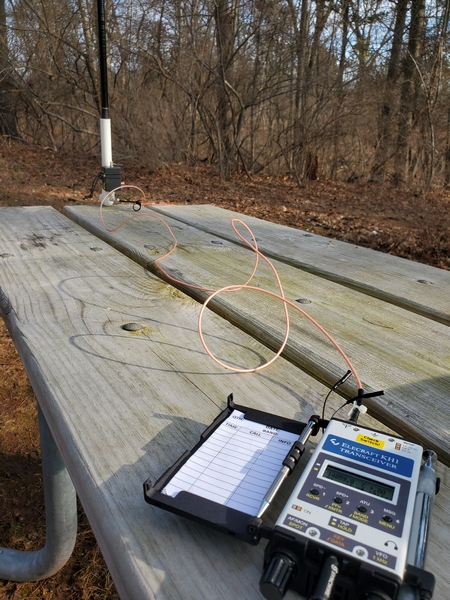
You could use a tree branch to support this antenna, but I like to keep my field setups self-contained. I found a cheap telescopic pole on eBay that measures about 12’ 3” fully extended, so I went with that.
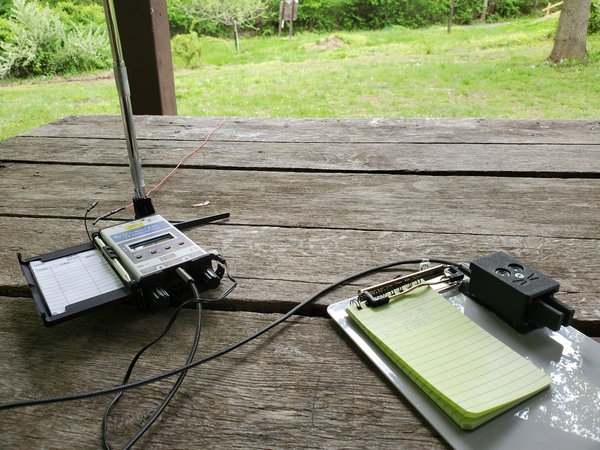
Typical picnic table setup with the 12-ft vertical and Elecraft KH1
I envisioned using this antenna primarily for “picnic table-portable” operation, running a short length of coax to the radio. Using a piece of PVC pipe and a PVC elbow fitting, I built a simple mount for clamping to a table. As luck would have it, the base of the pole fits perfectly inside a ¾-inch PVC pipe. I just use a C-clamp to fasten the elbow to the table and slide the pole into the pipe. When I built the mount, I inserted a small screw partway up the pipe to give the pole a few more inches of height. A six-foot length of RG316 is more than enough to reach the radio at the other end of the table.
Matchbox attached to the PVC pipe picnic table mount
Testing in the Field
I don’t have a good place for antenna experimentation where I live, so it took several trips to the field to tweak the inductor. On each trip, I took readings with an antenna analyzer, made any necessary adjustments to the loading coil when I got back home, and repeated the process on the next outing. That was a tedious process, which was spread out over a few months because of winter weather.
Once I set the antenna up in the field, I found I needed far fewer turns than I originally estimated. Initially, the antenna was resonating well below the 20M band, so I removed a turn at a time. Since I was going to need to use an ATU for 17M and 15M anyway, I didn’t get too fussy about getting it exactly resonant on 20M. However, I eventually got it resonating in the 20M band, with an SWR under 1.5:1 across the band.
The good news was that, even though I hadn’t finished tweaking the coil, the KH1 easily found a match. I had five successful activations during those testing sessions, typically running 3.5 to 4 watts. I consistently worked stations in Europe on all three bands, along with some U.S. stations on the west coast. On one outing, I worked W6LEN in California on all three bands from a park here in southeastern Pennsylvania. During my final testing session with the antenna, I had a 20-minute two-way QRP QSO with DL4ISX on 15M (CW). I declared the project completed at that point.
Below is a schematic showing the final configuration:
Wrap-up
So, there you have it. No revolutionary technical breakthrough here, just a fun little project that has been even more fun to use. I envision many more picnic-table-portable activations with it.
Several years back, a friend of mine said he found one of my old QSL cards for sale on eBay. It was a card I sent to a DX ham almost 31 years ago. While poking around on eBay recently, I saw it was still for sale.
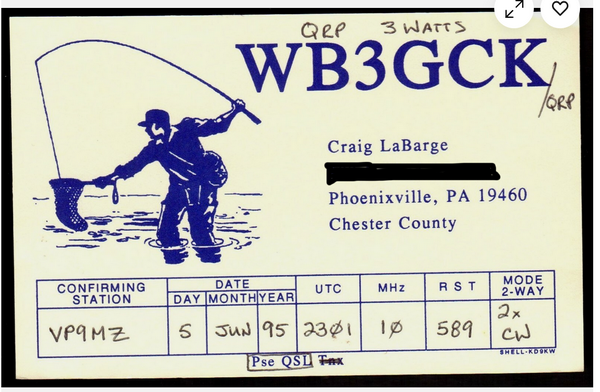
I sent this card to VP9MZ in Bermuda for our 30M CW QSO back in June 1995. The card shows a fisherman, representing one of my other hobbies. The eBay seller, located in Canada, is asking $6.95 Canadian ($5.08 US).
My old QSL card someone is selling on eBay
I went back through my old paper logbooks and found the QSO. I was running my old MFJ-9030 (about 3 watts, CW) into my raingutter antenna. In the remarks column, I made a note that he remembered me. Apparently, we had worked each other previously. My log entry also shows that I received his QSL card via his QSL manager. While I was on that page of the logbook, I saw another QSO with him 5 days later.
One part of me is insulted that my card hasn’t been sold after being up on eBay for years. On the other hand, I’m not really sure why someone would want to buy it.
I have boxes of QSL cards I have received over the past 50+ years. Hmmm…. Maybe I should start selling them on eBay.
While out in central Pennsylvania over the weekend visiting family, I headed out early on a chilly Saturday morning for a quick activation of the Captain John Smith Chesapeake National Historic Trail (US-4567). The 40M band was really hopping.
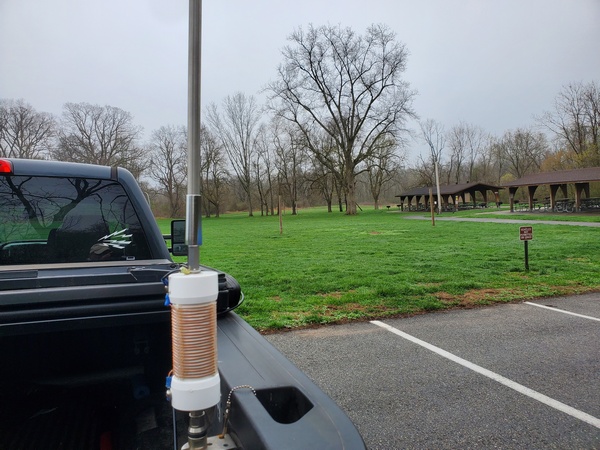
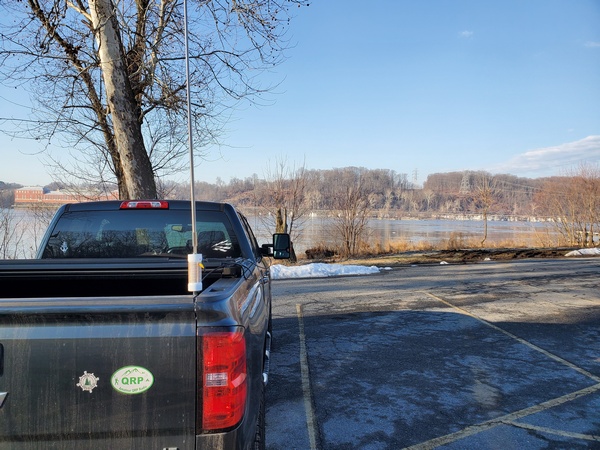
My destination was Falmouth Access Park, which is along the Susquehanna River in northern Lancaster County. The place was nearly empty, except for a few anglers along the river. Not too surprising, since it was only 0730 EST. I set up my 12-ft base-loaded whip on the back of the truck and my Elecraft KH1 (4.5W, CW) up in the cab.
My truck by the Susquehanna River for a chilly early-morning activation
After posting a spot and calling CQ on 40M a couple of times, the hunters started piling up. Once they started, the action was nearly non-stop for the next 45 minutes. The 40M band was in great shape, providing contacts all up and down the East Coast and out to Iowa to the west. I was short on time, so I never got around to trying other bands.
At the end of my 45-minute activation, I had 35 contacts in the log, including five park-to-park contacts. I had a couple of errands to run before heading back to the house for breakfast, so I packed up and headed out.
Thanks to all the early-rising hunters. You didn’t disappoint.